Documentation menu

Ashby for Screen

Last updated on Disponible en Français

The Ashby integration for CoderPad Screen allows you to send skills assessments as part of your Ashby workflow.

⚠️ This integration only works for customers on our US servers.

Setup and configuration

1. Go to the Integrations page by selecting Admin> Integrations > Integrations.

2. Search for “CoderPad Screen”, and select the “Screen” integration.

Coderpad Screen tile that says "move candidates forward with confidence with far, fast, and accurate coding assessments.

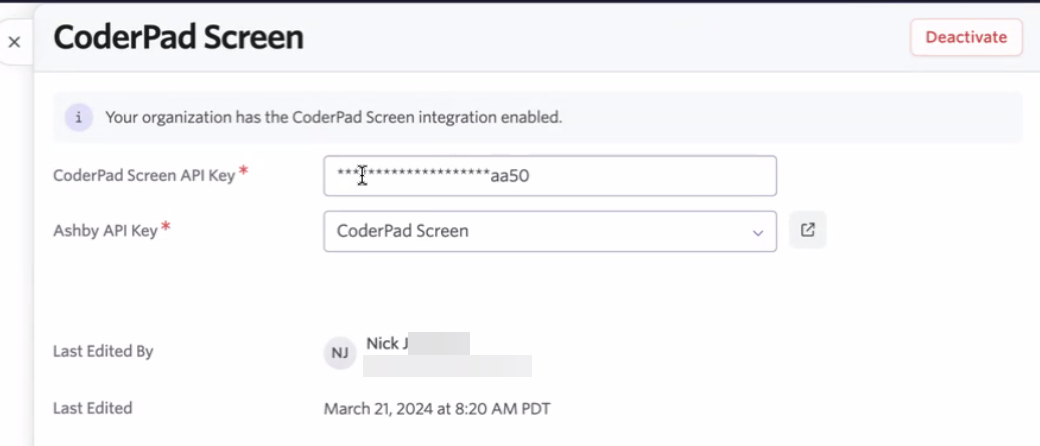
3. When you click on the CoderPad integration tile, you’ll see a pop-up open with places to enter your API keys. Grab your API key from CoderPad Screen and paste it into the appropriate box.

To get your Ashby API key, click on the pop-out menu to View API key settings.

A key value form. First row says "coderpad screen api key" and then has a text box for the api key.

Second row says "ashby api key" and then has a text field for ashby api key.

You’ll be taken to the API Keys screen. Click +New.

The API keys screen with an arrouw pointing to "+New".

On the API creation screen, generate a new key with CoderPad Screen selected

The image shows a dialog box for creating an API key, with a three-step process outlined on the left. Step 1 is to 'Choose Integration Partner', Step 2 is 'Choose API Scopes', and Step 3 is 'Copy API Key'. On the right, there's an informational note advising to save the API Key in a safe place as there will only be one opportunity to copy it. Below this, there are input fields: 'Name' is pre-filled with 'CoderPad Screen API Key', 'What will this key be used for?' is blank, and 'Integration Partner (optional)' is set to 'CoderPad Screen' from a dropdown menu. There's a question 'Will a third party be given access to this API key?' with no visible answer. At the bottom, there's a button to 'Create API Key'. The overall layout indicates a setup process for an API key within a system that integrates with external services, in this case, CoderPad.

Back on the API key entry screen, add your Ashby API key if it’s not already added.

A key value form. First row says "coderpad screen api key" and then has a text box for the api key.

Second row says "ashby api key" and then has a text field for ashby api key.

4. Contact our customer support team with your Ashby API key so we can add it into our system. Customer support will send confirmation once your Ashby API key is set up.

5. When complete, your API key window should look something like this.

The image is a screenshot of a settings window titled "CoderPad Screen" with various configuration fields. It contains a notification at the top informing that "Your organization has the CoderPad Screen integration enabled." Below this, there are input fields: 'CoderPad Screen API Key' with a partly obscured value, 'Ashby API Key' with a dropdown selector currently set to 'CoderPad Screen'. At the bottom, 'Last Edited By' is indicated as 'Nick' with an email and 'Last Edited' shows the date and time as 'March 21, 2024 at 8:20 AM PDT'. On the top right, there's a 'Deactivate' button. This window seems to be for managing API keys and their configurations related to CoderPad Screen integration within an organizational setting.

Using the integration

This section will walk you through adding an assessment step for a candidate. You can either do a one-off test scheduling, or add a test as part of a workflow.

✅ The email sent to the candidate notifying them of their test comes directly from CoderPad Screen. You can customize the email content by editing the Screen test “Communication settings” in your dashboard.

One-off test

1. Access the candidate pipeline dashboard by going to Candidates > Candidate Pipeline at the top of the screen.

The image shows the Ashby Candidate pipeline page with a focus on the 'Candidates' section. A dropdown menu titled 'Candidates' is highlighted with a red outline and arrow pointing to it, showing options 'Search', 'Candidate Pipeline', and 'Saved Searches'. The main content area of the interface displays a candidate pipeline with categories across the top: 'Leads', 'Application Review', 'Active', 'Pending Offer', 'Hired', and 'Archived'. Each category has an accompanying number indicating the count of candidates; for example, 'Active' has 7 candidates. The layout includes a search bar to 'Search by Candidate Name...' and a blue '+ Filter' button for more advanced search options. A detailed section for a 'Backend Engineer' position is partially visible, with steps such as 'Recruiter Screen', 'Technical Quiz', 'Technical Phone Screen', and others, each followed by a number, indicating the number of candidates at each stage.

2. Click on the job for which the candidate has applied to expand the menu. Then click on the candidate you’d like to assess.

3. On the candidate screen, click + New Activity and then click on Assessment.

The image is a screenshot of a candidate management interface with the candidate's name, Shaina McGlynn, at the top, followed by the tag 'Certain Event Automation'. The interface is sectioned into parts. On the left, there's a sidebar with sections 'VIEWS' and 'CONSIDERED FOR JOBS'. Under 'VIEWS', it mentions the candidate with the date 'Nov 6, 2023'. Under 'CONSIDERED FOR JOBS', there's a job titled 'Backend Engineer' with a sub-note 'Recruiter Screen' and a date 'Nov 4, 2023'. In the main panel, there are tabs for 'Activities & Progress' and 'Summary'. Under 'Current Activities', there is a card titled 'Recruiter Screen Schedule' with an 'Intro Call with Recruiter' activity, scheduled for 1 hour, marked as 'Needs To Be Scheduled'. On the right, a red box highlights a menu with options '+ New Activity', 'Assessment' (add an assessment activity for the candidate), and 'Debrief' (add a debrief activity for the candidate). There are icons for schedule, drafting emails, and drafting availability requests. A notification about 'Ashby Automator Bot follows up Jan 21' is visible at the top. At the bottom right, there's a profile picture of a person named Kathleen, suggesting an email thread. The interface appears to be used for organizing and tracking recruitment activities.

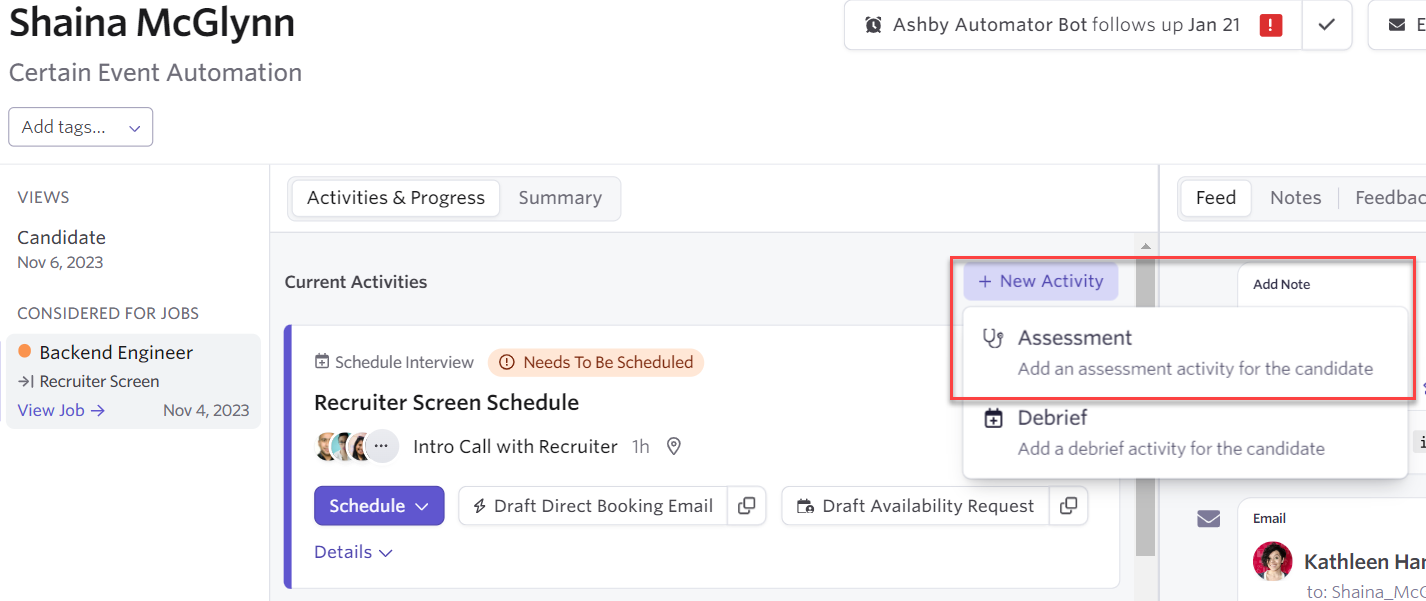
4. Select CoderPad Screen from the pop-out window.

A pop up titled "Add assessment activity" with the "coderpad screen" option highlighted.

5. Click on the Assessment type dropdown and then select one of the tests.

Below the "coderpad screen" option it has a box to select the assessment type. There is a drop down listing assessment types such as "data science - senior", "full stack-seniot", and "back-end c++, java, sql - junior."

6. Once you’ve selected the assessment type, click on Add Activity.

the "add assessment activity" pop up is shown with the assessment type selected as "full-stack - senior" at the bottom is a button to cancel and a button to "add activity".

7. Back on the candidate dashboard, click Start Assessment, which will send the test to the candidate (Note that, in Ashby, Start means the test has been sent. It does NOT mean the candidate has started the test). You can also cancel/delete the assessment here if needed.

Back on the candidae screen under "current activities" the assessment that was selected for full-stack - senior has been added.

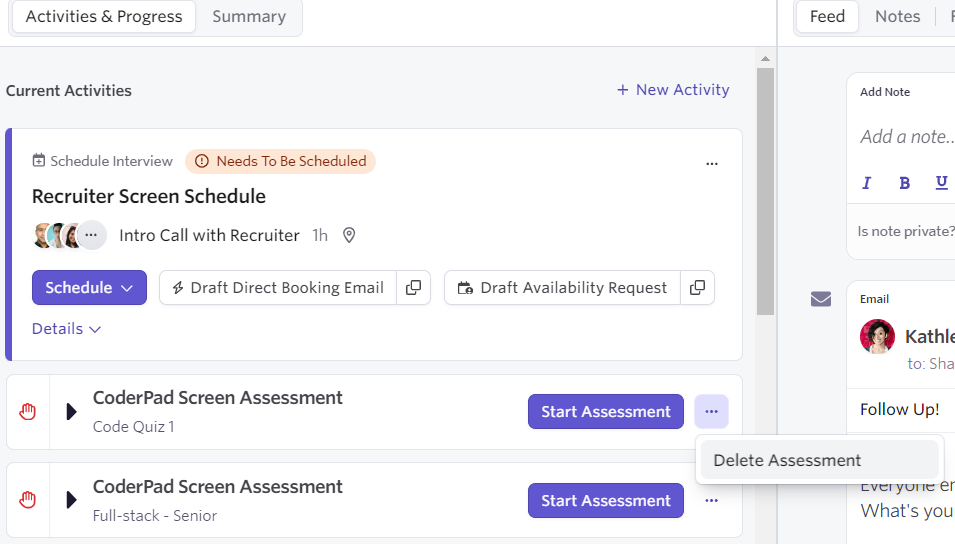
✅ When you cancel in Ashby, it will move the assessment back to Ready to start on the Candidate page. When canceled from inside CoderPad Screen, that assessment will just be marked canceled and you will have to add another assessment if you need to modify and resend it.

Add a test to a workflow

You can set an assessment to automatically be sent to every candidate when you move them to a specific interview stage for a particular job. This is configured in the Interview Plans tab under the job. Follow the Ashby guide on automated assessments using integrations here.

Reviewing test status and results

Once the candidate starts the assessment, the status will update with another date of when they started taking the test. You’ll also see an update to the status when the candidate completes the test.

Click on the assessment to expand it and see the results, including the total score, the comparative score, and a link to the detailed report.

An image showing a CoderPad screen assessment result. The assessment is for a Senior position in AWS, Banking. The status is marked as completed with the finish date and time noted as March 26, 2024, at 1:49 PM PDT. The assessment was both sent and started on the same day, March 26, 2024, at 1:48 PM PDT. A link to the detailed report is provided. The total points scored are 30 out of 40, with a score of 80 and a comparative score of 95%.

Video demo