How to Implement Infinite Scroll in React.js by Building a TikTok Clone

In 2006, Aza Raskin introduced the infinite scroll concept, a functionality that would later transform our digital lives. Facebook, TikTok, AliExpress, and Pinterest, to name a few, have all implemented the infinite scroll feature in their stories or feeds.
Infinite scrolling essentially brings endless information and entertainment to your screen. You keep scrolling and scrolling but never get to the end. Through the years, it has gathered a lot of criticism, even from its creator, due to its addictive nature. Regardless, this technology is fascinating from both a behavioral and implementation perspective.
This article will cover how infinite scrolling works behind the scenes and how TikTok incorporates infinite scrolling. We will also create a TikTok clone with React.js, pure CSS, and free videos from Pexels’ API to understand the implementation process further.
To be clear, we will mainly implement the mobile version of the TikTok feed rather than building a full-fledged TikTok clone. Here’s a preview of what our application will look like:
How infinite scroll works
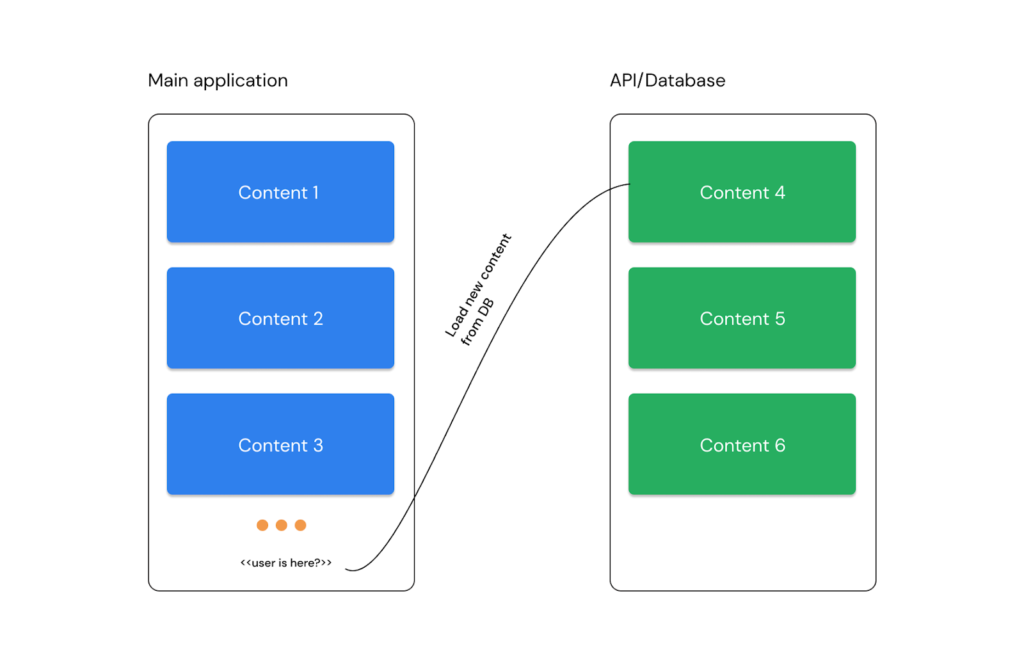
Infinite scroll implementations vary between applications, but the idea behind how they all work is mostly the same. They all rely on asynchronous programming and an API to load content.
First, you have your application fetch some initial video content once the application has loaded. You also add a listener that watches when the user scrolls or when the video ends. When the listener is triggered, the app will asynchronously load new content via the API.
A simple JavaScript-like pseudo code for this process might look like this:
function getContent(n) {
  // Asynchronously load 'n' new post from API
}

window.addEventListener("DOMContentLoaded", (event) => {
  getContent(5);
});

window.addEventListener("scroll", (e) => {
  if (e.scrollY === somePreferredScrollFrame) {
    getContent(5);
  }
});Code language: JavaScript (javascript)
How TikTok works
TikTok’s feed pretty much works the same way described above; however, the content in TikTok’s case is videos created or shared by other app users. Additionally, TikTok incorporates a unique feature where each video is displayed at full height, separating them from each other, coupled with a smooth scrolling effect that makes scrolling through each video feel satisfying.
Replicating special features like this one is pretty straightforward with pure CSS. We’ll utilize the scroll-snap and scroll-behavior properties for the scrolling effect. We will fully implement other methods to make the infinite scrolling effect work with native JavaScript.
How to build a TikTok clone
Let’s get started by creating a new React application. To do this, make sure you have npx (Node.js) installed, and run the following command:
npx create-react-app tiktok-cloneCode language: PHP (php)Next, open the newly created projected folder in your favorite text editor, then run the following command to start the app in your browser:
npm startImplement full height scroll-snap & bottom navbar
Let’s proceed by creating the TikTok-like scroll-snap and bottom navigation bar components. To do this, create a new components directory in the existing /src folder, and create two new files: BottomNav.js and VideoCard.js in this new directory. With these changes, our file tree should look like this:
.
├── . . .
├── public
├── src
│   ├── components
│   │   ├── BottomNav.js
│   │   └── VideoCard.js
│   └── . . .
└── . . .Code language: CSS (css)
Inside the VideoCard.js file, paste the code below:
const VideoCard = ({ index }) => {
  return (
    <div className="slider-children">
      <div
        style={{
          justifyContent: "center",
          alignItems: "center",
          display: "flex",
          height: "100%",
        }}
      >
        <h1>Video {index}</h1>
      </div>
    </div>
  );
};

export default VideoCard;Code language: JavaScript (javascript)
The code above creates a new VideoCard component that accepts a single prop called indexand displays this index concatenated with the word “Video.” Importantly, this component also contains the markup and class names that enable the full-height scroll snap effect.
Inside the BottomNav.js file, add the following content:
const BottomNav = () => {
  return (
    <nav className="bottom-nav">
      <a className="navbar-brand" href="/">
        <i className="fa fa-home"></i>
      </a>
      <a className="navbar-brand" href="/">
        <i className="fa fa-search"></i>
      </a>
      <a className="navbar-brand" href="/">
        <i className="fa fa-plus"></i>
      </a>
      <a className="navbar-brand" href="/">
        <i className="fa fa-commenting"></i>
      </a>
      <a className="navbar-brand" href="/">
        <i className="fa fa-user"></i>
      </a>
    </nav>
  );
};

export default BottomNav;Code language: JavaScript (javascript)
The code above contains the markup, class names, and icon definitions for our TikTok-like bottom navigation bar. We use Font Awesome icons for the icons, as seen in the previous code, but for it to work, we’ll also need to link its resource file. To do so, open the public/index.html file and paste the following into the head section:
<link
  rel="stylesheet"
  href="https://cdnjs.cloudflare.com/ajax/libs/font-awesome/6.2.0/css/all.min.css"
/>Code language: HTML, XML (xml)
To sort all CSS related codes, replace the content of the default src/index.css file with the following:
* {
  padding: 0;
  margin: 0;
  box-sizing: border-box;
}

*::-webkit-scrollbar {
  display: none;
}

html,
body {
  height: 100vh;
  overflow: hidden;
  color: #fff;
  font-family: 'Helvetica Neue', sans-serif;
}

.slider-container {
  height: 100vh;
  overflow-y: scroll;
  scroll-snap-type: y mandatory;
  scroll-behavior: smooth;
}

.slider-children {
  height: 100vh;
  scroll-snap-align: start;
  background: #000;
  position: relative;
  border: 1px solid transparent;
}

.video {
  position: absolute;
  width: 100%;
  height: 100%;
  object-fit: cover;
}

.video-content {
  padding: 10px;
  position: relative;
  top: 85%;
  color: #fff;
}

.bottom-nav {
  position: fixed;
  right: 0;
  bottom: 0;
  left: 0;
  display: flex;
  justify-content: space-between;
  align-items: center;
  padding: 20px;
  background-color: #000;
}

.bottom-nav a {
  color: #fff;
  text-decoration: none;
}

.fa {
  font-size: 20px;
}

.fa-plus {
  color: #000;
  background: #fff;
  padding: 3px 10px;
  border-radius: 10px;
  border: 2px solid #ff5722c4;
}Code language: CSS (css)
As you might have noticed, this CSS code contains the styling for achieving the smooth scrolling effect, fixing our navbar to the bottom of the page, a video element we’ll add in the future, and additional styling.
Finally, to wrap up this section, let’s import the newly created components in our entry file. Open src/App.js and replace its code with the below:
import { useState, useEffect } from "react";

import BottomNav from "./components/BottomNav";
import VideoCard from "./components/VideoCard";

function App() {
  const [videos, setvideos] = useState([]);

  const getVideos = (length) => {
    let newVideos = Array.from(Array(length).keys());
    setvideos((oldVideos) => [...oldVideos, ...newVideos]);
  };

  useEffect(() => {
    getVideos(3);
  }, []);

  return (
    <main>
      <div className="slider-container">
        {videos.length > 0 ? (
          <>
            {videos.map((video, id) => (
              <VideoCard key={id} index={id + 1} />
            ))}
          </>
        ) : (
          <>
            <h1>Nothing to show here</h1>
          </>
        )}
      </div>

      <BottomNav />
    </main>
  );
}

export default App;Code language: JavaScript (javascript)
Here, we imported the BottomNav and VideoCard components we created earlier. We also defined a videos state using React’s useState and set its initial value to an empty array. In addition, we defined a getVideos() function, which receives a length, creates an array of that length and pushes the resulting values to our previously defined videos state.
Furthermore, we used the useEffect hook to call the getVideos() function once our app was mounted, causing it to add three new items to our videos state. And in our markup, we looped over videos, rendering the VideoCard component for each iteration while also passing the iteration’s id (index) as the index prop for our VideoCard component.
If we preview our application at this point, we should see the following output:
Suppose your application renders six pieces of content instead of three after completing these steps. In that case, this is due to React StrictMode rendering the components twice because we’re in development mode – one of the impacts of upgrading to React 18.
To fix this, open src/index.js and remove the StrictMode option. Instead of returning:
root.render(
  <React.StrictMode>
    <App />
  </React.StrictMode>
);Code language: HTML, XML (xml)
You change it to:
root.render(
    <App />
);Code language: HTML, XML (xml)
And everything should work as expected.
Add infinite scroll
For our infinite scroll implementation, we will use the native Intersection Observer API, which allows us to asynchronously observe the visibility of an element in our browser’s viewport.
Our approach to achieving the infinite scroll will be in the following steps:
- Create a custom
is in viewporthook (via the Intersection Observer API) to check if an element is currently in the viewport. - Pass a preferred length to the
VideoCardcomponent at which we intend to load new content. For example: after the user scrolls to 3/5 of the screen (in this case, length is 3), load x new content. - Check if we’ve scrolled to the preferred length defined in step 2 using the is in the viewport and React Ref functions.
- Using the condition from the previous step, load new x content and increase the preferred length to a future length we haven’t yet scrolled to.
To accomplish the first step, create a new useIsInViewport.js file in the existing /src directory and paste the following code into it:
import { useEffect, useState, useMemo } from "react";

function useIsInViewport(ref) {
  const [isIntersecting, setIsIntersecting] = useState(false);

  const observer = useMemo(
    () =>
      new IntersectionObserver(([entry]) =>
        setIsIntersecting(entry.isIntersecting)
      ),
    []
  );

  useEffect(() => {
    observer.observe(ref.current);

    return () => {
      observer.disconnect();
    };
  }, [ref, observer]);

  return isIntersecting;
}

export default useIsInViewport;Code language: JavaScript (javascript)
Here we created a custom hook, useIsInViewport, that accepts a ref as its parameter and uses the IntersectionObserver API to check to see if the element with the provided ref is currently in the viewport.
For the second step, alter the src/App.js file such that the VideoCard component adds a new props entry like this:
<VideoCard
    key={id}
    index={id + 1}
    lastVideoIndex={videos.length - 1}
    getVideos={getVideos}
/>Code language: HTML, XML (xml)
The only difference here is that we pass a new parameter, lastVideoIndex, and set its value to the length of our original videos (3) – 1. In this manner, we initially load three videos and wish to load fresh content when the user reaches two of the three videos. We also passed the getVideos() function as a parameter so we can directly call it from the VideoCard component.
The final change happens in our VideoCard component file. Open src/components/VideoCard.js and update its code with the one below:
import { useRef, useState } from "react";

import useIsInViewport from "../useIsInViewport";

const VideoCard = ({ index, lastVideoIndex, getVideos }) => {
  const elementRef = useRef();
  const isInViewport = useIsInViewport(elementRef);
  const [loadNewVidsAt, setloadNewVidsAt] = useState(lastVideoIndex);

  if (isInViewport) {
    if (loadNewVidsAt === Number(elementRef.current.id)) {
      // increase loadNewVidsAt by 2
      setloadNewVidsAt((prev) => prev + 2);
      getVideos(3);
    }
  }

  return (
    <div className="slider-children">
      <div
        ref={elementRef}
        id={index}
        style={{
          justifyContent: "center",
          alignItems: "center",
          display: "flex",
          height: "100%",
        }}
      >
        <h1>Video {index}</h1>
      </div>
    </div>
  );
};

export default VideoCard;Code language: JavaScript (javascript)
Here’s a breakdown of what’s happening in this component: We defined a ref, elementRef, and added it to our scroll-snap div. We also gave this div a new id and set its value to match the index of current content. We then passed the elementRefto the useIsInViewport hook to check if it’s currently in viewport.
Furthermore, using React’s useState, we defined a new loadNewVidsAt state and set its initial value to the lastVideoIndex prop we passed previously. We’re doing this to make updating this value more flexible, as we can’t directly alter a prop.
Finally, we used an if-statement to check if a video is in the viewport, and if it is, we checked if the id of this current video is equal to the value of loadNewVidsAt state (i.e., the value at which we want to load new content). If this condition is met, we load three new videos using getVideos(3) and set the loadNewVidsAt state to its previous value + 2.
And voila! We have successfully implemented infinite scrolling. If you run your application at this point, everything should work as expected, as shown in the image below:

However, thus far, we only have infinite text, not infinite videos. Let’s dive right into adding videos in the next section.
Update with sample video files
Because our TikTok clone does not support any content publishing, we will instead load videos via a third-party API. I researched for you and discovered that Pexels provides an accessible and excellent API for loading community videos and images. The Pexels API is flexible in that we can specify the length of the videos we want to retrieve and filter them by different categories.
What you want to do now is go to Pexels’ homepage and create a new account. Once you’ve verified your account, go to their API page and request a new API. After following the instructions highlighted on this page, you should instantly get your API key. Copy this and keep it in a safe place for now.
Next, we want to install the Pexels library in our application. To do this, run the following command:
npm install pexelsOnce that’s done, open src/App.js and replace its content with the following code:
import { useState, useEffect } from "react";

import { createClient } from "pexels";

import BottomNav from "./components/BottomNav";
import VideoCard from "./components/VideoCard";

function App() {
  const [videos, setvideos] = useState([]);
  const [videosLoaded, setvideosLoaded] = useState(false);

  const randomQuery = () => {
    const queries = ["Funny", "Art", "Animals", "Coding", "Space"];
    return queries[Math.floor(Math.random() * queries.length)];
  };

  const getVideos = (length) => {
    // Replace with your Pexels API Key
    const client = createClient("YOUR_PEXEL_API_KEY");

    const query = randomQuery();
    client.videos
      .search({ query, per_page: length })
      .then((result) => {
        setvideos((oldVideos) => [...oldVideos, ...result.videos]);
        setvideosLoaded(true);
      })
      .catch((e) => setvideosLoaded(false));
  };

  useEffect(() => {
    getVideos(3);
  }, []);

  return (
    <main>
      <div className="slider-container">
        {videos.length > 0 ? (
          <>
            {videos.map((video, id) => (
              <VideoCard
                key={id}
                index={id}
                author={video.user.name}
                videoURL={video.video_files[0].link}
                authorLink={video.user.url}
                lastVideoIndex={videos.length - 1}
                getVideos={getVideos}
              />
            ))}
          </>
        ) : (
          <>
            <h1>Nothing to show here</h1>
          </>
        )}
      </div>

      <BottomNav />
    </main>
  );
}

export default App;Code language: PHP (php)
The main modifications in this file are that we’ve updated the getVideos() function to now really load video files via the Pexels API, and we’ve also added a new randomQuery() function that generates random queries and allows us to pass the generated query to our Pexels API request.
Aside from that, we changed the VideoCard component initialization to include information about loaded videos, such as the video author, video URL, and a link to the creator’s profile.
Finally, update src/components/VideoCard.js and also replace this file’s content with the code below:
import { useRef, useState, useEffect } from "react";

import useIsInViewport from "../useIsInViewport";

const VideoCard = ({
  index,
  author,
  videoURL,
  authorLink,
  lastVideoIndex,
  getVideos,
}) => {
  const video = useRef();
  const isInViewport = useIsInViewport(video);
  const [loadNewVidsAt, setloadNewVidsAt] = useState(lastVideoIndex);

  if (isInViewport) {
    setTimeout(() => {
      video.current.play();
    }, 1000);

    if (loadNewVidsAt === Number(video.current.id)) {
      setloadNewVidsAt((prev) => prev + 2);
      getVideos(3);
    }
  }

  const togglePlay = () => {
    let currentVideo = video.current;
    if (currentVideo.paused) {
      currentVideo.play();
    } else {
      currentVideo.pause();
    }
  };

  useEffect(() => {
    if (!isInViewport) {
      video.current.pause();
    }
  }, [isInViewport]);

  return (
    <div className="slider-children">
      <video
        muted
        className="video"
        ref={video}
        onClick={togglePlay}
        id={index}
        autoPlay={index === 1}
      >
        <source src={videoURL} type="video/mp4" />
      </video>
      <div className="video-content" onClick={togglePlay}>
        <p>@{author}</p>
        <p>
          Video by <a href={authorLink}>{author} </a> on Pexel
        </p>
      </div>
    </div>
  );
};

export default VideoCard;Code language: JavaScript (javascript)
The main modifications to this file are that we’ve added a video markup and set its source to the one loaded from the Pexels API. We also used our custom useIsInViewport hook to check the video in the viewport and automatically play it. If the video isn’t playing, we use the useEffect hook to stop it from playing.
Furthermore, we created a new togglePlay() function, similar to TikTok, that allows the user to pause or play a video anytime by simply clicking anywhere within the video frame.
And now our TikTok clone is complete! When we run our program now, we get the following results:

Voila!
Throughout this article, we’ve explored how infinite scrolling works and how to implement the TikTok endless scrolling news feed by loading free videos from the Pexels API. For your convenience, the complete code for this tutorial is also hosted on GitHub and in the CoderPad sandbox below:
ℹ️ Update line 17 in
src/App.tsxwith your Pexels API key before running the sandbox.
TikTok is a full-fledged program with a database, potentially microservices, and some other complex architecture. However, the fact that we were able to clone their news feed is pretty impressive, if I may say so.
Special credit to the following resource for making this tutorial possible:
- CSS Scroll Snap Points Full Height (codepen.io)
- Check if an Element is in the Viewport in React.js | bobbyhadz
- Responsive Fullscreen Video Background With CSS (codepen.io)
Thanks for reading!
Hi, I’m Elijah, a technical writer, and software developer, actively sharing all I’ve learned through writing. Follow me on Twitter if you enjoy programming tips and memes.