How To Get Up And Running With Django Migrations: A Guide

Django is a popular Python web framework for building web applications. One of its key features is its support for migrations, which allows developers to manage changes to their database schema over time easily. In this guide, I’ll walk you through the process of getting started with Django migrations, including creating and applying them and resolving typical problems that may arise. Whether you’re new to Django or an experienced developer, this guide will help you understand and take full advantage of this powerful feature.
What are Django migrations?
Django migrations are a way of handling the application of changes to a database schema.
Among others, here are some of the many changes you might want to make to your database schema:
- create a new database table
- add new fields to database tables
- modify constraints in a database table
Django’s documentation explains Django migrations as analogous to a version control system (or VCS for short). It explains that you can use makemigrations to create individual migration files, similar to commits. Migration files contain changes you’ll make to your models. The migrate command implements those changes to your database.
Purpose of migration
As you probably know, Django offers a way to manage databases without having to write raw Structured Query Language (SQL). The object-relational mapper (ORM) Django provides eliminates writing SQL statements, so you can interact with the database using Python code. In other words, you can create a database table by creating a simple model class.
However, because SQL is the standard language for interacting with databases (i.e., storing, manipulating, and retrieving data), Django still uses SQL to manage the database. But Django turns the ORM codes and models them into valid SQL statements to simplify things for you. So, how does this model class in Python translate into or become a database schema change? Django migrations takes care of that.
Now that you know why and when to perform Django migrations, let’s discuss how.
How to run Django migrations
There are four main commands for handling migrations and database schemas in Django.
showmigrations: shows the list of all migrations in a project and their current status (i.e., changes applied or not).sqlmigrate: displays the SQL statements that will be executed for a specific migration.migrate: implements the changes contained in migration files and updates the database schemas accordingly.makemigrations: makes new migration files according to the modifications made to the models.
If you paid attention to the above commands, you noticed that two unique keywords persist: migrate and migrations. That’s because migrations require two phases (or steps).
- In the first step, you make migrations (i.e., create migration files), as you can infer from the command’s name (
makemigrations). - In the second step, you apply the migrations (
migrate).
In order to illustrate and demonstrate the Django migration workflow, let’s work with a Django project.
Create a Django project and a new app called blog by running this command:
python manage.py startapp blogCode language: CSS (css)Step 1: Go to the blog app directory, and enter the following to create the Blog model in the models.py file.
from django.db import models

from django.contrib.auth import get_user_model

User = get_user_model()

class Blog(models.Model):

""" Blog Model that represents Blog Table """

    title = models.CharField(max_length=100, unique=True)

    slug = models.SlugField(max_length=50, blank=True)

    author = models.ForeignKey(User, on_delete=models.CASCADE)

    description = models.CharField(max_length=1000)

    date_created = models.DateTimeField(auto_now_add=True)

    last_modified = models.DateTimeField(auto_now=True)

def __str__(self):

    return "self.title[:20]"Code language: Python (python)
Step 2: Go to the command line interface (CLI for short), and in the root directory of the Django project folder, run this command.
Note: Ensure that the manage.py file is present in your current working directory in order to avoid getting the No such file or directory error.
$ python manage.py makemigrations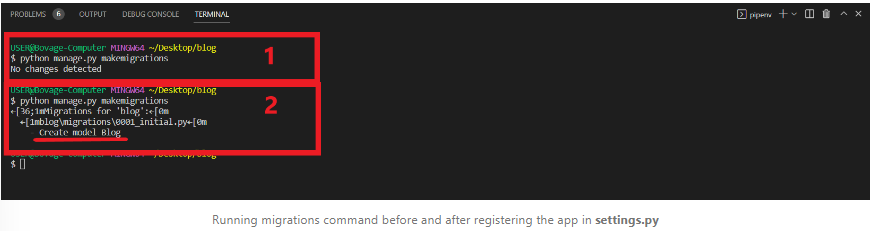
The image above shows the output of running the above command.
Common Problem 1: Not adding the Django App in installed_apps in the Django project’s settings.
The part labeled 1 in the image above is the output you’ll get when you run this command without adding the blog app as part of the installed apps. The output is “No changes detected” as no database fields or tables have been added or modified as far as Django is concerned.
Fix for Common Problem 1:
Remember to add the newly created app blog to the installed_apps list in the Django project’s settings.
Also, in the image, the part labeled 2 is the output you get when you run this command after adding the blog app as part of the installed apps. In the output in the image above, you can see the name of the migration file created and its path.
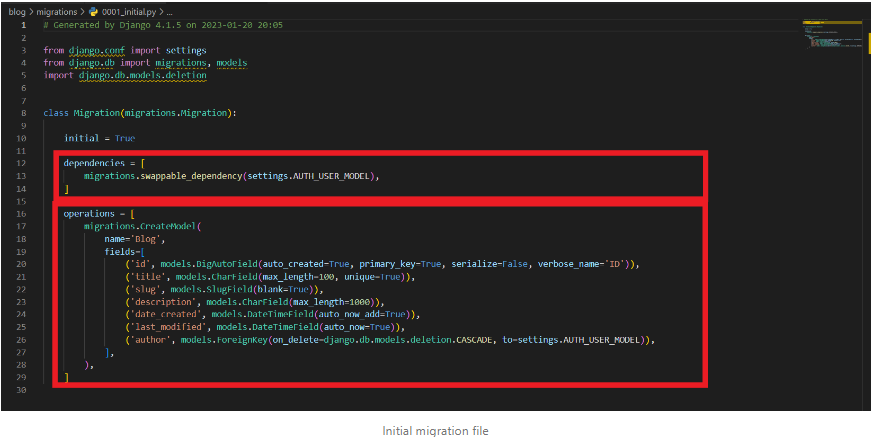
Overview of Migration File
Now that you know how to create a Django migration file, we’ll briefly explain the Django migration file.
The migration file contains a set of statements that instruct Django on the necessary database schema changes. Django uses these instructions to generate SQL statements that make the schema changes. These migration files are usually stored in the app folder, which sits in the migrations folder. Moreover, the migration file is a Python file containing two important things.
- Operations
- Dependencies
You need to pay attention to your Python code, but you also need to familiarize yourself with the migration file. To this end, you can open the migration file to see the list of operations and identify the create blog model operation in the list, as shown in the CLI output.
ℹ️ You can override the name of the package that contains the migrations on a per-app basis.
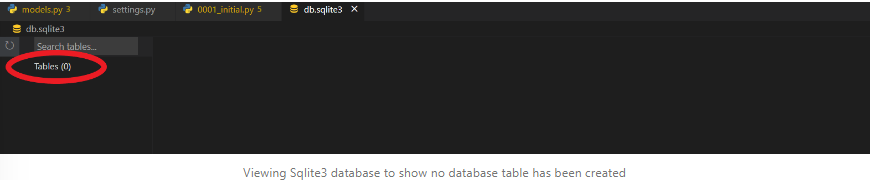
Remember that the database table corresponding to our model has not actually been created yet. As a matter of fact, you can check the db.sqlite3 file to confirm this. This makes sense because you haven’t yet run the migrate command.
Run the command below actually to apply the schema changes to the database (i.e., to create a new blog database table). In other words, perform the operations defined in the migrations files.
$ python manage.py migrateYou’ll see output similar to the output in the image below.
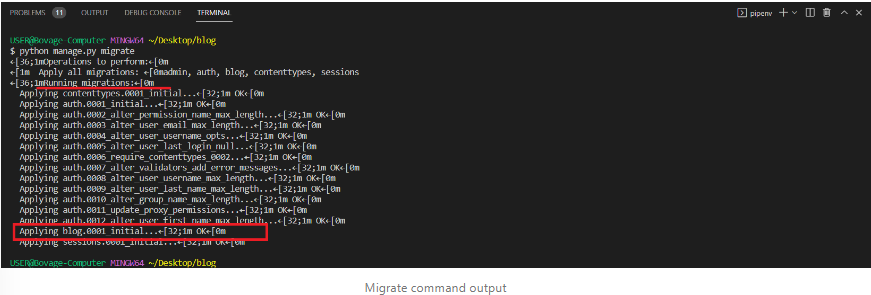
Breakdown of the migrate command output:
- The apps you’re applying the migrations to
- The migrations files list
The migrations files not highlighted are those that come default with Django.
If you check the database at this point, you’ll see that several tables have been created, as shown in the image below.
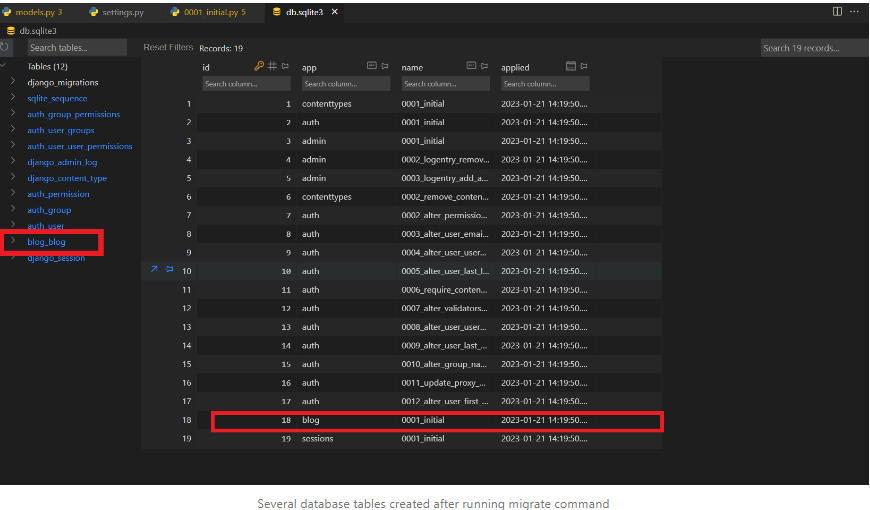
The tables not highlighted are those created by Django by default.
Adding Dummy Data for Testing
Now that you’ve created your database tables, let’s add some data for testing.
- To simplify adding data, you can use the Django admin dashboard. But first, you need to register the blog model in the
blog/admin.pyfile:
from django.contrib import admin

from .models import Blog

# Register your models here.

@admin.register(Blog)

class BlogAdmin(admin.ModelAdmin):

list_display = ["id", "title", "author", "date_created"]Code language: Python (python)- Next, run this command to create a superuser that can access the admin dashboard:
$ python manage.py createsuperuser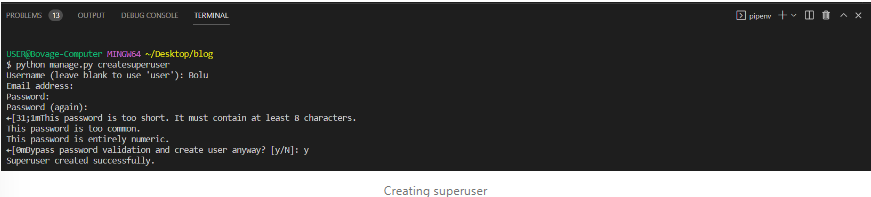
- Start the development server:
python manage.py runserver
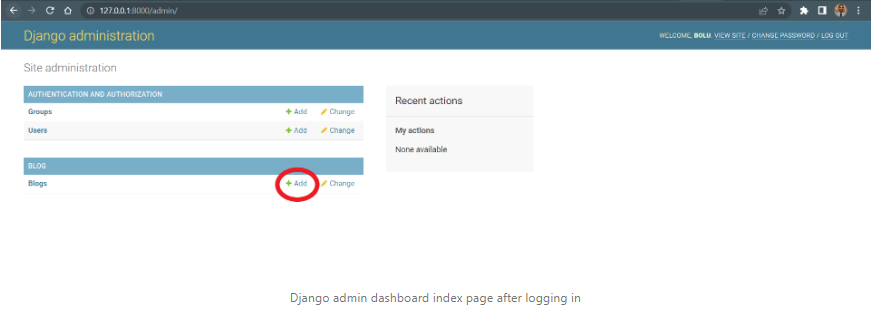
- Navigate to http://127.0.0.1:8000/admin, then log in.
- Click on the Add button under Blogs and add some dummy data for testing.
Making Changes to Existing Models
Software requirements change from time to time, and some changes necessitate adding additional fields or changing existing fields. As a result, you’ll need to make changes to your models. Let’s see how you can propagate those changes to your database schema.
Imagine that the new change we need to make requires you to store the number of views for each blog post.
To store the number, you need to add a field to the existing Blog model.
...

class Blog(models.Model):

""" Blog Model that represents Blog Table """

...

    no_of_views = models.PositiveIntegerField() # new fieldCode language: Python (python)
Django Migrations Default Value
Of course, you need to perform the two-step migration workflow before the new field can appear in the database.
- Run the
makemigrationcommand.
The image above shows the output of running the makemigrations command.
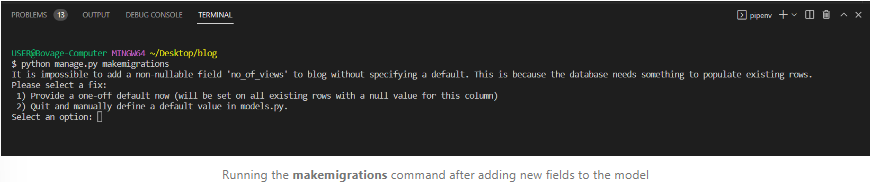
The message tells you to specify a default value for the newly added field in the existing rows of the database.
You have two options:
- You can provide a one-off default for all existing rows.
- You can abort and add a default value into the field as an argument.
For this example, let’s provide a one-off default value by entering 1 as the chosen option and then specifying 0 as the one-off default value.
ℹ️ If you check the migration file created earlier, you’ll see the
AddFeldoperation and the default value 0 specified.
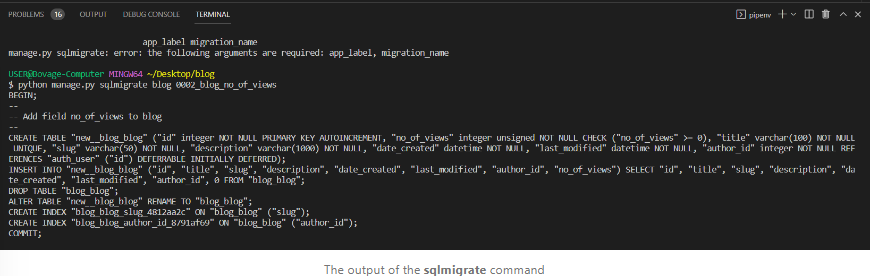
Before applying the changes to the database schema, you can inspect the SQL statements for the migration by running the sqlmigrate command.
Note: Unlike the two migrations commands you’ve used so far, sqlmigrate requires two arguments: app_label and migration_name.
$ python manage.py sqlmigrate blog 0002_blog_no_of_viewsThe output should be similar to the one in the image below.
- Run the
migratecommand. Afterward, you can view the new fields added and the default value specified for the existing data in the database.
Reversing Django Migration
From the previous section, you learned that Django keeps track of changes made to the database by storing a migration file. As a result, you can revert to the previous database schema. Think of this as resetting your codebase to a previous commit in case of a glitch or other issue.
Now, let’s say you decided you no longer want to store the number of times a blog was viewed. In this case, you need to remove it, but you must remember that you added the no_of_views field separately after the model had already been created. As a result, all you need to do is to roll back to your initial migration, when the model was created (i.e., the first migration within the blog app). To do that, run this command:
$ python manage.py migrate blog 0001_initial
If you check your database table, you’ll see that the no_of_views column was dropped even though:
- The migration file for adding the
no_of_viewsfield still exists in the migrations folder, and - The definition of the
no_of_viewsfield still exists as part of the blog model attributes inmodels.py.
What’s the implication?
Remember the showmigrations command from the previous section? Run it here.
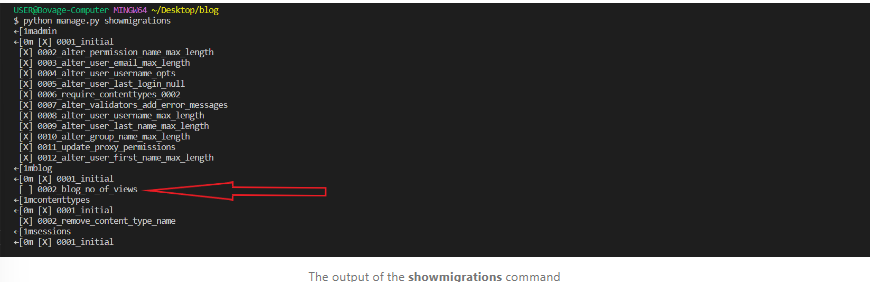
As the image above shows, only 0002_blog_no_of_views looks odd (i.e., it has no times (X) symbol).
ℹ️ The times (X) symbol indicates the migration files were applied to the database schema.
Common Problem 2: Reversing migration without deleting the migration file.
If you try to run the migrate command, Django applies the pending migration file (i.e., 0002_blog_no_of_views), even though you don’t want it to.
Fix for Common Problem 2
You need to delete the migration file that contains changes you don’t want. See the next section for how to do that!
How to Delete a Django Migration?
Deleting a migration requires two steps:
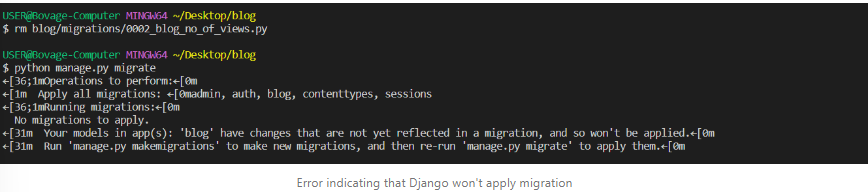
- Delete the migration file associated with the change you no longer need.
$ rm blog/migrations/0002_blog_no_of_views.py- Change your model to match the latest migration file you created or whichever you want to keep.
Common Problem 3: Django won't apply migration error.
If you try to run a migrate command without performing second step, you’ll get the error depicted in the image below.
This happens because the migrate command scans and then compares the models to the versions currently contained in the migration file. If it detects changes that don’t have an associated migration file, the database won’t know how to handle the changes made to the model and you’ll get an error. This error occurs because the changes made to the models aren’t reflected in the migration files and hence, the database can’t keep track of the changes and apply them.
Fix for Common Problem 3:
Perform second step mentioned above by removing the entire no_of_views attribute in the Blog class.
How to Make Fake Migrations in Django
As with all commands generally, the Django migration commands take extra arguments. Extra arguments allow you to add customizations and configurations to the migration. One of these extra arguments is fake, which allows you to do fake migrations. The --fake argument in Django migrations allows you to mark one or multiple migrations as already applied without actually running their SQL statements. This can be useful in cases where you want to see what changes a migration would make to your database, but you don’t want any actual changes to the database schema.
Django Migration Best Practices
Best practices you should adhere to when working with Django migrations include the following.
- Run migration files consistently across all environments. Migration files are part of the codebase. As a result, you’d commit and distribute them as part of the codebase. It is essential to ensure you run the migration files consistently across all environments, such as development, staging, and production to avoid inconsistencies in the database schema.
- Test your migrations thoroughly. Make sure to test your migrations on a test database before deploying them to production. This ensures that there are no issues with the migration that could cause data loss or other problems.
- Use the –database option when applying migrations. This allows you to apply migrations to specific databases, which can be useful when working with multiple databases in a single project.
- Never edit your migration files manually. Always use the `makemigrations` command to create new migrations.
- Be mindful of the order of migrations. Apply migrations in the order of their dependence on each other.
Conclusion
Migrations are an indispensable part of Django. By following the steps outlined in this guide, you can easily set up and use migrations in your Django projects. Additionally, always strive to follow best practices.
This post was written by Boluwatife Fayemi. Boluwatife is a Full Stack Web Developer, proficient in Javascript, Python, and their frameworks. His curiosity makes him explore and gain knowledge about a variety of topics. Boluwatife is passionate about teaching and writing, and this makes writing technical articles an enjoyable process for him.