How To Write Integration Tests With Jest And React Testing Library

When you build applications or websites as a developer, your primary goal is to ensure it works. To ensure it works, you test your application by checking if it works as expected, but we often perform this testing manually, which is referred to as manual testing.
In this article, you will learn what testing means, the various types of testing, why you need to test, how testing works in React, what integration testing means, and how to write an integration test with the React testing library.
What is testing?
Testing is the act or process of interacting with an application to ensure all its functionalities and features work as intended. There are generally two types of tests: manual and automated.
Manual testing involves an individual or group of people (mostly handled by the quality assurance team) who interact with your application to ensure every functionality works as intended. This type of testing gets cumbersome when working with large applications. For example, when a new feature is released, you would not only test that feature but will have to test the entire application and repeat this for every little change.
This becomes time-consuming, and you can be at the risk of human error when testing is done under pressure because no human is above mistakes. To avoid these drawbacks, we make use of automated testing.
Automated testing is the act of writing programs or code to automate the process of testing your application. This will also require writing extra testing code when you create a new feature, but you’ll not need to re-write the entire test for your application. And this will also be accurate based on your code, eliminating human error, and it becomes easy to identify and fix features that break tests. Overall it gives you confidence when shipping your application.
Types of Automated Tests
To ensure your application is thoroughly tested, three different types of automated tests exist. These tests are as follows:
1. Unit tests
2. Integration tests
3. E2E (end-to-end) tests
Unit tests involve testing an individual block/unit of your application in isolation from other units. This unit can be a component, function, or class. Integration test involves testing a combination of units to ensure they work together. Finally, the E2E test involves testing your entire application flow to ensure everything works as designed from start to finish.
This guide will focus on integration tests. The question that will come to your mind is why?
Why Write Integration Tests?
One importance of writing tests is that you become confident when shipping your application. Still, it’s also essential to write the right test and write only a few tests because, at a point, it would become difficult to maintain.
Unit tests are fast to write and run, but they involve testing independent units of your application, not how they work together. E2E test, on the other hand, is used to test your entire application ensuring proper communication with other systems, interfaces, and databases. Still, writing and running the E2E test takes a lot of time and can be expensive in terms of efficiency, time, and money.
This leaves us with the last option, which is the integration test. The integration test strikes a balance between the unit and E2E tests. This is one of the best, most moderate, cheap, and most efficient tests you can write for your application. It lets you test how your application’s components work together.
ℹ️ This doesn’t mean that both unit and E2E tests are useless or you shouldn’t write them. It just means that writing more integration tests is better and more intelligent because it provides you with confidence.
How testing works in React
Two major libraries, make it possible to write tests and test your React application. These libraries are Jest and the React testing library (RTL). The React testing library was created by Kent C. Dodds and built on the DOM Testing Library by adding APIs for working with React components. At the same time, Jest is a JavaScript testing framework, but in React, it serves as a test runner that finds the test, runs the test, determines if a test pass or fails, and returns it in a human-readable format.
When you create a React application with create-react-app, by default, these dependencies are installed and ready to be used. Although you may overlook the Jest dependency in your package.json file because it is a dependency to react-script dependency, so when you inspect the react-script directory in your node_modules folder, you will notice it.
How to run tests in React
When you scaffold your React application with create-react-app, you will notice a sample test file (App.test.tsx) created for the App.tsx file in your project’s src directory.
You may not understand what the code in the App.test.tsx file is all about but let’s first learn how to run the test. You can run tests in React with the test command in your terminal. By default, the command has been created as part of your default script when you check package.json
"scripts": {
    "start": "react-scripts start",
    "build": "react-scripts build",
    "test": "react-scripts test",
    "eject": "react-scripts eject"
},Code language: JSON / JSON with Comments (json)
You can run the following command in your terminal, which will run the test file.
$ npm run testWhen you run the command, some options will appear, “type ‘a’ to run all tests”, and then you will get the following output which shows that you have one test with the name “renders learn react link”, and the test is successful.
PASS src/App.test.tsx
✓ renders learn react link (10 ms)

Test Suites: 1 passed, 1 total
Tests: 1 passed, 1 total
Snapshots: 0 total
Time: 0.167 s, estimated 1 s
Ran all test suites.
Suppose there is an error; it will show that the test failed and explain what caused the failure—making it possible for you to fix it quickly.
Structure of tests
When you open the App.test.tsx file, you will notice some codes for testing the App.tsx component, which may not make sense to you yet but will soon make sense. It is important to understand that when naming a test file, you should always add .test after the component name and before the file extension. This makes it possible for Jest to notice it as a test file and run it when you run the test command.
When creating a test, you will make use of the test method, which accepts two major parameters: the name of the test (test identifier) and a callback function that will hold the various test instructions:
test('test identifier', () => {
    // test instructions
});Code language: JavaScript (javascript)
Building demo project
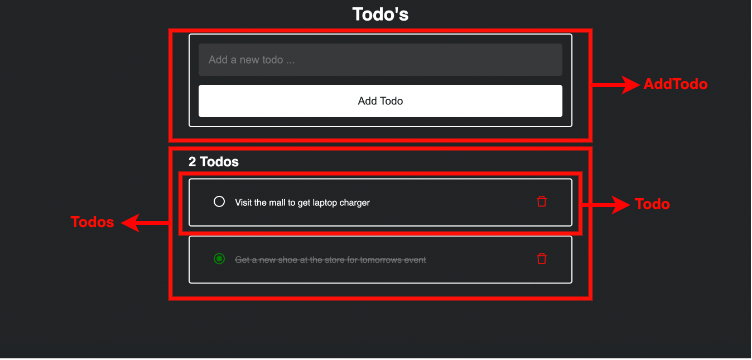
For this article, you’ll build a todo application comprising three components: App, Todos, and AddTodo, allowing you to add, delete and toggle todos in the CoderPad React sandbox.
The App.tsx file is the parent component that will be tested. It houses the AddTodo.tsx and Todos.tsx components:
import { useState } from 'react';
import AddTodo from './components/AddTodo';
import Todos from './components/Todos';

const App = () => {
    const [todos, setTodos] = useState([
    { id: 2, text: 'Visit the mall to get laptop charger', completed: false },
    {
        id: 1,
        text: 'Get a new shoe at the store for tomorrows event',
        completed: true,
    },
    ]);

    const addTodo = (newTodo) => {
    setTodos([newTodo, ...todos]);
    };

    const toggleTodo = (id) => {
    setTodos(
        todos.map((todo) => {
        if (todo.id === id) {
            return {
            ...todo,
            completed: !todo.completed,
            };
        }
        return todo;
        })
    );
    };

    const deleteTodo = (id) => {
    setTodos(todos.filter((todo) => todo.id !== id));
    };

    return (
    <div className="container">
        <h1 className="center">Todo's</h1>
        <AddTodo todos={todos} addTodo={addTodo} />
        <Todos todos={todos} toggleTodo={toggleTodo} deleteTodo={deleteTodo} />
    </div>
    );
};

export default App;Code language: JavaScript (javascript)
In the code above, I added all the functionalities responsible for adding, removing, and toggling todos in this component. Also, the todos state stores all the todos with two default todos added.
The AddTodo.tsx component contains the form alone, and the addTodo method is passed in as a prop from the App component:
import { useState } from "react"

const AddTodo = ({ todos, addTodo }) => {
    const [todo, setTodo] = useState('')
    let newTodo = {
        id: todos.length + 1,
        text: todo,
        completed: false
    }

    const handleSubmit = (e) => {
        e.preventDefault()
        addTodo(newTodo)
        setTodo('')
    }

    return (
        <div className="add-todo__container">
            <input type="text" className="add-todo__input" value={todo} onChange={(e) => setTodo(e.target.value)} />
            <button className="add-todo__button" onClick={handleSubmit}>Add Todo</button>
        </div>
    )
}

export default AddTodo;Code language: JavaScript (javascript)
The second component is the Todos.tsx component which receives the array of all todos as a prop alongside methods to delete and toggle a todo:
import Todo from "./Todo"

const Todos = ({ todos, toggleTodo, deleteTodo }) => {
    return (
        <div className="all-todos__container">
            <h2>{todos.length} {todos.length > 1 ? 'Todos' : 'Todo'}</h2>
            {todos.map((todo) => <Todo key={todo.id} todo={todo} toggleTodo={toggleTodo} deleteTodo={deleteTodo} />)}
        </div>
    )
}

export default Todos;Code language: JavaScript (javascript)
Finally, the todo item is separated into a new component Todo.tsx. This component receives each todo item as a prop and also the deleteTodo and toggleTodo methods:
import { MdRadioButtonChecked } from 'react-icons/md';
import { MdRadioButtonUnchecked } from 'react-icons/md';
import { AiOutlineDelete } from 'react-icons/ai';

const Todo = ({ todo, toggleTodo, deleteTodo }) => {
    return (
        <div className="todo__container ">
            <div className="todo__checkbox" onClick={() => toggleTodo(todo.id)}>
                {todo.completed ? <MdRadioButtonChecked className='icon checked' /> : <MdRadioButtonUnchecked className='icon' />}
            </div>
            <div className={todo.completed ? 'todo__text complete' : 'todo__text'}>
                <p>{todo.text}</p>
            </div>
            <div className="todo__delete" onClick={() => deleteTodo(todo.id)}>
                <AiOutlineDelete className='icon' />
            </div>
        </div>
    )
}

export default Todo;Code language: JavaScript (javascript)
With the todo application in place, let’s proceed to write integration tests for the component.
Writing Integration Test
To understand how integration testing works, you’ll be introduced to the methods contained in the @testing-library/react library and how to use them by first writing a sample test before testing the Todo component.
Example test
For the example test, you’ll test the heading text if it truly exists in the component. You’ll use the render method and screen object from @testing-library/react library to render the component and execute the getByText method.
💡 The render method is used to specify the component to be tested, while the screen object holds several query methods that can be used to access elements within the DOM. An example of this query is the
getByTextmethod.
import { render, screen } from '@testing-library/react';
import '@testing-library/jest-dom';Code language: JavaScript (javascript)
ℹ️ I imported
@testing-library/jest-dom, which is a companion library for React Testing Library and would help run your test methods. Some methods liketoBeInTheDocument()is not part of React Testing Library, so you will need to install jest-dom to enable it.This article demonstrates how to use Jest with React.
In App.test.tsx, add the following:
import { render, screen } from '@testing-library/react';
import '@testing-library/jest-dom';
import App from './App';

test('if the heading is correct', () => {
    render(<App />);
    const headingElement = screen.getByText(/Todo's/i);
});Code language: JavaScript (javascript)
In the code block above, the “if the heading is correct” test block uses the render and screen methods. The render method renders the App component and the screen method retrieves the element with the text “Todo’s”. The element is stored in the headingElement variable.
💡 When naming your tests, use descriptive names. Also, when passing text identifiers into methods like the
getByText()method, you can use string or regex as seen below, but regex is preferred as it makes it easy to ignore casing using theiflag.screen.getByText('Todo's'); screen.getByText(/Todo's/i);Code language: JavaScript (javascript)
At this point, the heading element has been stored in the headingElement variable. You can now use the expect() assertion method to test if any element with the text “Todo’s” exist:
This test renders the component to be tested, gets the element with the “Todo’s” text, and checks if it exists in the document. When you run the test with `npm run test`, you will notice it passes:
PASS src/App.test.tsx
✓ if the heading is correct (13 ms)

Test Suites: 1 passed, 1 total
Tests: 1 passed, 1 total
Snapshots: 0 total
Time: 0.325 s, estimated 1 s
Ran all test suites.
Now that you understand how the render and screen method work, let’s write the test for adding single and multiple todos and deleting a todo.
Test adding and displaying a single todo
This will test across all the components and check if adding a new todo item will work or throw an error. To do this, you will create a new test, give it your preferred name, and then render the component to be tested (which is App.tsx):
import { render, screen, fireEvent } from '@testing-library/react';
import '@testing-library/jest-dom';
import App from './App';

test('typing into input and displaying todo', () => {
    render(<App />);
});Code language: JavaScript (javascript)
Then you can proceed to retrieve the input element and the button element using the screen method. You can retrieve these elements with any property or attribute of your choice, such as the placeholder text for the input and lots more.
const inputElement = screen.getByPlaceholderText(/Add a new todo .../i);
const buttonElement = screen.getByRole('button', { name: /Add Todo/i });Code language: JavaScript (javascript)
The code above retrieve the input element with the placeholder value, which will check your code for any placeholder with the value “Add a new todo …” and store the input element in the inputElement variable. Secondly, it will get the button using the getByRole query, which searches for any button with the value “Add Todo“.
You can now test adding a value to the input element and click the “Add Todo” button. You will do this with the fireEvent method. This method allows you to fire events to simulate user actions such as click events, change events, and lots more.
import { render, screen, fireEvent } from '@testing-library/react';
import '@testing-library/jest-dom';
import App from './App';

test('typing into input and displaying todo', () => {
    render(<App />);
    const inputElement = screen.getByPlaceholderText(/Add a new todo .../i);
    const buttonElement = screen.getByRole('button', { name: /Add Todo/i });
    fireEvent.change(inputElement, { target: { value: 'Send a mail to Dad' } });
    fireEvent.click(buttonElement);
});Code language: JavaScript (javascript)
ℹ️ You need to import the
fireEvent methodfrom@testing-library/reactso you can use it within your test file.
In the code above, you are testing the add todo form by adding a new todo with the value “Send a mail to Dad” into the inputElement and then clicking the buttonElement.
The last step would be to validate the test by checking if this todo item is added to the Todo component. You can use the screen method and the expect assertion to check if it exists in the DOM/document.
const todoElement = screen.getByText(/Send a mail to Dad/i);
expect(todoElement).toBeInTheDocument(); Code language: JavaScript (javascript)
Overall, the entire test for typing into input and displaying todo will look like this:
import { render, screen, fireEvent } from '@testing-library/react';
import '@testing-library/jest-dom';
import App from './App';

test('typing into input and displaying todo', () => {
    render(<App />);
    const inputElement = screen.getByPlaceholderText(/Add a new todo .../i);
    const buttonElement = screen.getByRole('button', { name: /Add Todo/i });
    fireEvent.change(inputElement, { target: { value: 'Send a mail to Dad' } });
    fireEvent.click(buttonElement);
    const todoElement = screen.getByText(/Send a mail to Dad/i);
    expect(todoElement).toBeInTheDocument();
});Code language: JavaScript (javascript)
When you run the test, it will display the outcomes indicating that all tests passed:
PASS src/App.test.tsx
✓ typing into input and displaying todo (39 ms)

Test Suites: 1 passed, 1 total
Tests: 1 passed, 1 total
Snapshots: 0 total
Time: 0.477 s, estimated 1 s
Ran all test suites.
Test adding and displaying multiple todos
So far, you have learned how to test the addition of only one todo, but in the actual sense, you’ll want to have more than one todo in your application, so let’s test by adding multiple todos into the application.
You might think of repeating some lines of code, but what if you want to add 100 todos? Then it’s not realistic:
test('typing into input and displaying muliple todos', () => {
    render(<App />);
    const inputElement = screen.getByPlaceholderText(/Add a new todo .../i);
    const buttonElement = screen.getByRole('button', { name: /Add Todo/i });
    fireEvent.change(inputElement, { target: { value: 'Send a mail to Dad' } });
    fireEvent.click(buttonElement);
    fireEvent.change(inputElement, { target: { value: 'Get some gifts for Bae' },});
    fireEvent.click(buttonElement);
    const todoElement1 = screen.getByText(/Send a mail to Dad/i);
    expect(todoElement1).toBeInTheDocument();
    const todoElement2 = screen.getByText(/Get some gifts for Bae/i);
    expect(todoElement2).toBeInTheDocument();
});Code language: JavaScript (javascript)
Instead of having to repeat these lines, you can create a function to handle the addition of multiple todos so you can use a loop:
const addTodo = (todos) => {
    const inputElement = screen.getByPlaceholderText(/Add a new todo .../i);
    const buttonElement = screen.getByRole('button', { name: /Add Todo/i });
    todos.forEach((todo) => {
        fireEvent.change(inputElement, { target: { value: todo } });
        fireEvent.click(buttonElement);
    });
};Code language: JavaScript (javascript)
This function will receive an array of todos, then loops through these todos to add them to your application. You can call this function and pass in all the todos within your test:
test('typing into input and displaying all todos', () => {
    render(<App />);
    addTodo(['Send a mail to Dad', 'Get some gifts for Bae']);
    const todoElements = screen.queryAllByTestId('todo');
    expect(todoElements.length).toBe(4);
});Code language: JavaScript (javascript)
Finally, you’ll need to validate your test. In the previous test, you checked if the todo added was in the document by using expect(todoElement).toBeInTheDocument(), but since you now have more than one todo, doing so for each can be time-consuming. Instead, you can check for the number of todos in your DOM if the number matches what you are expecting.
For example, looking through the application, you’ll notice that two todo items were added to the todo state at the beginning. This means that because you are adding two new items, you expect four todos to appear on the DOM, which is why the number four is used in the following assertion:
expect(todoElements.length).toBe(4);Code language: JavaScript (javascript)When you run the test, you will notice it passes:
PASS src/App.test.tsx
App
✓ typing into input and displaying all todos (41 ms)

Test Suites: 1 passed, 1 total
Tests: 1 passed, 1 total
Snapshots: 0 total
Time: 0.595 s, estimated 1 s
Ran all test suites.
But suppose you estimated the total number of elements to be two, then it will throw an error and explain the cause of the error:
FAIL src/App.test.tsx
    App
    ✕ typing into input and displaying all todos (42 ms)

    ● App > typing into input and displaying all todos

    expect(received).toBe(expected) // Object.is equality

    Expected: 2
    Received: 4

        33 | addTodo(['Send a mail to Dad', 'Get some gifts for Bae']);
        34 | const todoElements = screen.queryAllByTestId('todo');
    > 35 | expect(todoElements.length).toBe(2);
            | ^
        36 | });
        37 | });
        38 |

        at Object.<anonymous> (src/App.test.tsx:35:31)
        at TestScheduler.scheduleTests (node_modules/@jest/core/build/TestScheduler.js:333:13)
        at runJest (node_modules/@jest/core/build/runJest.js:404:19)

Test Suites: 1 failed, 1 total
Tests: 1 failed, 1 total
Snapshots: 0 total
Time: 0.482 s, estimated 1 s
Ran all test suites.Code language: JavaScript (javascript)
Performing multiple tests
Suppose you want a dedicated test for each function/feature of your application in one test file. You can use the describe method, which works like the test method but can hold more than one test:
import { render, screen, fireEvent } from '@testing-library/react';
import '@testing-library/jest-dom';
import App from './App';

const addTodo = (todos) => {
    const inputElement = screen.getByPlaceholderText(/Add a new todo .../i);
    const buttonElement = screen.getByRole('button', { name: /Add Todo/i });
    todos.forEach((todo) => {
        fireEvent.change(inputElement, { target: { value: todo } });
        fireEvent.click(buttonElement);
    });
};

describe('App', () => {
    test('typing into input and displaying one todo', () => {
        render(<App />);
        const inputElement = screen.getByPlaceholderText(/Add a new todo .../i);
        const buttonElement = screen.getByRole('button', { name: /Add Todo/i });
        fireEvent.change(inputElement, { target: { value: 'Send a mail to Dad' } });
        fireEvent.click(buttonElement);
        const todoElement = screen.getByText(/Send a mail to Dad/i);
        expect(todoElement).toBeInTheDocument();
    });

    test('typing into input and displaying all todos', () => {
        render(<App />);
        addTodo(['Send a mail to Dad', 'Get some gifts for Bae']);
        const todoElements = screen.queryAllByTestId('todo');
        expect(todoElements.length).toBe(4);
    });
});Code language: JavaScript (javascript)
ℹ️ The
describemethod or block is a test suite used to hold more than one test (test case). Thisdescribeblock has two parameters like thetestblock: the name or identifier (a string) and a callback function to hold all yourtestblocks or cases.
In the above, you have two tests, one will check if you can add one todo item to your application, and the second will check if you can add multiple todos. When you run the code, it will indicate that two tests passed and also list the names of the tests (identifiers):
PASS src/App.test.tsx
App
✓ typing into input and displaying one todo (34 ms)
✓ typing into input and displaying all todos (11 ms)

Test Suites: 1 passed, 1 total
Tests: 2 passed, 2 total
Snapshots: 0 total
Time: 0.314 s, estimated 1 s
Ran all test suites.
Test deleting a todo
Finally, let’s also test how you can select a single todo and delete it from your application just like you’d do if it were manual testing. You can also use a function to get the todo, the container, and the delete button to fire a click event.
const deleteTodo = (todo) => {
    const todoElement = screen.getByText(todo);
    const todoElementContainer = todoElement.closest('div');
    const deleteButton = within(todoElementContainer).getByTestId('delete');
    fireEvent.click(deleteButton);
};Code language: JavaScript (javascript)
The function receives a todo; you then write test instructions to look for the todo element and get the entire todo container to be removed using the closest method. Then get the deleteButton from within the todoElementContainer and fire a click event that removes the todo. You can call this function in the test:
test('if delete button is working', () => {
    render(<App />);
    addTodo(['Send a mail to Dad', 'Get some gifts for Bae']);
    deleteTodo('Send a mail to Dad');
    const todoElements = screen.queryAllByTestId('todo');
    expect(todoElements.length).toBe(3);
});Code language: JavaScript (javascript)
In the test, you can add new todos with the addTodo() function, then call the deleteTodo() function by passing the todo to be deleted. To assert this test (if one has deleted), you can check your application’s total number of todos. This is done by checking the length — meaning it must have reduced from four to three.
This is what the entire test, alongside other tests, looks like:
import { render, screen, fireEvent, within } from '@testing-library/react';
import '@testing-library/jest-dom';
import App from './App';

const addTodo = (todos) => {
    const inputElement = screen.getByPlaceholderText(/Add a new todo .../i);
    const buttonElement = screen.getByRole('button', { name: /Add Todo/i });
    todos.forEach((todo) => {
        fireEvent.change(inputElement, { target: { value: todo } });
        fireEvent.click(buttonElement);
    });
};

const deleteTodo = (todo) => {
    const todoElement = screen.getByText(todo);
    const todoElementContainer = todoElement.closest('div');
    const deleteButton = within(todoElementContainer).getByTestId('delete');
    fireEvent.click(deleteButton);
};

describe('App', () => {
    test('typing into input and displaying one todo', () => {
        render(<App />);
        const inputElement = screen.getByPlaceholderText(/Add a new todo .../i);
        const buttonElement = screen.getByRole('button', { name: /Add Todo/i });
        fireEvent.change(inputElement, {
            target: { value: 'Send a mail to Dad'},
        });
        fireEvent.click(buttonElement);
        const todoElement = screen.getByText(/Send a mail to Dad/i);
        expect(todoElement).toBeInTheDocument();
    });

    test('typing into input and displaying all todos', () => {
        render(<App />);
        addTodo(['Send a mail to Dad', 'Get some gifts for Bae']);
        const todoElements = screen.queryAllByTestId('todo');
        expect(todoElements.length).toBe(4);
    });

    test('if delete button is working', () => {
        render(<App />);
        addTodo(['Send a mail to Dad', 'Get some gifts for Bae']);
        deleteTodo('Send a mail to Dad');
        const todoElements = screen.queryAllByTestId('todo');
        expect(todoElements.length).toBe(3);
    });
});Code language: JavaScript (javascript)
When you run the test, you will notice that three tests have passed:
PASS src/App.test.tsx
App
✓ typing into input and displaying one todo (43 ms)
✓ typing into input and displaying all todos (21 ms)
✓ if delete button is working (18 ms)

Test Suites: 1 passed, 1 total
Tests: 3 passed, 3 total
Snapshots: 0 total
Time: 0.737 s, estimated 1 s
Ran all test suites.Code language: JavaScript (javascript)
Run the test in the sandbox below:
Wrapping up
In this article, you have learned what the integration test means, how it is differentiated from other tests, and why it stands out. You have also learned how to write integration tests in React. You can check out the final project, which includes the working test file in this repository.
Have fun coding!
I’m Joel Olawanle, a frontend developer and technical writer interested in making the web accessible to everyone by always looking for ways to give back to the tech community. Follow me and connect with me on Twitter.