How To Handle State Management in Vue Using Pinia
State management is often necessary when building applications, but it can be challenging to implement, especially with large-scale applications.
Your application’s size and features often dictate how large or complex your state management will be. Although keeping track of states in an application is not easy, it can be with the right tools for the job. This post aims to provide a high-level overview of one of the many ways in which state management can be handled in a Vue application using Pinia.
What is state management?
First, what is a state? State means data in your application, which ranges from data from a database server or an API response, to data from the client side, like the input values on a contact form. State simply means data that exists in our application.
As such, state management involves the process of creating, using, mutating, and sharing data across an application via components. In most cases, it relates to how user input or server data is handled. For instance, by filling out a form on a website, a user is adding new data/state to the site or mutating an already existing state.
When do we need state management?
State management is often necessary for complex or large-scale applications, where multiple components or modules must share and coordinate their state to function properly.
State management becomes crucial when an application needs to remember data across multiple pages and components or when the application needs to keep track of user interactions. For example, a shopping cart application needs to remember what items have been added to the cart, and a web application needs to remember user preferences and settings. Without proper state management, applications would not be able to persist data and would then not be able to provide the expected functionality or user experience.
However, when managing complex states, relying on just the internal state management offered by a framework such as Vue may not always be sufficient. It can sometimes lead to something called props drilling, a process of passing state down several unrelated components (that do not need it) to get said state to a deeply nested component that requires it.
This makes it more challenging to keep track of the state and to identify which components require the state because most of these components are simply “passage” points for the state to reach the component that needs it. As a result, this approach can result in confusion, especially in large-scale applications with hundreds of states.
Different options for state management in Vue
State management is an essential topic in the frontend world, and the tools used depend on the particular framework being used.
Like other front-end JavaScript frameworks, Vue offers several options for managing a web application’s state, and each has its advantages and disadvantages. The appropriate choice will depend on the specific needs of the application.
Vuex
Vuex is the state management library created and maintained by the Vue team. It is a very complex yet powerful state management library that uses the Flux design pattern which Facebook built. In the same way as Redux, the Vuex state management library uses unidirectional data flow to pass data between components, ensuring that the state can be mutated predictably.
It does this by providing a centralized store for storing and mutating application states, which serves as the only source of truth for all the components in a Vue application.
However, using mutations with Vuex is one of the things that gets tiresome. Changing the state of our store from a component requires us first to call an action, which then triggers the mutation. As a result, each state change requires a great deal of boilerplate and extremely verbose code.
Pinia
Pinia is a relatively new state management library for Vue.js that aims to provide a more lightweight and simplified state management alternative to VueX. It uses a similar approach to VueX but with a more modular and customizable design.
Pinia was first introduced to the Vue ecosystem by a member of the core Vue 3 team as an experiment, but it quickly gained popularity and has become the official state management library recommended by the Vue team for Vue 3. The library is lightweight (1KB), straightforward to use, and does away with most of the complexity many developers dislike about the Vuex library.
In Pinia, states are defined by creating stores containing states, getters, and actions. Essentially, the store’s state defines what global data is managed, getters return computed or derived values from the state (or other getters), and actions are methods that perform asynchronous operations or execute business logic.
Pinia is relatively flexible as it can be used with the Composition API or Options API and allows developers to create plugins that can do a wide variety of things, like providing reusable functionality for stores. It also has strong support for Typescript, server-side-rendering (SSR), and hooks into Vue DevTools to facilitate easy debugging.
Other options
VueX vs Pinia
When comparing the two libraries, there are a few important advantages Pinia has over VueX:
- Pinia’s API is much simpler than VueX’s, and if you’ve worked with composeables in Vue3, Pinia will feel very familiar to you.
- You can only have one store in Vuex, whereas in Pinia, we can have multiple stores. In VueX, we can divide our store into modules if we need multiple stores. However, this is extremely tedious and requires us to import these modules into our components.
- Unlike Vuex where actions are dispatched via dispatch/commit methods or MapAction/MapMutation helper functions, Pinia stores dispatch actions as regular function calls.
- Vuex and Pinia both integrate well with Vue Devtools, so we can take full advantage of all of its debugging functionality.
- Pinia fully supports TypeScript out of the box, whereas Vuex does not have proper support, making it less suitable for TypeScript developers.
Creating a simple store with Pinia
Now that we have grasped Pinia and what it brings to the table, it is time to see a practical example of how it is used in a Vue application, as this will give us a better understanding of how to use it. We’ll be using a Vue CoderPad sandbox for this article.
In the sandbox shell, install the pinia library.
npm i piniaSetting up a store in Pinia
Setting up a store in Pinia is very simple; first, we need to set up a folder structure that will help tell where the state and all its configurations live in the project folder. We will create a folder named stores in the src directory. As stated earlier, this will be the directory that houses all the state management logic.
Next, we create a Pinia instance – this is just a way to inject Pinia into the Vue app. It tells Vue there is an external library we intend to use alongside Vue internals. Otherwise, Vue won’t know we have a state library.
As the main.js file is the entry point of a Vue application (the same way index.html is the entry file of a website), we create an instance in this root directory, so a Pinia instance initializes once our app starts. So let’s create the Pinia instance by editing our main.js to the code below:
import { createApp } from 'vue'
import { createPinia } from 'pinia' // Import the createPinia function from Pinia
import App from './App.vue'

import './assets/main.css'

const app = createApp(App)

app.use(createPinia())  // Create an instance of Pinia and injected it into the app.

app.mount('#app')Code language: JavaScript (javascript)
Next, we’ll set up a Pinia store that manages a count state to give us a better understanding of how simple it is to set up a Pinia store. In the stores folder, create a file counter.js to store state logic relevant to the counter application. Add the following into it:
import { defineStore } from "pinia";

export const useCounterStore = defineStore("counter", {
  state: () => ({ count: 0, name: "David" }),
  getters: {
    doubleCount: (state) => state.count * 2,
  },
  actions: {
    increment() {
      this.count++;
    },
    decrement() {
      this.count--;
    },
    changeName() {
      this.name = "Franklin";
    },

  },
});Code language: JavaScript (javascript)
Look confusing? Don’t worry. We’ll go through it and explain every line of code.
Let’s start with the first line, which is the importation of a function defineStore. As the name implies, this is a function imported from the Pinia package that lets us create an instance of a store, and it takes two arguments (more on that later).
Then, we created an export function that exports all the defineStore state logic so it can be invoked in any Vue component to use this counter store. The naming convention typically begins with “use” and ends with “store” to help distinguish a function that manages state logic from other utility functions in our Vue application.
The first argument accepted by the defineStore function is the name of the store you are creating or defining; this can be any name of your choice. However, it must be a unique name because Pinia uses it to connect the store to the dev tools.
Furthermore, ensuring the store’s name reflects what you are storing in the state is a good and recommended practice. Since we are storing a count state that increases and decreases, we called our store counter.
The second argument passed to the defineStore function is of two kinds: a setup function or an options object.
Options object
The options object is the method we’ve opted for and is similar to Vue’s Options API. We define it by passing an object containing our store’s state, getters, and actions property, as shown in the code snippet above.
Setup function
The setup function is the alternative second argument that can be passed to the defineStore function and is very similar to Vue’s Composition API. We pass in a callback function that defines our store’s reactive state, properties, and methods. This callback function returns the items in the store that we wish to expose for use. To understand it properly, let’s convert the initial options object to the setup function.
// Options Object
import { defineStore } from "pinia";

export const useCounterStore = defineStore("counter", {
  state: () => ({ count: 0, name: "David" }),
  getters: {
    doubleCount: (state) => state.count * 2,
  },
  actions: {
    increment() {
      this.count++;
    },
    decrement() {
      this.count--;
    },
    changeName() {
      this.name = "Franklin";
    },
});Code language: JavaScript (javascript)
To:
// Setup Function
import { defineStore } from "pinia";

export const useCounterStore = defineStore('counter', () => {
  const count = ref(0)
  const name = ref('David')
  const doubleCount = computed(() => count.value * 2)
  function increment() {
    count.value++
  } function decrement() {
    count.value--
  }
  function changeName () {
    name.value = "Franklin"
}

  return { count, name, doubleCount, increment, decrement, changeName }
})Code language: JavaScript (javascript)
Beautiful, isn’t it? I love how Pinia is flexible and allows us to use whichever method seems convenient. Moving forward, we will continue using the options object because it is straightforward and easy to use. You can use whatever you like in the future as long as you understand the fundamentals.
Importing the store into our Vue project
We will now see how to use this counter store in our component. Update the App.vue component to the code snippet below:
<script setup>
</script>

<template>
<main>
  <h1>Hello World</h1>
</main>
</template>

<style scoped></style>Code language: HTML, XML (xml)
The next step is to import and use the Pinia store we created earlier into our Vue project. We do this by importing the useCounterStore function from the stores directory; recall that this folder contains our counter state, getters, and actions.
<script setup>
import { useCounterStore } from "./stores/counter";
</script>

<template>
<main>
  <h1>Hello World</h1>
</main>
</template>

<style scoped></style>Code language: HTML, XML (xml)
How to access the state in our Vue component
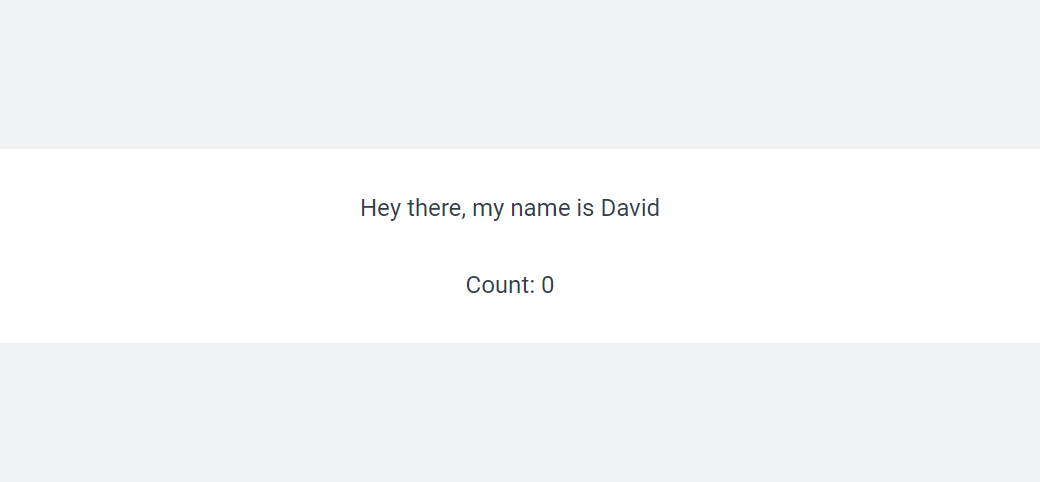
After importing the function that contains our store, it is time to use it to make our Vue component interactive and stateful. All we have to do is destructure the items we need from the useCounterStore() function. However, to keep reactivity while destructuring reactive properties such as state and getters, we can use the storeToRefs() function. This creates refs for the reactive properties, while unreactive items can be destructured normally, as shown below.
<script setup>
import { useCounterStore } from "./stores/counter";
import { storeToRefs } from "pinia";

const { count, name } = storeToRefs(useCounterStore()); //destructuring reactive items from the store
const { increment, decrement } = useCounterStore(); //destructuring unreactive item from the store
</script>

<template>
<main>
  <p>Hey there, my name is {{ name }}</p>
  <p>Count: {{ count }}</p>
</main>
</template>

<style scoped></style>Code language: HTML, XML (xml)
In a Vue application, you can think of states and getters as equivalent to data and computed values, respectively. For this reason, they are reactive values, while actions are regular functions that update the store.
Now that we have that out of the way, let’s create two buttons to increase and decrease the count value in our store. Recall we already created an increment and decrement action in our store that increases and decreases the current count value by 1, respectively, as shown below.
actions: {
increment() {
this.count++;
},
changeName() {
this.name = "Franklin";
},
decrement() {
this.count--;
},
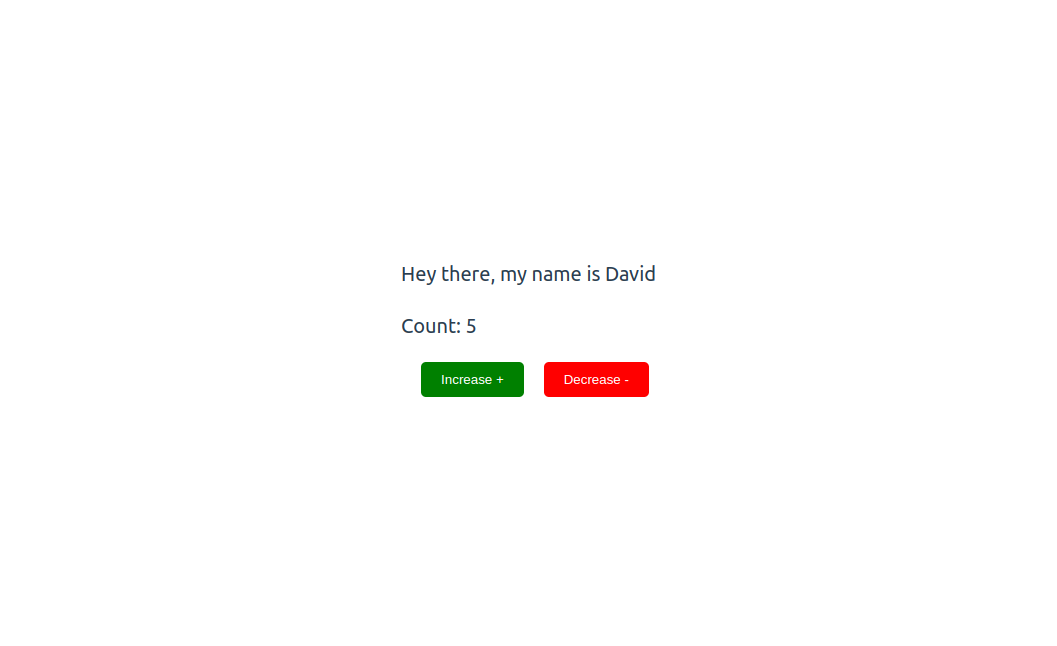
},Code language: JavaScript (javascript)Now let’s hook these actions into our Vue component by attaching them to click events placed on the increase and decrease buttons; we’ll also add a bit of styling so they look presentable.
<script setup>
import { useCounterStore } from "./stores/counter";
import { storeToRefs } from "pinia";

const { count, name } = storeToRefs(useCounterStore());
const { increment, decrement } = useCounterStore();
</script>

<template>
  <main>
    <p>Hey there, my name is {{ name }}</p>
    <p>Count: {{ count }}</p>

    <button class="increase" @click="increment()">Increase +</button>
    <button class="decrease" @click="decrement()">Decrease -</button>
  </main>
</template>

<style scoped>
p {
  margin-bottom: 20px;
  font-size: 20px;
}
button {
  border: none;
  padding: 10px 20px;
  cursor: pointer;
  margin-left: 20px;
  border-radius: 5px;
  color: white;
}

button.increase {
  background-color: green;
}

button.decrease {
  background-color: red;
}
</style>Code language: HTML, XML (xml)
From the code snippet above, we listen for click events on the increase and decrease buttons. When clicked, we fire the increment or decrement action from our store, which increases or decreases the store’s count state and reflects on the app as the count’s value changes.
Output (after clicking the increase button 5 times):
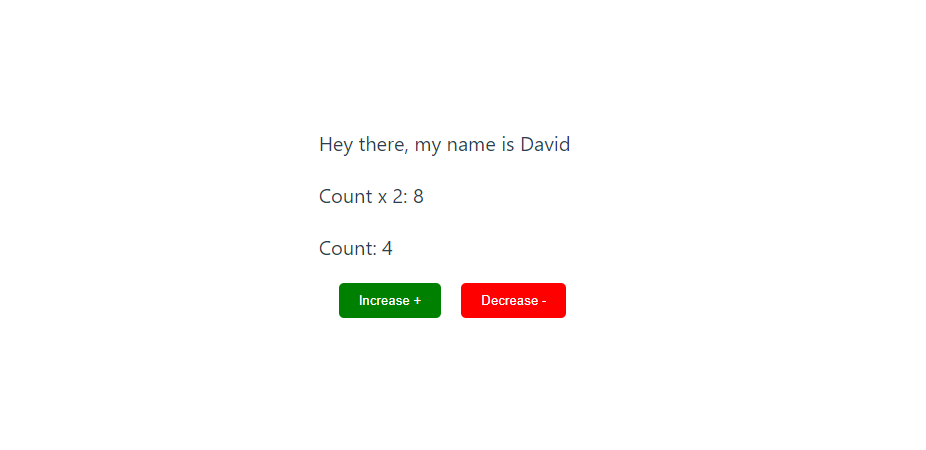
From the code snippets above, we can see how easy it is to use a Pinia store in our Vue components. Next, let’s see how we can use the doubleCount getter function, which multiplies the state by 2 and returns the computed value.
<script setup>
import { useCounterStore } from "./stores/counter";
import { storeToRefs } from "pinia";

const { count, name, doubleCount } = storeToRefs(useCounterStore());
const { increment, decrement } = useCounterStore();
</script>

<template>
  <main>
    <p>Hey there, my name is {{ name }}</p>
    <p>Count x 2: {{ doubleCount }}</p>
    <p>Count: {{ count }}</p>

    <button class="increase" @click="increment()">Increase +</button>
    <button class="decrease" @click="decrement()">Decrease -</button>
  </main>
</template>

<style scoped>
p {
  margin-bottom: 20px;
  font-size: 20px;
}
button {
  border: none;
  padding: 10px 20px;
  cursor: pointer;
  margin-left: 20px;
  border-radius: 5px;
  color: white;
}

button.increase {
  background-color: green;
}

button.decrease {
  background-color: red;
}
</style>Code language: HTML, XML (xml)
The first thing we did was import the doubleCount getters method from the store using the storeToRefs function to maintain its reactivity in our component. Now when the count state is 4, doubleCount‘s value is computed to 8, and when the count state is 7, doubleCount‘s value is computed to 14 as shown below
Getters can be used for far more complex and practical uses than multiplying a count by 2 – for example, to build a cart system in Vue using Pinia as our state management library.
We can use getters to calculate the prices of items in the cart and even add tax, discount, and delivery fee so that customers can instantly see the total price of the goods, which gets updated as items are added or removed from the cart. Getters are the best solution for such use cases.
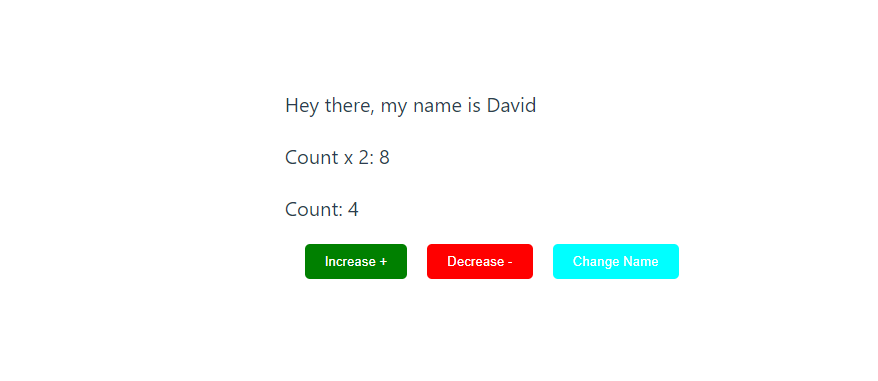
Finally, we’ll add a button to fire the changeName action in our store so the name property changes from “David” to “Franklin” when this button is clicked.
<script setup>
import { useCounterStore } from "./stores/counter";
import { storeToRefs } from "pinia";

const { count, name, doubleCount } = storeToRefs(useCounterStore());
const { increment, decrement, changeName } = useCounterStore();
</script>

<template>
  <main>
    <p>Hey there, my name is {{ name }}</p>
    <p>Count x 2: {{ doubleCount }}</p>
    <p>Count: {{ count }}</p>

    <button class="increase" @click="increment()">Increase +</button>
    <button class="decrease" @click="decrement()">Decrease -</button>
    <button @click="changeName()">Change Name</button>
  </main>
</template>

<style scoped>
p {
  margin-bottom: 20px;
  font-size: 20px;
}
button {
  border: none;
  padding: 10px 20px;
  cursor: pointer;
  margin-left: 20px;
  border-radius: 5px;
  color: white;
  background-color: aqua;
}

button.increase {
  background-color: green;
}

button.decrease {
  background-color: red;
}
</style>Code language: HTML, XML (xml)
Again, we first imported the changeName action from our counter store, and then we hooked it up to the button so that when the button is clicked, the name value is changed from “David” to “Franklin.”
This is the current state when the button is not clicked yet:
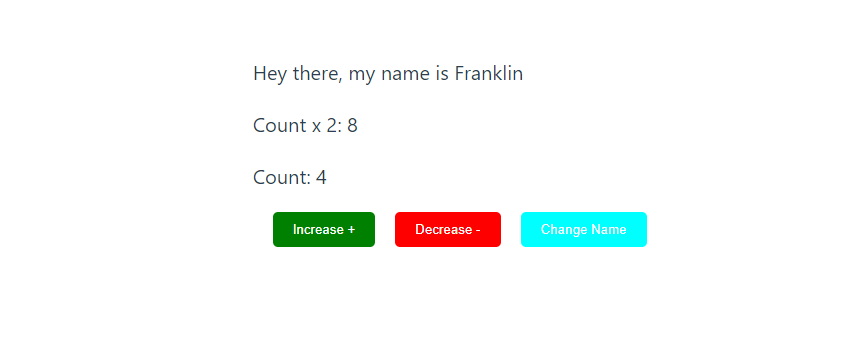
Now, let’s click the “Change Name” button to change the name.
With that, you’re now ready to use Pinia as you like.
Play with the sandbox to understand how state is managed by Pinia:
Conclusion
Congratulations on getting to this article’s end; we have learned what state management is, explored how Pinia differs from VueX, and how to install and set up a store in Pinia. We also looked at various examples of how to use Pinia. You can read more about Pinia in the official docs. I hope you found this article helpful and enjoyed it.
David is a front-end developer by day and a technical writer by night, who enjoys breaking down complex topics into comprehensible bits digestible to even 5-year-olds.