How to Configure Different Load Balancing Algorithms on Nginx

Low latency, high uptime, and good performance are required in today’s world of keeping users engaged with your application.
During times of high traffic, the overall performance of most web applications drops, the latency rises, and sometimes the request times out. This often happens when the server computing power is not enough to process the workload during this period of high traffic.
As a prerequisite, you only need a good understanding of basic web terminology like HTTP, servers, requests etc. We’ll start with learning about NGINX as a load balancer and the different load-balancing algorithms. From there, you will learn how to configure the different algorithms to best fit your particular use case, and the pros and cons of load balancing.
What is load balancing?
Take this system setup, for example:
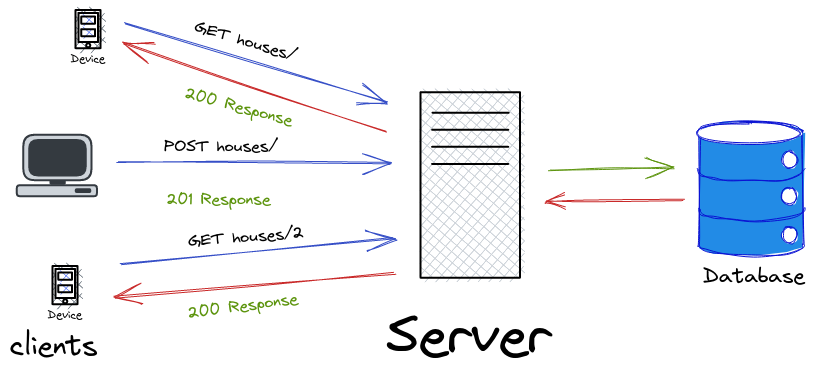
The system makes use of a single web server to process all web requests from the client. This single server can be overworked when it receives multiple concurrent requests beyond what it can process.
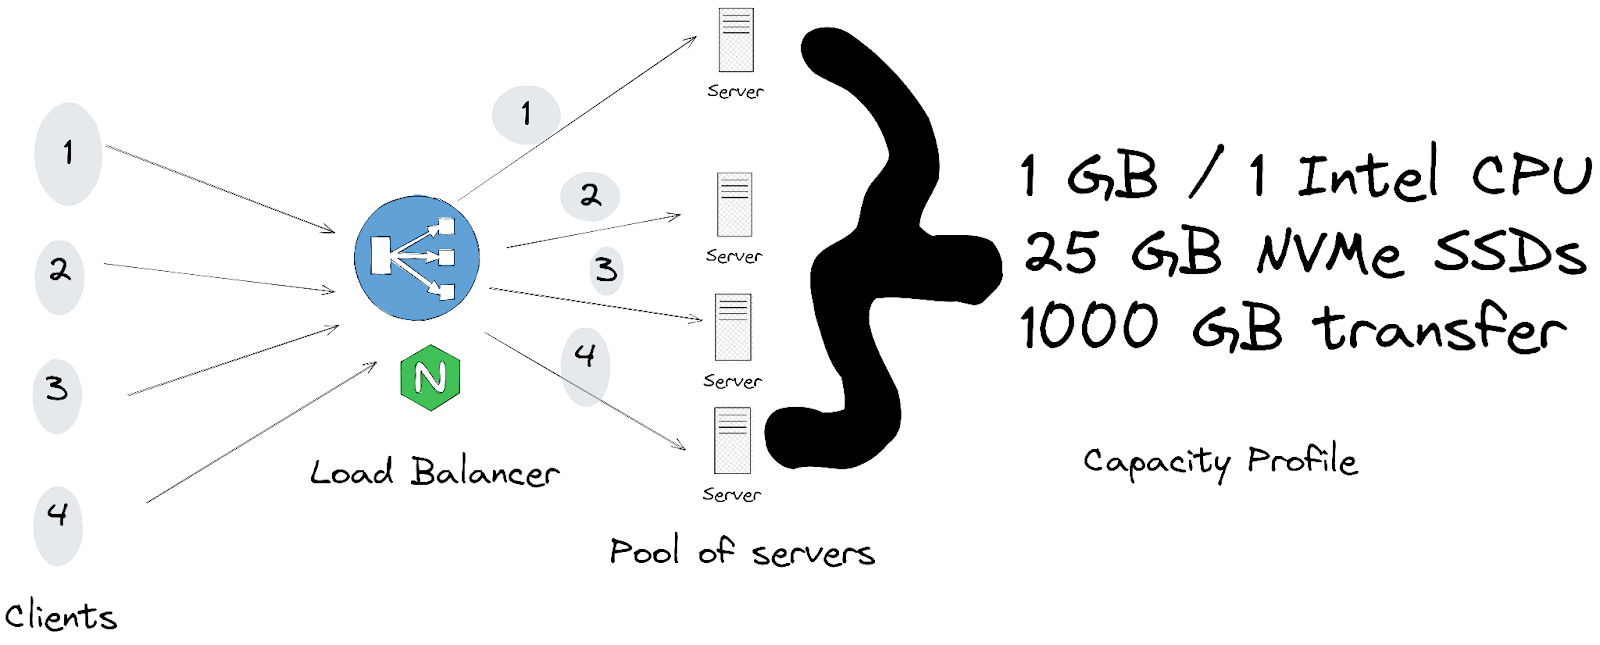
HTTP load balancing is a method that can be used to mitigate this. HTTP load balancing is a method where requests or workloads are distributed across multiple instances of a web server with the same or varying capacity profile to ensure that no single server is overworked. This optimizes resource utilization, provides fault tolerance, and improves the system’s overall performance.
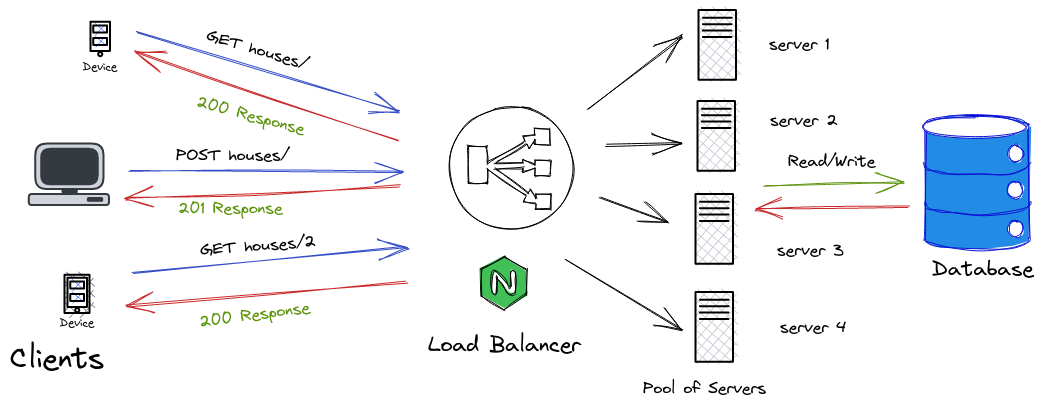
The load balancer acts as a proxy server that accepts the request from the client. This request is then distributed across the multiple servers in a fashion specified by the load balancing algorithm configured on the load balancer.
NGINX as a load balancer
NGINX is software that can be used as a web server, reverse proxy, HTTP cache, mail proxy, and load balancer. It has been adopted by several of the busiest websites — like Adobe and WordPress — for fast request processing and response delivery.
It is heavily used as a load balancer for high-traffic websites. If properly configured, it can serve more than 10 thousand concurrent requests with low memory usage.
The behavior of NGINX depends on the context and directives specified in the Nginx configuration file. Depending on the mode of installation, this configuration file can be in any of the following directories:
/etc/nginx/nginx.conf/usr/local/nginx/conf/nginx.conf/usr/local/etc/nginx/nginx.conf
Contexts, directives, and blocks
The Nginx configuration file has a tree-like structure defined by a set of commands ( statements ) and braces ( { } ). The statements are called directives which are either block directives or simple directives.
The simple directives have a name and a list of space-separated parameters. They are terminated by a semicolon:
directive_name parameter_1 parameter_n ;Code language: Nginx (nginx)The block directives end with a brace { } instead of a semicolon, and they can contain inner directives.
directive_name parameter_n{
      inner_directive parameters;
}Code language: Nginx (nginx)
These block directives with braces are called context. The inner directives are valid only within the context they are designed for.
The following contexts are relatively important in the discourse of Nginx as a load balancer.
The Main context
The main context is a global context containing directives that affect the whole application. The directives defined in this context include:
- The number of worker processes
- The location of the log file
- The process ID
Unlike other contexts, the main context doesn’t define an explicit block using braces. All directives with a global scope are regarded to be in the main context.
The Events context
Nginx uses an asynchronous event-driven approach, rather than threads, to handle requests. The events context contains the directives that define how Nginx processes requests.
Some of the directives that are specified in this context include:
- The number of connections per worker process
- The connection processing method to use
- Directive that decides whether a worker process will accept a new connection
The HTTP context
This context contains inner context and directives that determine how Nginx handles HTTP and HTTPS connections. When Nginx is configured as a load balancer, this context contains most of the directives and inner contexts that allow Nginx to act as a load balancer. Some of the directives defined in this context include:
- The default content type
- The proxy headers
- The server and upstream inner context
The Server context
This is an inner context in the HTTP context. It contains the directives for the virtual server that respond to a request. Some of the directives defined in this context include:
- The server name
- The server port to listen to
- The location inner context
The Location context
This is an inner context in the server context. It defines how Nginx responds to HTTP/HTTPS requests for a particular endpoint. You can specify custom headers, URL redirection, and request distribution to upstream servers.
The Upstream context
This is an inner context in the HTTP context. It defines a pool of servers that can be used for load balancing. When configured as a load balancer, Nginx accepts client requests, distributes them evenly among the multiple web servers specified in its upstream context. The fashion in which the loads are distributed among the upstream servers depends on the load-balancing algorithms.
Load balancing algorithm
The load balancing algorithm is a logical process that is configured on the load balancer that determines how it will distribute the client’s request among the upstream servers.
Generally, the load balancing algorithms can be classified into two types:
- Static load balancing algorithms
- Dynamic load balancing algorithms
Static load balancing algorithm
These algorithms do not take the current state of the servers — like the number of active connections, available resources, and computing power — into consideration while distributing the requests among the servers. They distribute the request in a preset fashion.
Types of static load balancing algorithms
The following are the different types of static load balancing algorithms:
- Round robin
- Weighted round robin
- IP hash
1. Round robin: In this algorithm, the load balancer circularly distributes the load without any consideration for the processing capacity, number of active connections, or available resources of the servers. This is the default load-balancing algorithm of Nginx.
2. Weighted round robin: This algorithm is similar to the round robin. However, the administrator can assign weight to each server based on their chosen criteria. The loads are distributed while considering the weight assigned to each server in the pool of servers. This algorithm is suitable when the upstream servers have varying capacity profiles.

3. IP hash: This algorithm hashes the IP address of the client sending the request with a hashing function and then sends the request to one of the servers for processing. Subsequent requests from the client’s IP address are always sent to the same server.
Dynamic load balancing algorithms
Dynamic load balancing algorithms consider the state of the server — like available resources and the number of active connections — before distributing the client’s request to the upstream servers. The server that will process the request is determined by the dynamic state of the servers.
Types of dynamic load balancing algorithms
Dynamic load balancing algorithms come in one of two types:
- Least connection
- Least time
1. Least connection: This algorithm distributes the client’s request to servers with the least active connections at a particular time. This will ensure that no one server is overworked while other servers have fewer active connections.
2. Least time: This algorithm distributes requests to the servers based on the average response time of the servers and the number of active connections on the server. This load-balancing algorithm is only supported by Nginx Plus.
Configurations
In this configuration exercise, we will:
- Spin up three local servers running on ports 8000, 8001, and 8002
- Configure the load balancing algorithm for different algorithms
- Balance the requests to the servers with the different algorithms we will configure.
- Spin up Nginx with docker.
We will create the servers with Python’s SimpleHTTPServer library.
Creating the servers
When you launch a server with the SimpleHTTPServer library:
- It loads up the
index.htmlfile in the directory in the browser if there is anindex.html. - If there is no
index.htmlfile, the server will display the file directory of the current working directory.
To show that the load balancing works, we will create three different index.html files with different contents indicating which servers are serving the request. To do this, we will create different folders for these servers. Each server folder will include an `index.html` file.
Create a directory and cd into it:
$ mkdir Nginx_Tuts

$ cd Nginx_Tuts
Create three different folders in this directory:
$ mkdir server_1 server_2 server_3Create an index.html file in each of these directories and add different contents in the html files.
In server_1 directory:
$ cd server_1

$ echo “<h1> Served with Server 1 </h1>” >> index.htmlCode language: HTML, XML (xml)
In the second directory:
$ cd server_2

$ echo “<h1> Served with Server 2 </h1>” >> index.htmlCode language: HTML, XML (xml)
In the third directory:
$ cd server_3

$ echo “<h1> Served with Server 3 </h1>” >> index.htmlCode language: HTML, XML (xml)
You should have a file structure as shown below:
Nginx_Tuts

├── server_1

│   └── index.html

├── server_2

│   └── index.html

└── server_3

    └── index.htmlCode language: CSS (css)
cd into each of these directories and start up the server on different ports:
$ cd server_1

$ python -m SimpleHTTPServer 8000
You will get the following output in the command line:
Serving HTTP on 0.0.0.0 port 8000 ...Code language: CSS (css)Do the same for the other servers also using “8001” and “8002” port numbers.
We have successfully spun up multiple local servers!
Static load balancing algorithms
We will create the nginx.conf file for each algorithm from scratch and only specify the context and directive we need in the configuration file. We will build an Nginx docker image with the configuration file we created.
Round-robin configuration
As discussed earlier, The default Nginx load balancing algorithm is round robin and this algorithm distributes requests to the upstream servers in a circular fashion.
Define the http and events context:
http {

}

events {

}Code language: Nginx (nginx)
Define a server inner context in the http context and specify the port 8080 that Nginx will listen to:
http{

   server {

       listen 8080;

   }

}

events {

}Code language: Nginx (nginx)
Add an upstream context in the http context that specifies the list of servers that we created earlier.
Name the upstream servers as ourservers so that we can identify this pool of servers with that name:
http {

   upstream ourservers {

       server localhost:8000;

       server localhost:8001;

       server localhost:8002;

   }

   server {

       listen 8080;

   }

}

events {

}Code language: Nginx (nginx)
Then:
- Add a location context in the server block that will process all requests sent to the base route
/ - Add a proxy_pass directive
- The proxy_pass directive will resolve and distribute requests sent to the base route location to the pool of upstream servers we added earlier.
http {

   upstream ourservers {

       server localhost:8000;

       server localhost:8001;

       server localhost:8002

   }

   server {

       listen 8080;

       location / {

           proxy_pass http://ourservers/;

               }

   }

}

events {

}Code language: Nginx (nginx)
With this configuration, all the requests sent to the base route / on localhost port 8080 will be proxied and passed to the server groups ourservers where the requests will be distributed in a round robin fashion among the servers that we specified in the upstream block.
We don’t need to specify any directive in the event context for our case, however, the context must still be declared.
Building the Nginx Docker image
Create a Dockerfile in the Nginx_Tuts directory and add the following:
FROM nginx:alpine

COPY nginx.conf /etc/nginx/nginx.conf
This will:
- Pull an alpine nginx docker image from the docker hub.
- Replace the configuration in the
/etc/nginx/nginx.confwith thenginx.conffile we created
Build a docker image from this docker file:
$ docker build -t loadbalancer .You should get the following output after a successful build:
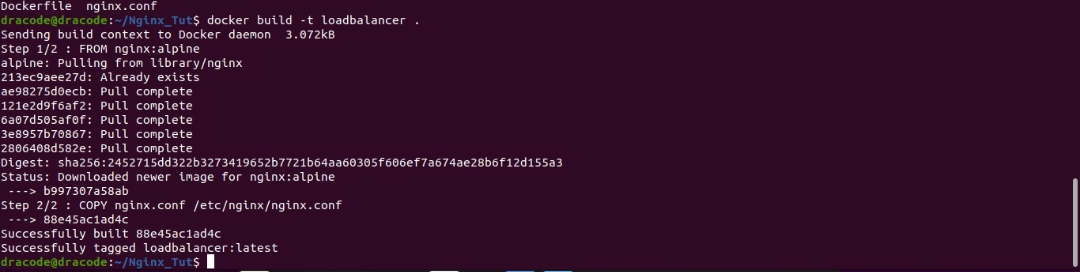
loadBalancer image is built with the docker command docker build -t loadbalancer .Run the Nginx container from the Docker image we just built:
$ docker run --net=host loadbalancer .The --net=host argument makes the container’s application available on port 80 on the host’s IP address.
You should get the following output from the command above:

loadbalancer image is run using the docker run command: docker run --net=host loadbalancer . The container is spun with a --net=host argument to make the container’s application available on port 8080 and the host’s IP address.Open your browser and send a request to http://127.0.0.1:8080, you should get the following output:
As we notice, from the video demonstration above, the servers were picked circularly.
Weighted round-robin
Weights can be assigned to the different servers that are configured in the upstream block directive, as discussed earlier. To configure this, we will simply assign a weight value to each of the servers in the pool of servers we had specified earlier:
http{

   upstream ourservers {

       server localhost:8000 weight=4;

       server localhost:8001 weight=2;

       server localhost:8002 weight=1;

   }

   server {

       listen 8080;

       location / {

           proxy_pass http://ourservers/;

               }

   }

}

events {

}Code language: Nginx (nginx)
With this configuration, the first server will process 4 times the requests that will be processed by the third server and 2 times the requests that will be processed by the second server. The second server will process 2 times the request that will be processed by the third server
Next, we will create a new Docker file and build a new Nginx image with this configuration file.
In the Dockerfile:
FROM nginx:alpine

COPY weighted-rr-nginx.conf /etc/nginx/nginx.conf
Build an nginx image from the dockerfile:
$ docker build -t wrr-loadbalancer .You should get the following output:

nginx image is built from the Dockerfile with the command docker build -t wrr-loadbalancer . Run a new container from the new Docker image you just created:
$ docker run --net=host wrr-loadbalancer .You should get the following output:

wrr-loadbalancer image is run using the docker run command: docker run --net=host wrr-loadbalancer . The container is spun with a --net=host argument to make the container’s application available on port 8080 and the host’s IP address.Open your browser and send a request to http://127.0.0.1:8080:
As you will notice in the video above, the requests are distributed to the servers based on the weight assigned to each server.
IP-hash configuration
This algorithm hashes the IP address of the client and makes sure every request from this client is served by the same server. When this server is unavailable, the request from this client will be served by another server.
To configure this, add an ip_hash directive in the upstream context:
http{

   upstream ourservers {

       ip_hash;

       server localhost:8000;

       server localhost:8001;

       server localhost:8002;

   }

   server {

       listen 8080;

       location / {

           proxy_pass http://ourservers/;

               }

   }

}

events {

}Code language: Nginx (nginx)
You can build and run a new Nginx image with this configuration.
When we navigate to the 127.0.0.1:8080 in the browser, the same server will keep serving the request from my IP address.
This is demonstrated in the video below:
Dynamic load balancing algorithms
Least connection configuration
In the least connection algorithm, the load balancer sends the client’s request to the server with the least number of active connections.
This can be configured by specifying the least_conn directive in the upstream context:
http{

   upstream ourservers {

       least_conn;

       server localhost:8000;

       server localhost:8001;

       server localhost:8002;

   }

   server {

       listen 8080;

       location / {

           proxy_pass http://ourservers/;

               }

   }

}

events {

}Code language: Nginx (nginx)
You can build and run a new Nginx image with this configuration.
The video illustration is shown below:
Least time configuration
With this configuration, Nginx distributes requests to the servers based on the average response time as well as the number of active connections. In addition, different weights can be assigned to these servers depending on the capacity profile of the servers. If weight is assigned to each server, The weight parameter will be considered alongside the average response time and the number of active connections.
This algorithm can be configured by adding a least_time directive to the upstream context.
The average response time of the servers is either based on the time to receive the response header or the response body. This is controlled by the header and last_byte parameters in the least_time directive. There is a third optional parameter called inflight that indicates whether the response time of all requests will be tracked or just the response time for successful requests.
The configuration below shows the least_time configuration that uses the average time of the response body to track the average response time.
http{

   upstream ourservers {

       least_time last_byte;

       server localhost:8000;

       server localhost:8001;

       server localhost:8002;

   }

   server {

       listen 8080;

       location / {

           proxy_pass http://ourservers/;

               }

   }

}

events {

}Code language: Nginx (nginx)
The video description below assumes all servers have the same number of active connections:
Pros and cons of load balancing
Pros
- Load balancing provides the requisite performance benefit that is needed for a high-traffic website. It does this by distributing the load evenly among the pool of servers.
- It also ensures high availability and fault tolerance in the system. The application can continue working normally in the event of failure of one of the upstream servers. Stand-by backup servers can be configured to replace failed servers.
Cons
- The load balancer can introduce a single point of failure to the system since it controls the client’s request delivery to the server. If it fails, it can bring down the whole system.
- It is not guaranteed that a single server will process the client’s request every time. This could lead to a loss of session. Additional configuration is required to maintain a persistent session between the client and server. Some of the load balancing algorithms — like IP Hash — solve this by ensuring that a particular server always processes a client’s request.
Conclusion
In this tutorial, we discussed:
- Nginx as a load balancer
- The static and dynamic load-balancing algorithms
- The Round Robin, Weighted Round Robin, and the IP Hash load balancing algorithms from the static type
- The Least connection and Least load-balancing algorithms
- We also configured these different types of algorithms as well as showed a video illustration of them.
- Lastly, we discussed some of the pros and cons of this technique.
The configuration and files used in this tutorial can be found in this GitHub repository.
Ahmad is a Software developer and technical writer focusing on backend technologies. He has an interest in optimization and scalability techniques. When he is not writing software, he is writing about how to build them. You can reach out to him on LinkedIn.