A Guide To API Rate Limiting In Django

Imagine you’re driving on a busy highway during rush hour. As you approach a bottleneck in the road, you start to slow down and eventually come to a complete stop. Suddenly, a car comes speeding up behind you and tries to squeeze into the small gap between you and the car in front of you. The driver behind you is trying to bypass the traffic and get ahead, but their reckless behavior could potentially cause an accident. This is similar to the concept of rate limiting in the digital world. Just like how a bottleneck on a highway limits the number of cars that can pass through at a given time, rate limiting in technology limits the number of requests a server can handle in a specific timeframe to prevent overwhelming traffic and potential crashes.
API rate limiting is one of the most effective practices for improving security and preventing large spikes in API request calls, which can degrade overall performance.
In this article, we will discuss rate limiting and why it is essential, different types of rate limiting, rate-limiting implementation methods, and how we can implement throttling in Django.
Objectives
By the end of this article, we should learn the following:
- Rate limiting and why it is important
- Different types of rate limiting
- Methods of implementing rate limiting
- How to implement rate limiting in Django
What is rate limiting and why is it important?
Rate limiting is a technique used to control or limit the distribution or flow of traffic on an API in order to keep it from becoming overloaded and underperforming. API owners typically impose some control over their APIs by limiting the number of requests in a given time frame to ensure that clients use their resources fairly. This avoids an unnecessary spike in its traffic and improves web service scalability.
When developing applications with many users, API rate limiting is essential. It limits bot attacks to APIs and prevents DoS attacks, in which a user launches many requests in seconds. Rate limiting can be used to ensure that API resources are not depleted and that legitimate users have proper access to the API.
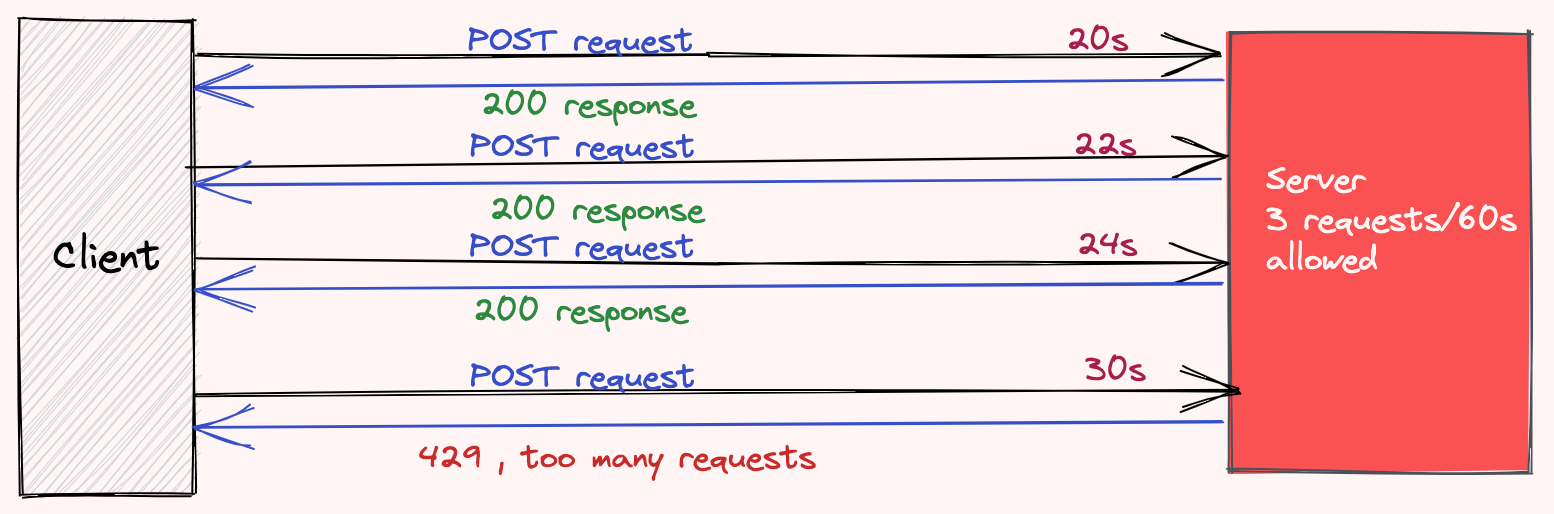
Rate limiting is measured in requests per second, or RPS, which means that we can, for example, configure our API to allow three requests per minute from a specific user. When the user exceeds the limit, the API returns a 429 status code error, which means “Too Many Requests,” to notify the user that they have sent too many requests in the allotted time frame.
Types Of rate limiting
Rate limiting can be used by defining different parameters based on the objectives and level of restriction desired. There are three major types of rate limiting, which we will go over in more detail below.
User rate limiting
This type of rate limiting detects the number of requests made by a specific user and limits the user based on the restrictions set by the API developer. Many organizations use it as the most common type of rate limiting. It typically monitors a user’s IP address or API key and blocks additional requests if the limit is exceeded within the time frame specified until the rate-limiting period resets.
Geographic-based rate limiting
This type of rate limiting limits the number of requests sent to the server from a specific region and location. This can be useful for reducing traffic spikes from a specific region, freeing up resources in the target regions.
Server rate limiting
If different servers handle different parts of an application, rate limiting can be configured at the server level. This method allows developers to increase the rate limit on frequently used servers while decreasing the traffic limit on less regularly used servers, giving them more flexibility.
Different methods of implementing rate limiting
Rate limiting can be implemented in various ways in an application. Below, we will go over some of the more general methods.
Using request queues
Request queues limit the number of requests sent to an API in a given time frame. It is one of the most commonly used rate-limiting techniques. Numerous request libraries are available for various programming languages that make it simple to set rate-limiting for our API while doing most of the hard work for us. Service services such as Amazon Simple Queue Service can handle request and message queues.
Throttling
Throttling is the process of putting the API into a temporary state to evaluate each request. A user may be disconnected or have a slower bandwidth when the throttle is triggered. It is a flexible rate-limiting method that can be applied at the user, API, or application level.
Rate limiting algorithms
There are several algorithms to use when implementing rate limiting in a system. We will be discussing some of them below:
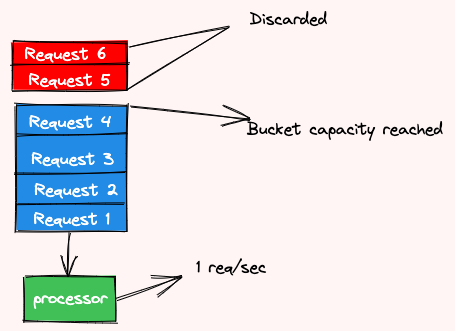
- Leaky Bucket: Leaky Bucket is a memory-efficient algorithm that queues and processes user requests using the FIFO (First In, First Out) method. It creates a queue with a specific capacity in a given time frame, processes each request in the queue in the order they arrive, and discards requests that arrive when the queue reaches its capacity in the given time frame. The leaky bucket algorithm makes it simple to regulate API requests and avoid traffic outbursts or spikes.
- Token Bucket: Token Bucket is an algorithm that tracks individual users and the number of requests they make in a given period to limit them based on the quota set by the developer. When a user makes a request, the bucket containing the number of tokens the user has in the given time frame is checked, and if there are enough tokens, the request is processed, and a token is removed from the bucket. When the bucket’s tokens are depleted, the incoming request is rejected until the rate limiter is reset.
- Fixed window: Each user’s requests are given a fixed time window of n seconds in this algorithm. When a user requests within a specific time frame, a counter is incremented to keep track of how many requests the user is making. When the counter reaches the maximum number of requests for each window, the requests are discarded and not processed.
- Sliding window: This algorithm is similar to the fixed window algorithm, but the individual requests for a timestamp are not saved in this case. The sliding window will keep timestamps and a counter for requests that occur at the same time. This aids in the management of bursts of requests that occur at the same time and saves memory space.
Implementing throttling in Django
Throttling is the same as permissions in the Django Rest Framework, as it determines whether a particular request should be authorized or discarded. It is used to rate-limit the number of API requests a client can make. Throttling is flexible in DRF, and multiple throttles can be implemented to control requests made by authenticated and anonymous users or to restrict resources based on different parts of the APIs.
Now let’s create an API and set some throttle policies.
Project setup
To get started, we will set up a new CoderPad Django sandbox. In the sandbox shell, install the djangorestframework library:
$ pip install djangorestframeworkWe then add the new app and rest_framework to the list of installed apps in settings.py and create a urls.py file for the app.
INSTALLED_APPS = [

    "django.contrib.admin",

    "django.contrib.auth",

    "django.contrib.contenttypes",

    "django.contrib.sessions",

    "django.contrib.messages",

    "django.contrib.staticfiles",

    "productApp",

    "rest_framework",

    "rest_framework.authtoken",

]Code language: Python (python)
We will be having two urls.py files, one will be included in the project’s directory while the other in the productApp folder. Let’s create a new urls.py in the app’s directory and include it in the project’s own.
from django.contrib import admin

from django.urls import path, include

urlpatterns = [

    path("admin/", admin.site.urls),

    path("products", include("productApp.urls"))

    ]Code language: Python (python)
In the app’s urls.py file, add the following code:
from django.urls import path

urlpatterns = [

]Code language: Python (python)
Creating models
With the project setup and routes pattern in place, let’s create a new model to add products to the database in the models.py file.
In models.py, add the following:
from django.db import models

class Product(models.Model):

    name = models.CharField(max_length=250)

    price = models.CharField(max_length=250)

    color = models.CharField(max_length=250)

    weight = models.CharField(max_length=250)Code language: Python (python)
In the code block above, we created a new class named Product by inheriting Django’s model class which lets us define the fields and behaviors of the data we are storing. We then created the class attributes named name, price, color, and weight which map as database columns in our table.
Now, let’s migrate our fields to the database. In the command line, we’ll write the following commands to migrate our table to the database.
$ python manage.py makemigrations

Migrations for 'productApp':

  productApp/migrations/0001_initial.py

    - Create model Product

$ python manage.py migrate

Operations to perform:

  Apply all migrations: admin, auth, authtoken, contenttypes, polls, productApp, sessions

Running migrations:

  Applying authtoken.0001_initial... OK

  Applying authtoken.0002_auto_20160226_1747... OK

  Applying authtoken.0003_tokenproxy... OK

  Applying productApp.0001_initial... OKCode language: JavaScript (javascript)
In the next section, we will be creating a serializer for our model data.
Creating serializers
Let’s create a new file serializers.py in the productApp directory and add the following code:
from rest_framework import serializers

from .models import Product

class ProductSerializer(serializers.ModelSerializer):

    class Meta:

        model = Product

        fields = ["id", "name", "price", "color", "weight"]Code language: Python (python)
In the code block above, we created a new class for our model serializer. We then added a Meta class, which lets us define the model we are creating a serializer for and specify the fields of the models we want to output. Serialization in the Django Rest Framework helps us convert model objects into more flexible data types like JSON, which are more understandable by JavaScript and frontend frameworks.
Now let’s head over to creating views and routes for our API.
Creating views and routes
In the previous sections, we created a model and serializer to format the output of our data properly. In this section, we will be creating a view for defining our API and a route.
In the views.py file in the app’s directory, add the following code:
from rest_framework.generics import CreateAPIView, ListAPIView, DestroyAPIView

from .models import Product

from .serializers import ProductSerializer

class CreateProduct(CreateAPIView):

    serializer_class = ProductSerializer

    queryset = Product.objects.all()

class GetProducts(ListAPIView):

    serializer_class = ProductSerializer

    queryset = Product.objects.all()

class DeleteProduct(DestroyAPIView):

    serializer_class = ProductSerializer

    queryset = Product.objects.all()Code language: Python (python)
In the code block above, we created views to create, get, and delete products using generic views in DRF. This lets us create basic CRUD (create, read, update, and delete) APIs to get and modify data in our database.
We then create the routes for our APIs in the app’s urls.py file.
from django.urls import path

from .views import CreateProduct, GetProducts, DeleteProduct

urlpatterns = [

    path("create", CreateProduct.as_view()),

    path("get", GetProducts.as_view()),

    path("delete", DeleteProduct.as_view()),

]Code language: Python (python)
In the code block above, we defined routes for our API views created earlier, which let us map to proper resources when requested on our browser.
Now let’s define some throttling policies for our API globally.
💡 The Django REST framework (DRF) provides several classes for implementing throttling in a Django application. These classes are located in the
rest_framework.throttlingmodule.
In the settings.py file, we will be adding some throttling classes that will tell Django to throttle our APIs according to the policies we set.
REST_FRAMEWORK = {

    'DEFAULT_THROTTLE_CLASSES': [

        'rest_framework.throttling.AnonRateThrottle',

        'rest_framework.throttling.UserRateThrottle'

    ],

    'DEFAULT_THROTTLE_RATES': {

        'anon': '2/min',

        'user': '4/min'

    }

}Code language: Python (python)
In the code block above, we defined some throttling classes named UserRateThrottle and AnonRateThrottle. The UserRateThrottle throttles the requests of authenticated users in the app by using the user ID to generate a unique key to throttle against, while the AnonRateThrottle throttles the requests of unconfirmed or unauthenticated users in the app by using the IP address to generate a unique key to throttle against.
The DEFAULT_THROTTLE_RATES sets the number of requests per period for each type of user. The period can be minute, second, hour, or day.
To test this, let’s try the create product endpoint and attempt to create a new product more than twice in the same minute. In the sandbox shell, execute the request:
curl --location --request POST 'http://0.0.0.0:3000/products/create' \

--header 'Content-Type: application/json' \

--data-raw '{

    "name": "Foodco",

    "price": "3000",

    "color": "blue",

    "weight": "32kg"

}'Code language: Python (python)
In the code block above, we made a request to create a product.
When we try the create product endpoint for the third time in the same minute, we will get a 429 too many requests error code and the response shown below.
{"detail":"Request was throttled. Expected available in 58 seconds."}Code language: JSON / JSON with Comments (json)The throttle classes can also be defined on each view. For example, we can rewrite the CreateProduct view and specify the throttle class.
from rest_framework.throttling import UserRateThrottle

class CreateProduct(CreateAPIView):

    throttle_classes = [UserRateThrottle]

    serializer_class = ProductSerializer

    queryset = Product.objects.all()Code language: Python (python)
In the code above, we defined the throttle class on the CreateProduct view by adding it as an attribute.
Multiple user rate throttle
We may want to set different throttling policies for an API. To accomplish this, we define multiple user rate throttles for users by overriding the default throttle class and adding a scope value that will be used to identify them when defining the throttle rate.
Let’s create a new file in the app’s directory named throttles.py.
In throttles.py, let’s add the following code:
from rest_framework.throttling import UserRateThrottle

class HighRateThrottle(UserRateThrottle):

    scope = 'high'

class LowRateThrottle(UserRateThrottle):

    scope = 'low'Code language: Python (python)
We will change the settings.py file to the new throttle classes defined:
REST_FRAMEWORK = {

    'DEFAULT_THROTTLE_CLASSES': [

        'productApp.throttles.HighRateThrottle',

        'productApp.throttles.LowRateThrottle',

    ],

    'DEFAULT_THROTTLE_RATES': {

        'high': '30/minute',

        'low': '4/minute'

    }

}Code language: Python (python)
In the code block above, we override the UserRateThrottle class and define two new throttles to handle requests based on the policies set. The high-rate throttle will handle more requests in a minute than the low-rate throttle.
Scoped rate throttle
We may want to limit access to some APIs while increasing access to others. This is accomplished by setting the default throttle class to ScopedRateThrottle and including a ‘throttle scope’ property in our view.
For example, let’s override our throttle settings in the settings.py file.
REST_FRAMEWORK = {

    'DEFAULT_THROTTLE_CLASSES': [

        "rest_framework.throttling.ScopedRateThrottle"

    ],

    'DEFAULT_THROTTLE_RATES': {

        'high': '30/day’,

        'low': '4/day'

    }

}Code language: PHP (php)
Then, in our view, we define the throttle scope for each view:
from rest_framework.generics import CreateAPIView, ListAPIView, DestroyAPIView

from .models import Product

from .serializers import ProductSerializer

class CreateProduct(CreateAPIView):

    throttle_scope = "low"

    serializer_class = ProductSerializer

    queryset = Product.objects.all()

class GetProducts(ListAPIView):

    throttle_scope = "high"

    serializer_class = ProductSerializer

    queryset = Product.objects.all()

class DeleteProduct(DestroyAPIView):

    throttle_scope = "low"

    serializer_class = ProductSerializer

    queryset = Product.objects.all()Code language: Python (python)
We defined a throttle_scope in the code block above for each view. The user requests on the endpoint to create and delete products will be restricted to 4 per day, while the user requests to get products will be as high as 30 per day.
Test the request rate limiter built in this article in the sandbox below:
Conclusion
In this article, we have discussed rate limiting and why it is essential. We also discussed the different types of rate limiting, which include user rate limiting, geographic-based rate limiting, and server rate limiting. We then discussed how to implement rate limiting using various methods, including throttling, request queues, and different rate-limiting algorithms. In the last part of the article, we created an API in the Django Rest Framework and explained how to set throttling on the APIs using different throttling classes, giving us a better understanding of how rate limiting works and how we can use it in Django Rest Framework APIs.
Ubaydah is a backend developer experienced in building APIs and writing documentation. She loves sharing technical knowledge in form of articles to educate others.