✅ Only Enterprise plans support SSO integration. If you’d like to upgrade your plan to enable SSO, please reach out to our sales team.
CoderPad supports SSO integrations using the SAML protocol with Okta, Microsoft Azure, and Google Workspace. SSO can also be combined with User Provisioning through the SCIM protocol.
Prerequisites for activating SSO on your CoderPad account:
You must have admin rights for your CoderPad Interview account.
You must have identified the proper person at your end who will be able to implement the required configuration changes on your SSO provider account, i.e. your system administrator.
✅ Account-wide failure to login may occur for your users during the configuration process. Reversing the SSO activation on the account can be done at any time if the configuration fails.
ℹ️ At any time, even when the SSO configuration is active, it is possible for an admin to log into the account using email and password credentials as long as the option to enforce SSO is not active
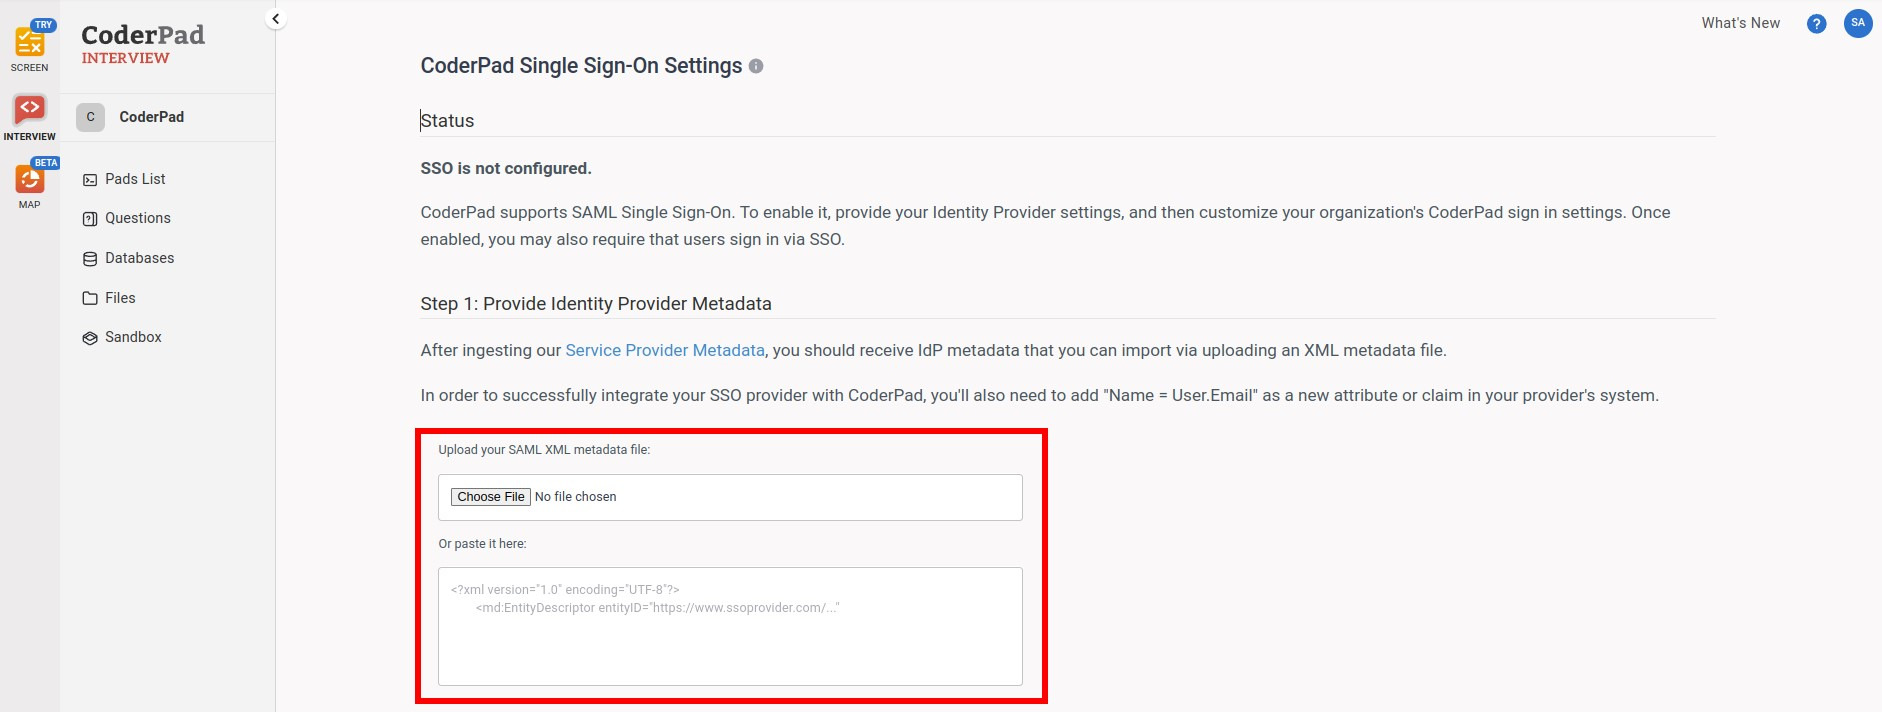
Step 1: Obtain SSO configuration values from CoderPad
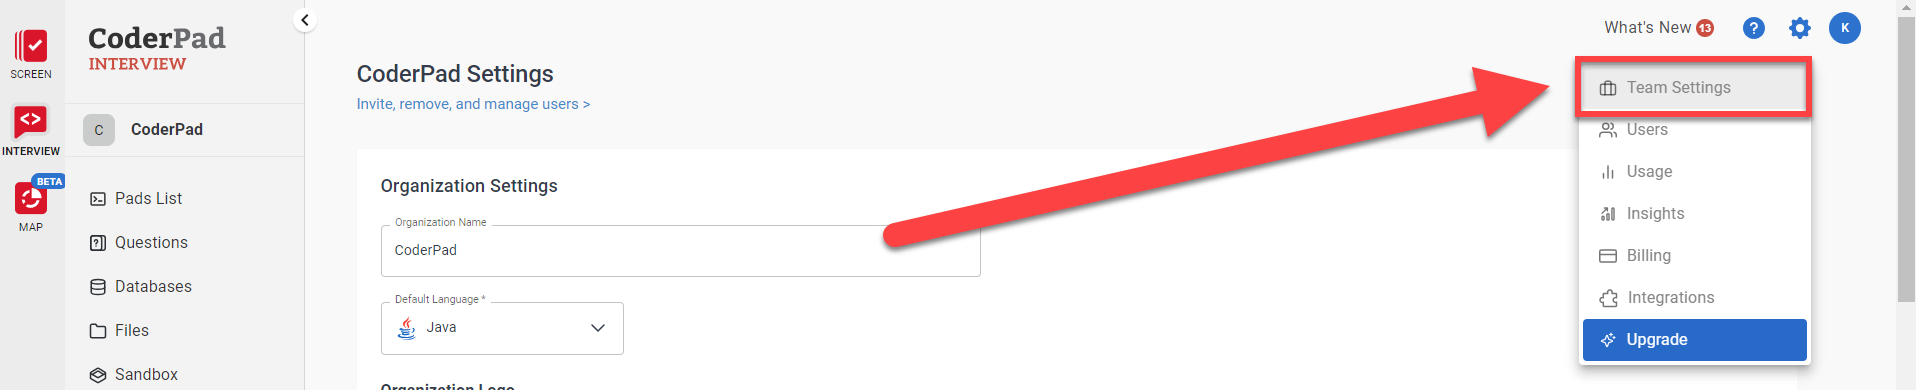
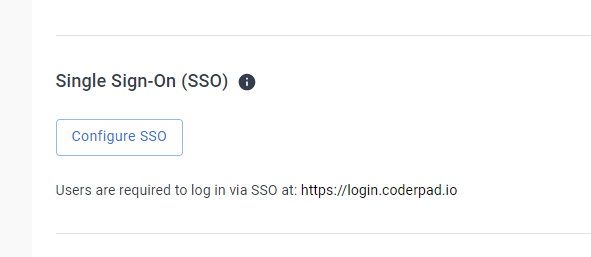
To obtain the SSO values you’ll need to give to your SSO provider, you’ll first need to navigate to the Team Settings screen in CoderPad Interview by clicking on that option in the settings menu .
Then, scroll down to the Single Sign-On (SSO) section and click on Configure SSO.
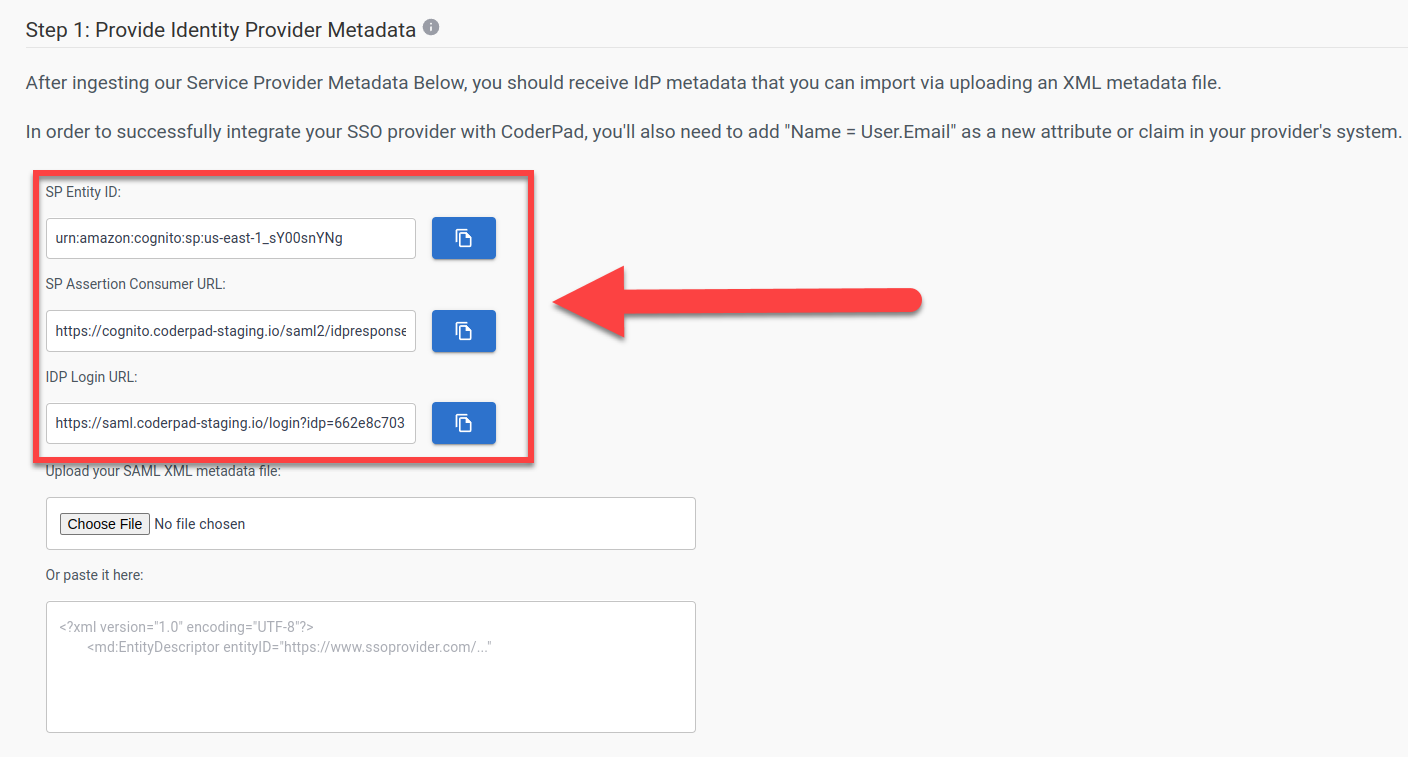
This will open up the SSO configuration screen. In Step 1: Provide Identity Provider Metadata you’ll see the three values you’ll need for your SSO provider:
SP Entity ID
SP Assertion Consumer URL
IDP Login URL
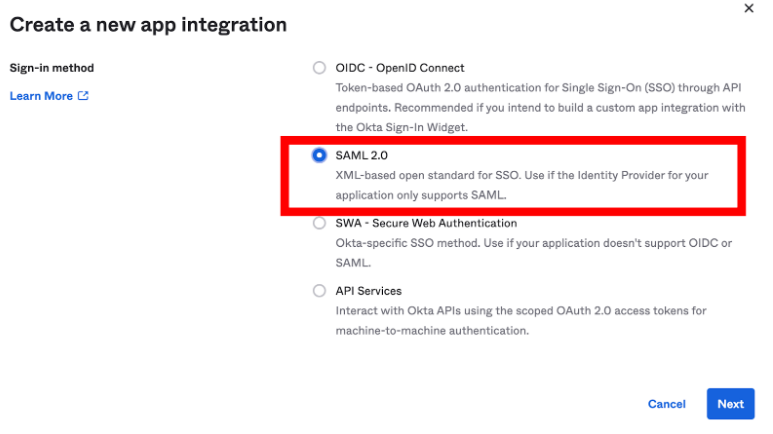
Step 2: Configure SSO Provider
We currently support the following SSO providers. Click on the provider link for instructions on how set up integration with CoderPad:
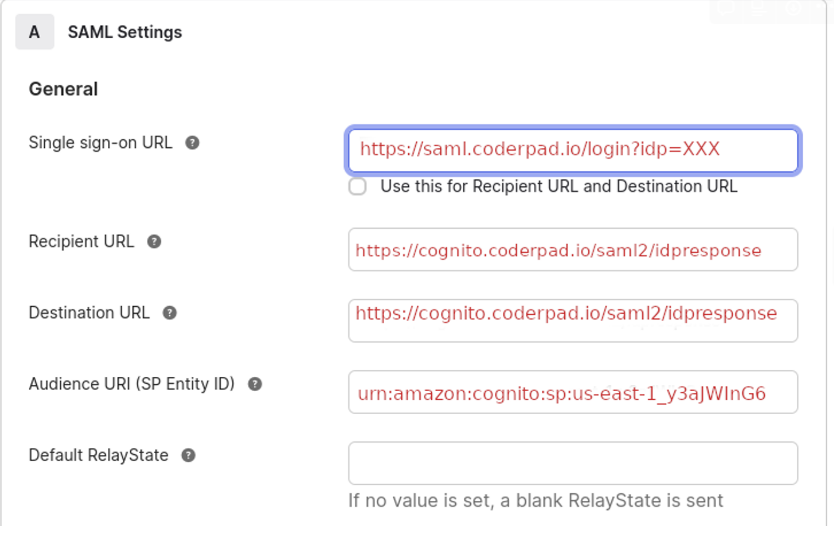
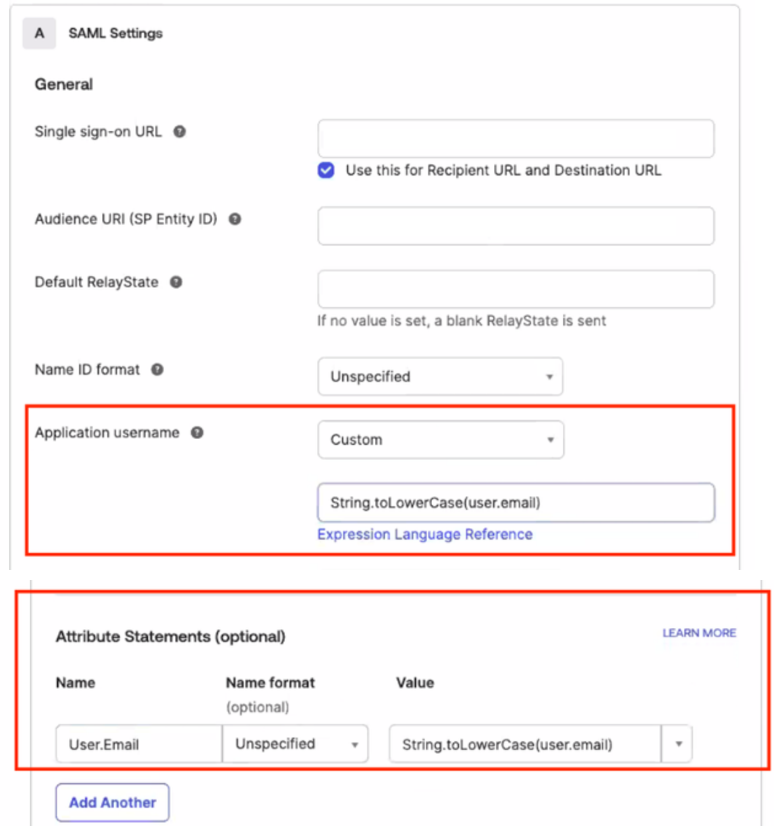
Uncheck Use this for Recipient URL and Destination URL
Recipient URL = SP Assertion Consumer URL
Destination URL = SP Assertion Consumer URL
The resulting SAML settings should look like this:
For the other fields, use these values:
Name ID format = Unspecified
Application username = Email
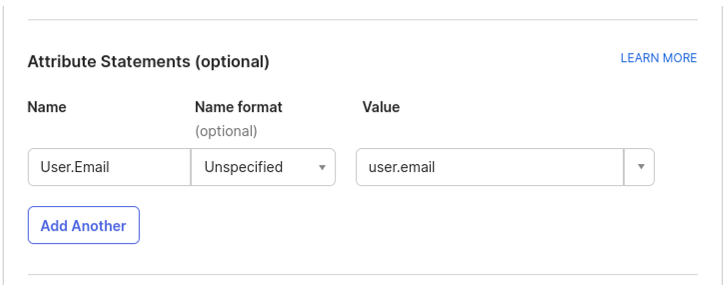
5. Add the attribute statements (the SAML won’t work without them):
Name = User.Email
Value = user.email
⚠️ When user.email contains uppercase (even just first letter capitalization) letters, CoderPad won’t be able to match the user so it will end up in an login error. To solve this issue, please review and follow this document from OKTA Support.
This knowledge base article demonstrates how to convert Okta usernames to all lowercase characters when assigning users to an application. The provided solution leverages the Okta Expression Language to create a custom application username format.
6. Next, you’ll need to obtain the Identity provider metadata file from Okta. In the Sign On tab of the Application, copy or download the Identity Provider metadata file.
7. Back on the CoderPad SSO Settings page, upload or paste the file into the respective input box.
7. Test the configuration: Ask one of your users to login through SSO to check that it is working before proceeding to the user provisioning steps.
Adding SCIM User Provisioning
Once SSO has been activated, User Provisioning can be turned on using the SCIM protocol:
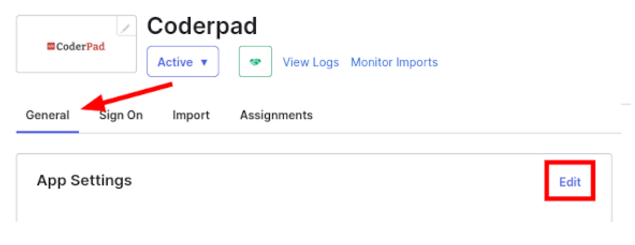
1. In Okta, select the CoderPad application then General > App Settings > Edit.
2. Then under Provisioning select SCIM and click Save.
3. From the new Provisioning tab, click on Edit in the SCIM Connection section.
4. Enter in the following configurations:
SCIM connector base URL = SCIM URL
Unique identifier field for users = email
Supported provisioning actions = Select all the options
The Test Connector Configuration action should be successful at this point.
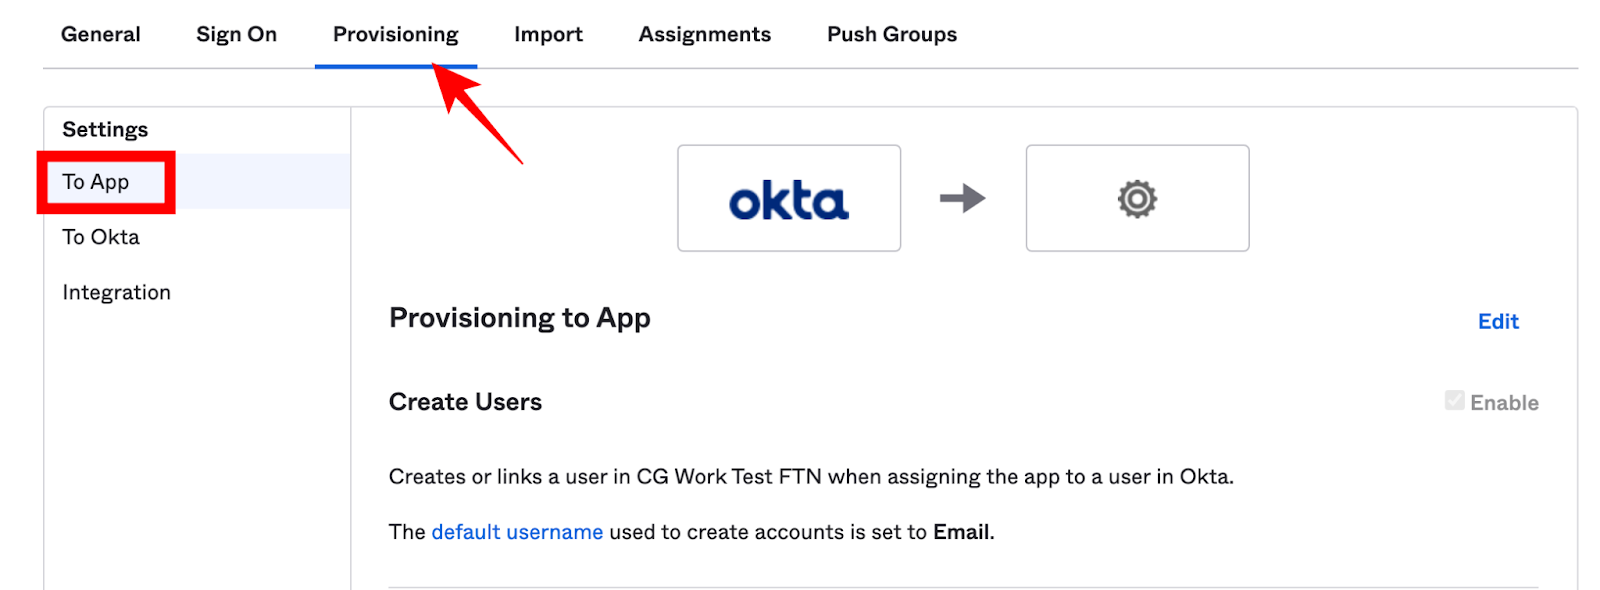
5. Edit the provisioning. Navigate to Provisioning > Settings > To App and select Edit:
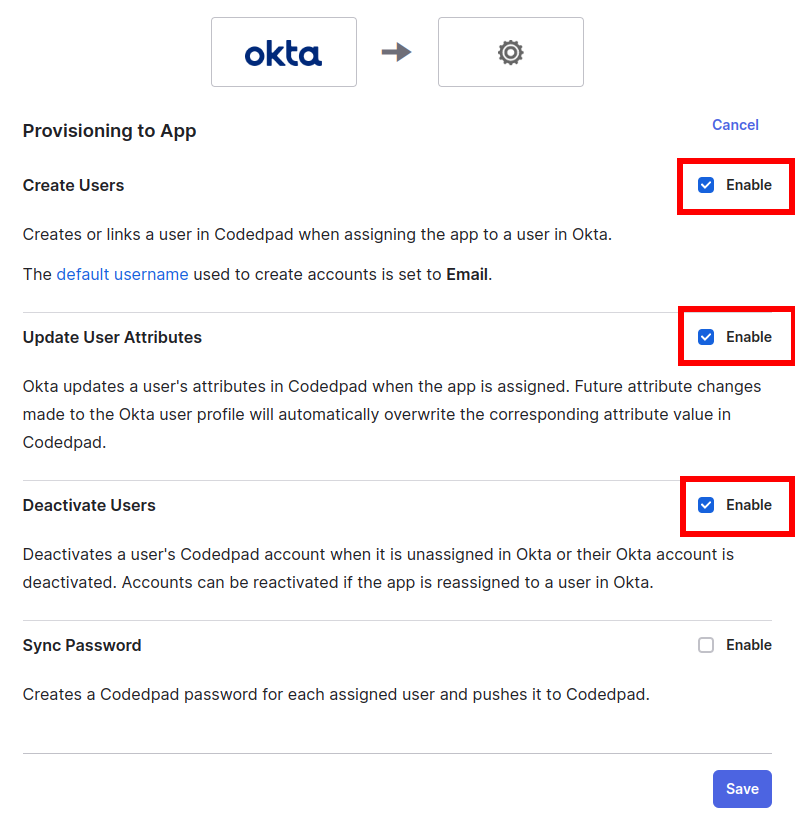
6. Check Create Users, Update User Attributes, Deactivate Users.
7. Click Save.
8. Go to the Push Groups tab of the App
9. Click Push groups >Find groups by name
✅It is recommended to select all groups assigned to the Okta App
10. Click Save.
11. SCIM provisioned users will automatically have user rights but not admin rights. To manage permissions through SCIM please create different groups and let our support team know which group should have which permissions(Admin or Member); otherwise your CoderPad users may not have the appropriate access.
12. From now on users added to your groups will be automatically created in CoderPad with the proper set of permissions.
✅ After you assign new users with SCIM:
Have them connect through your company’s Okta tile first.
They will then receive an email with a link where they will need to click to verify their email address.
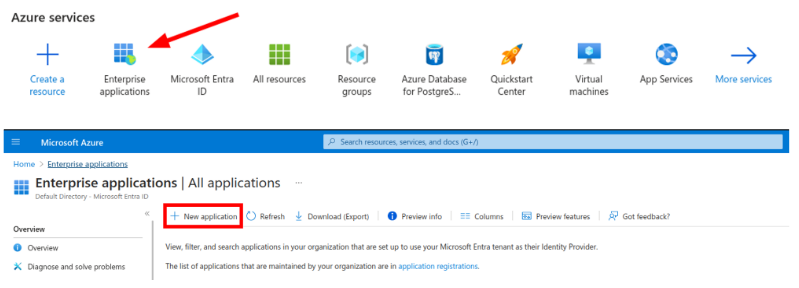
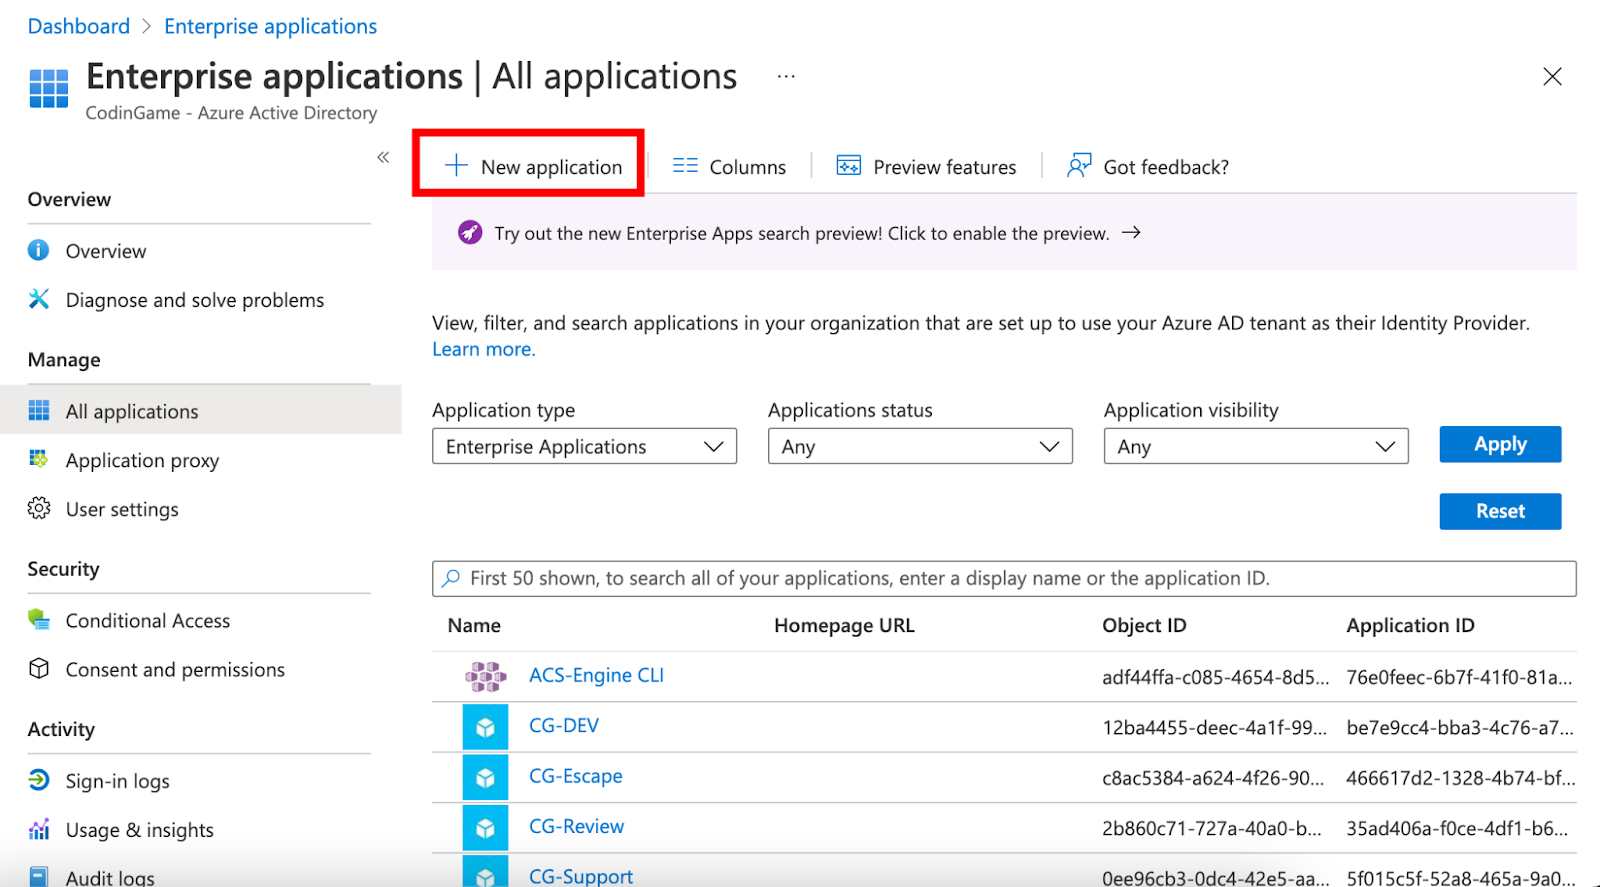
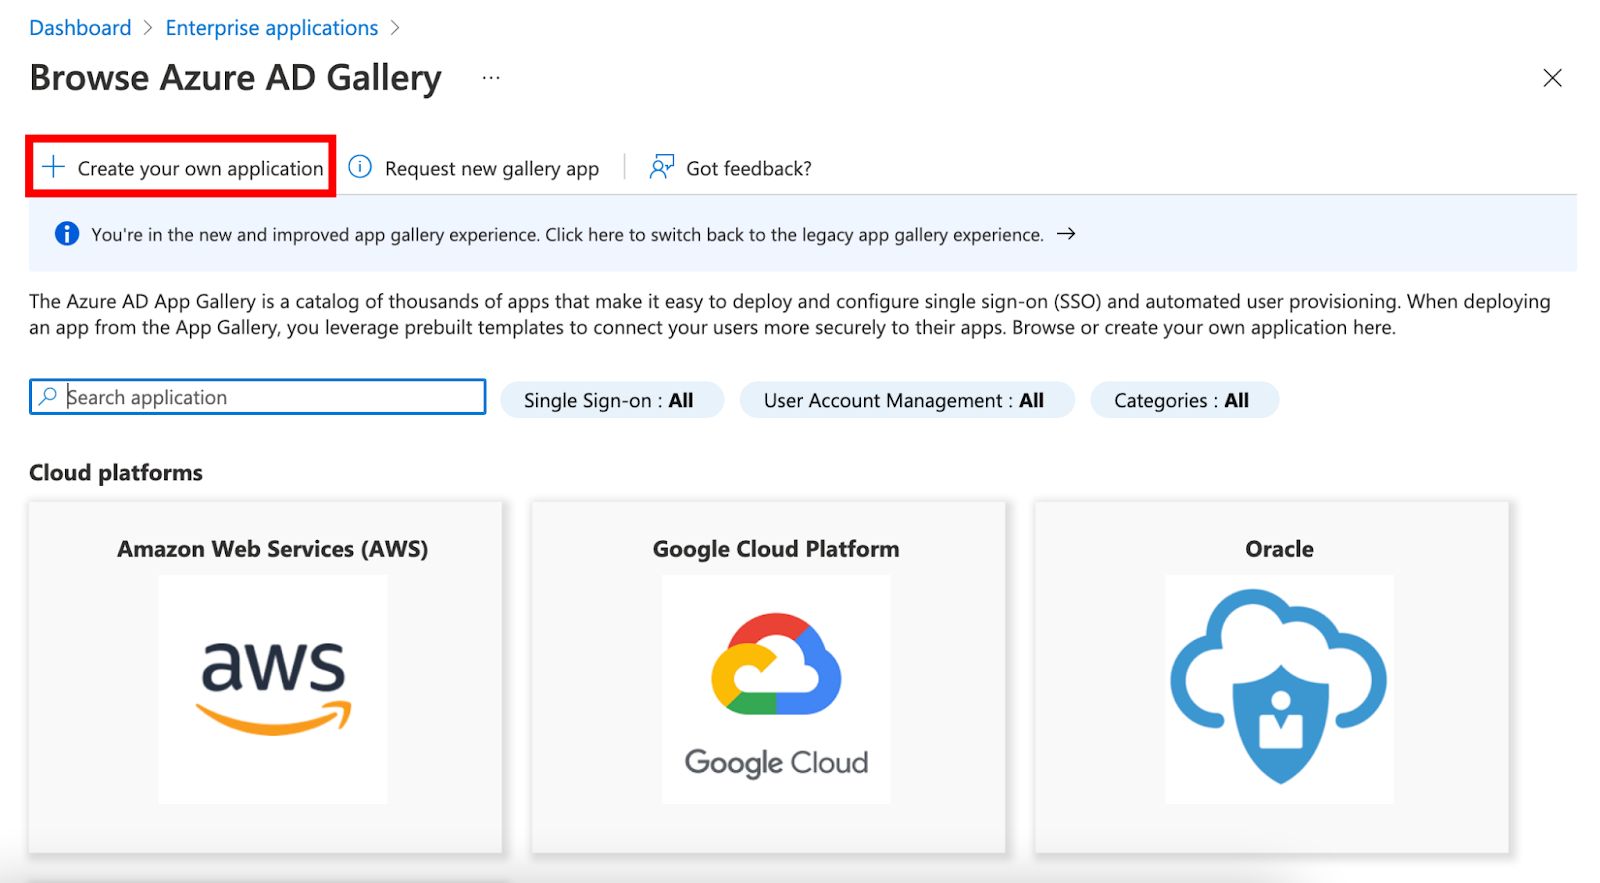
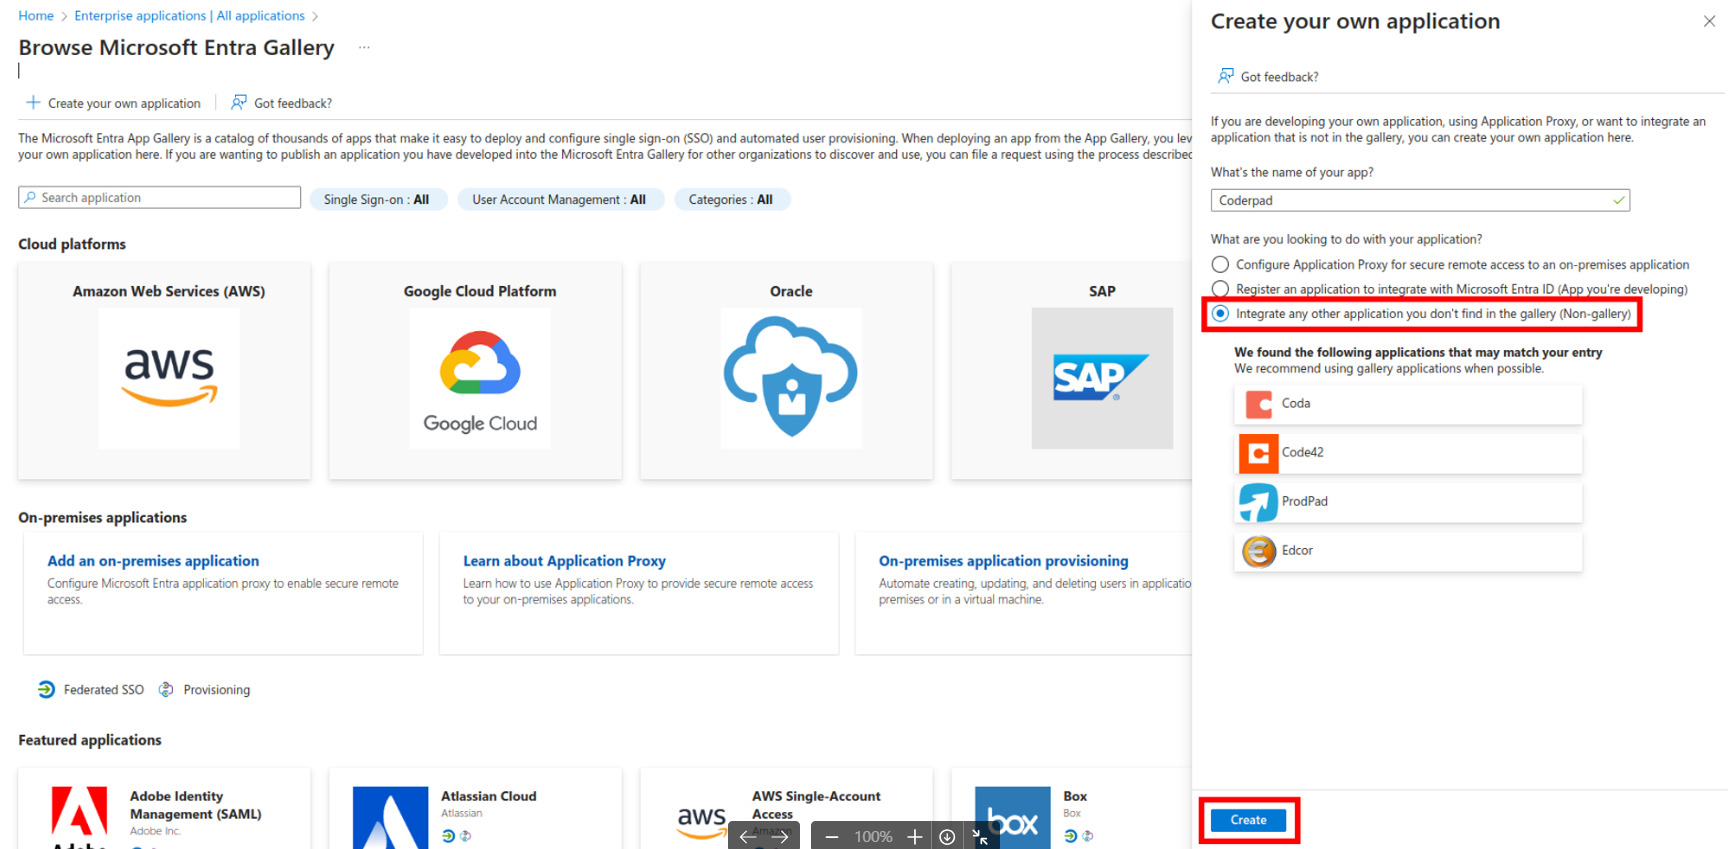
1. Configure an Enterprise application in Azure AD corresponding to CoderPad by clicking Enterprise applications > + New application > + Create your own applications.
❗Do not use the Microsoft Entra SAML Toolkit application — it doesn’t allow for SCIM configuration.
2. Enter Coderpad as the name of your app, select the Integrate any other application you don’t find in the gallery (Non-gallery) option, and click Create.
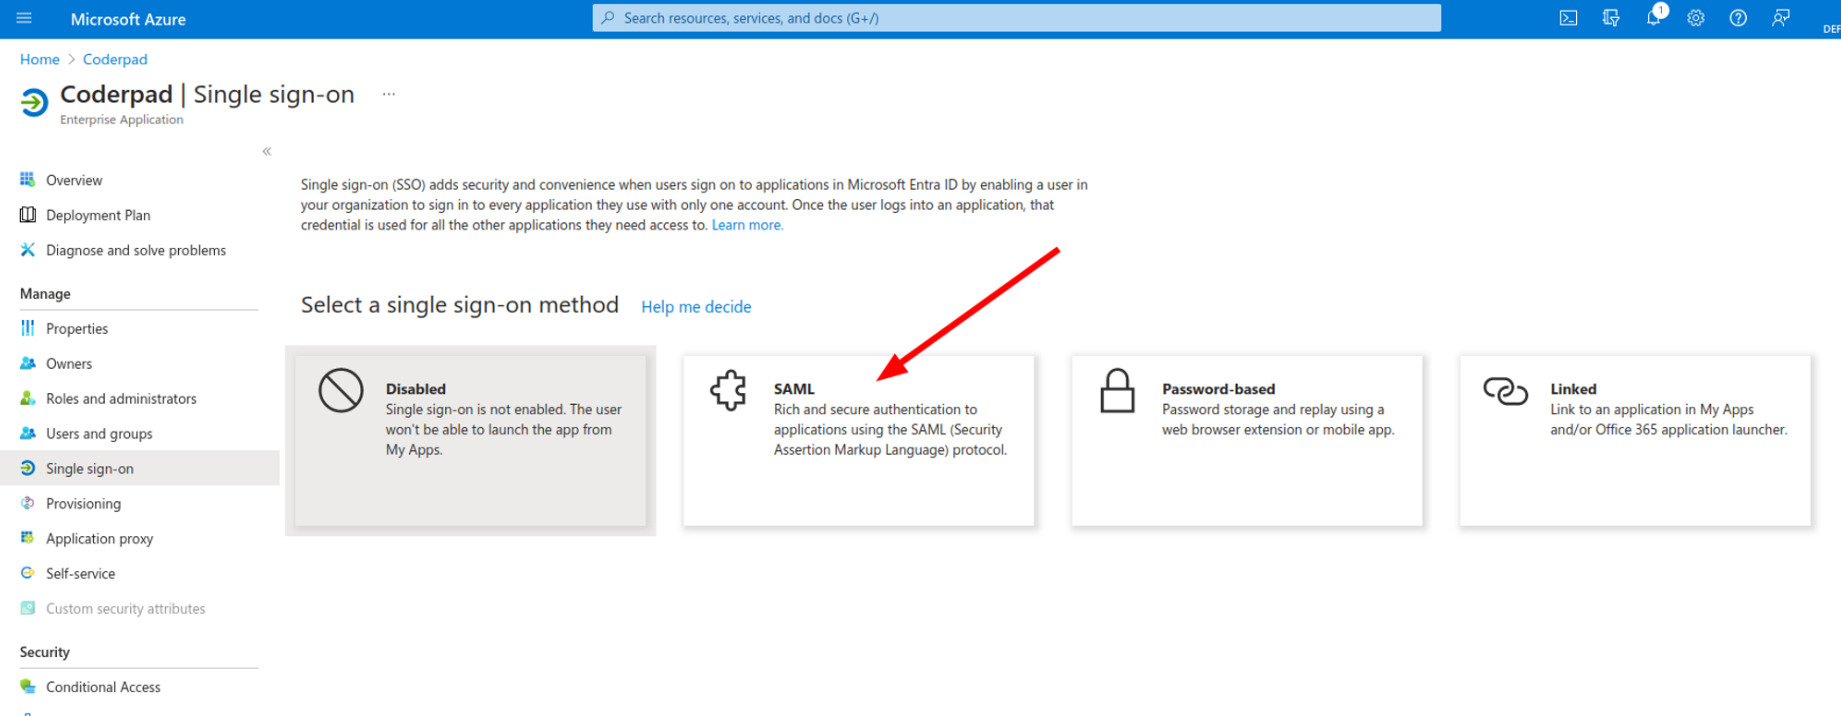
3. Select Single sign-on in the left navigation menu, and then SAML card from the gallery in the center.
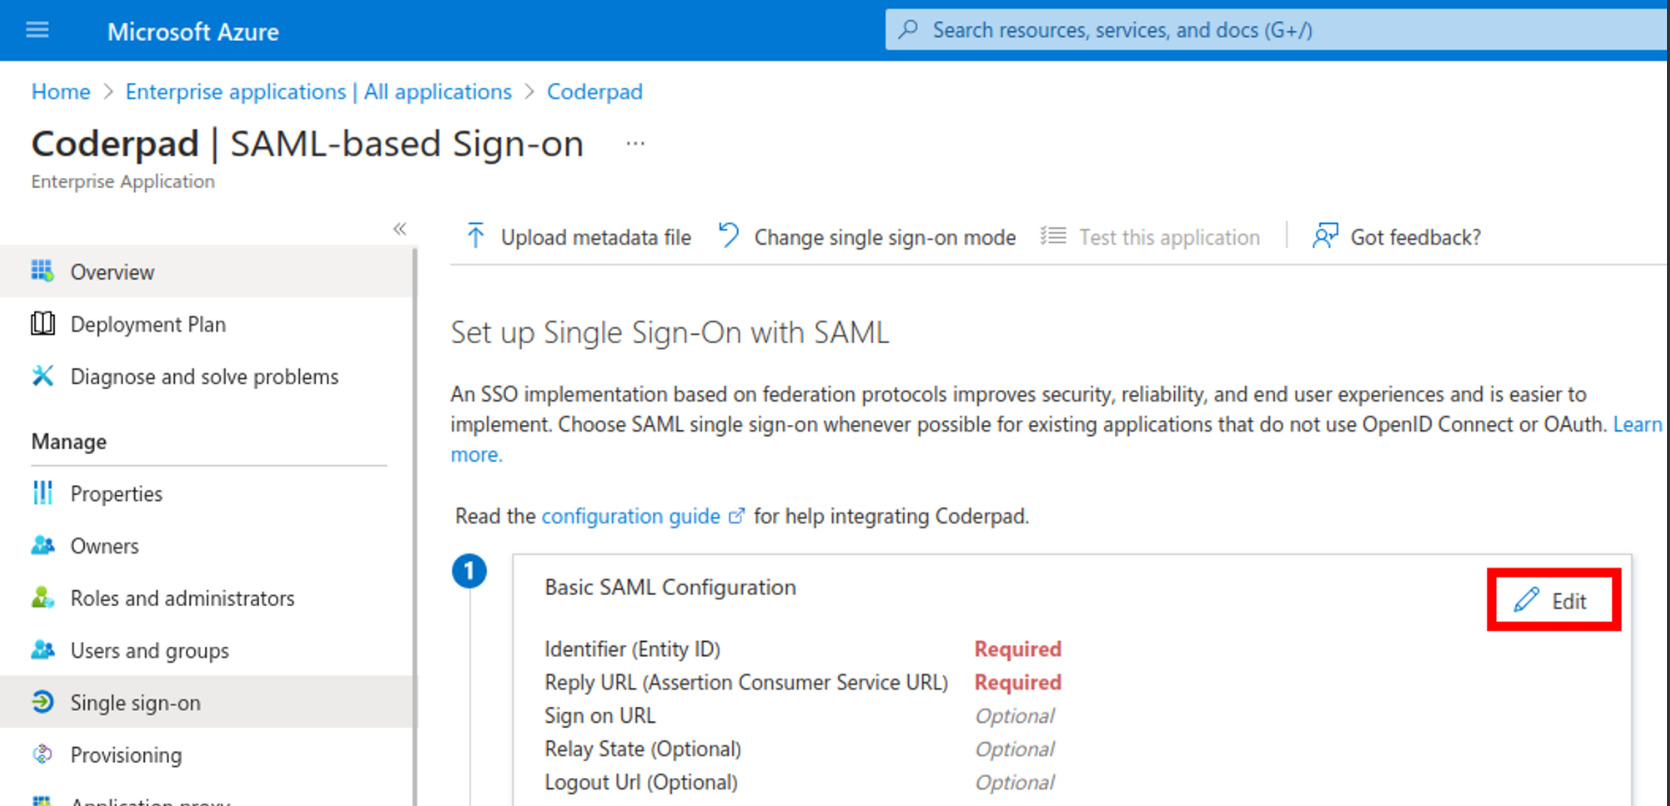
4. Click Edit on the Basic SAML Configurationsection.
5. Enter in the following information:
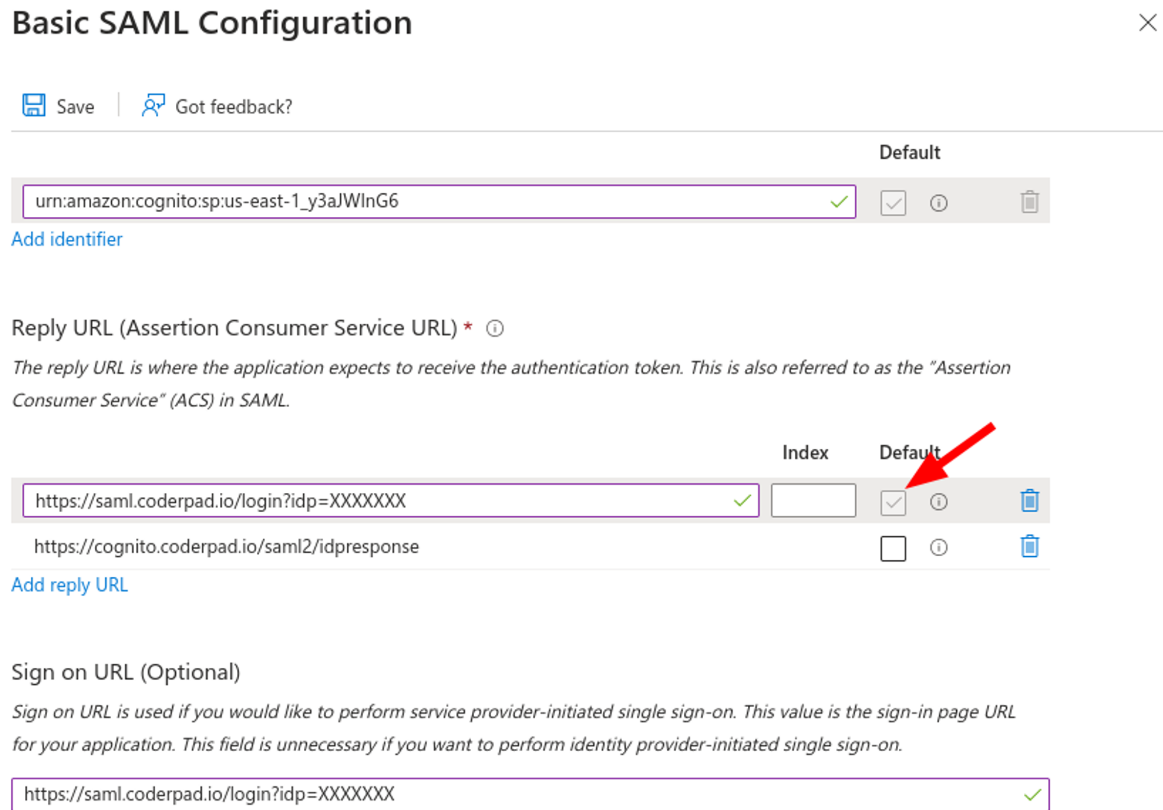
Identifier (Entity ID) = SP Entity ID
Add 2 Reply URL (Assertion Consumer Service URL):
IDP Login URL — make sure that the IDP Login URL Default box is checked!
SP Assertion Consumer URL
Sign on URL = IDP Login URL
Save the configuration. Here is what it should look like:
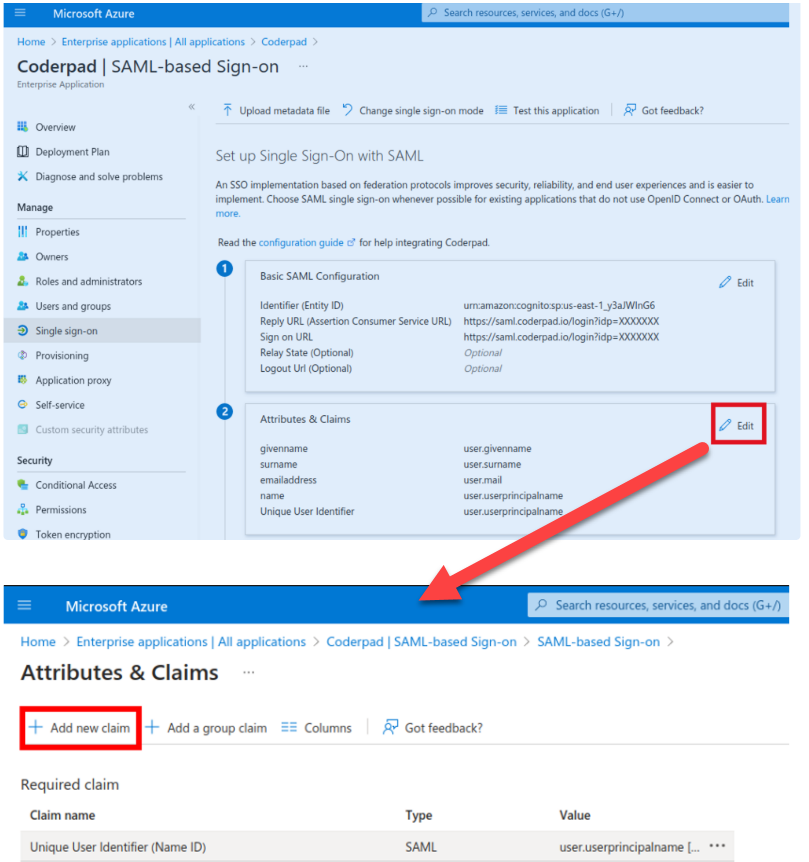
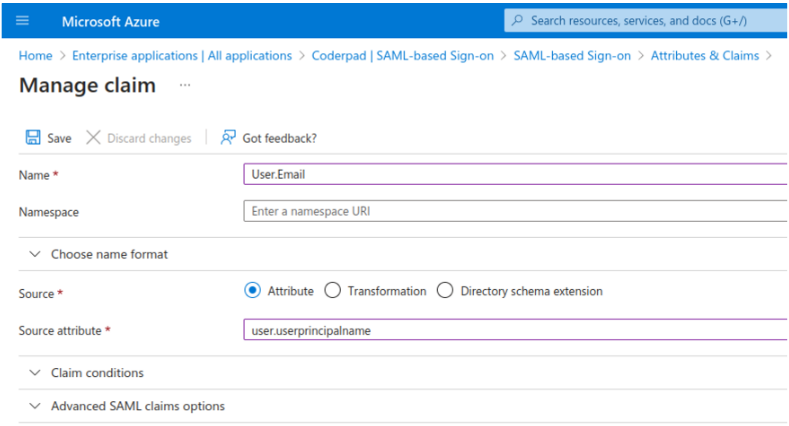
6. Back on the SAML-based Sign-on page, click Edit on the Attributes & Claims section, and then select +Add new claim.
Add the following in the Manage claim screen:
Name: User.Email
Source Attribute: user.userprincipalname
✅ We expect that this field is filled with the exact same email as the one in CoderPad. If for some reasons that’s not the case, use another field that should correspond to the email in CoderPad (case sensitive).
Leave the other fields as-is, then click Save.
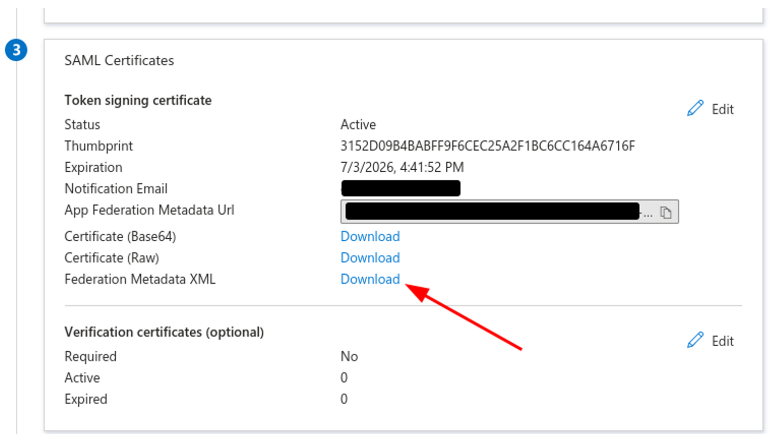
7. On the SAML Certificates section, download the Federation Metadata XML file.
8. Back on the CoderPad SSO Settings page, upload or paste the file into the respective input box.
9. Test the configuration: Ask one of your users to login through SSO to check that it is working before proceeding to the user provisioning steps.
Adding SCIM User Provisioning
Once SSO has been activated, User Provisioning can be turned on using the SCIM protocol:
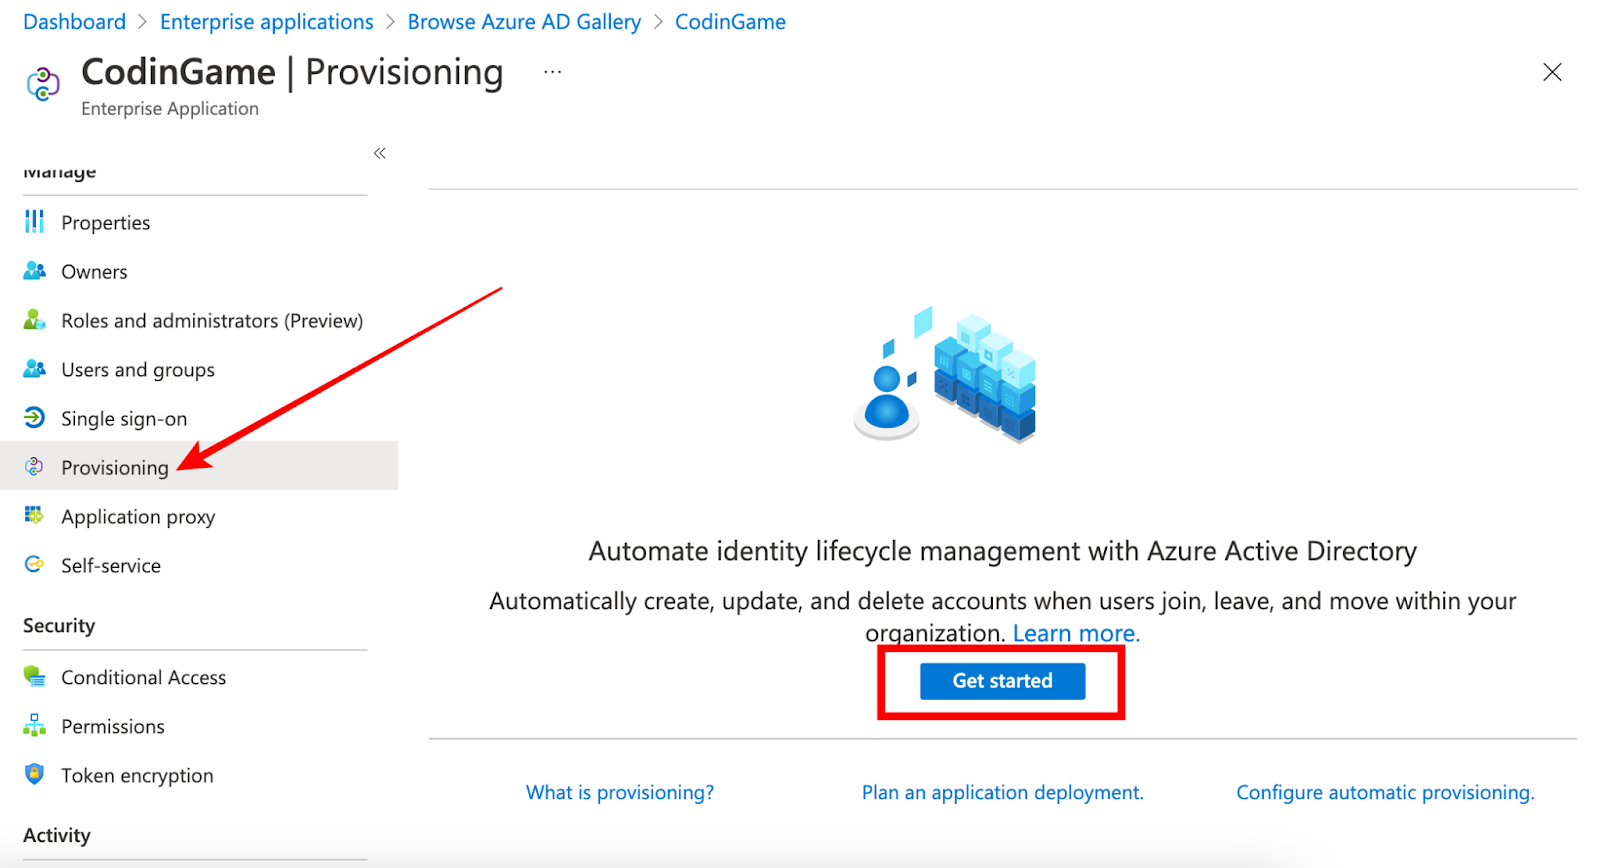
1. From the Azure AD application, select Provisioning and then Get started:
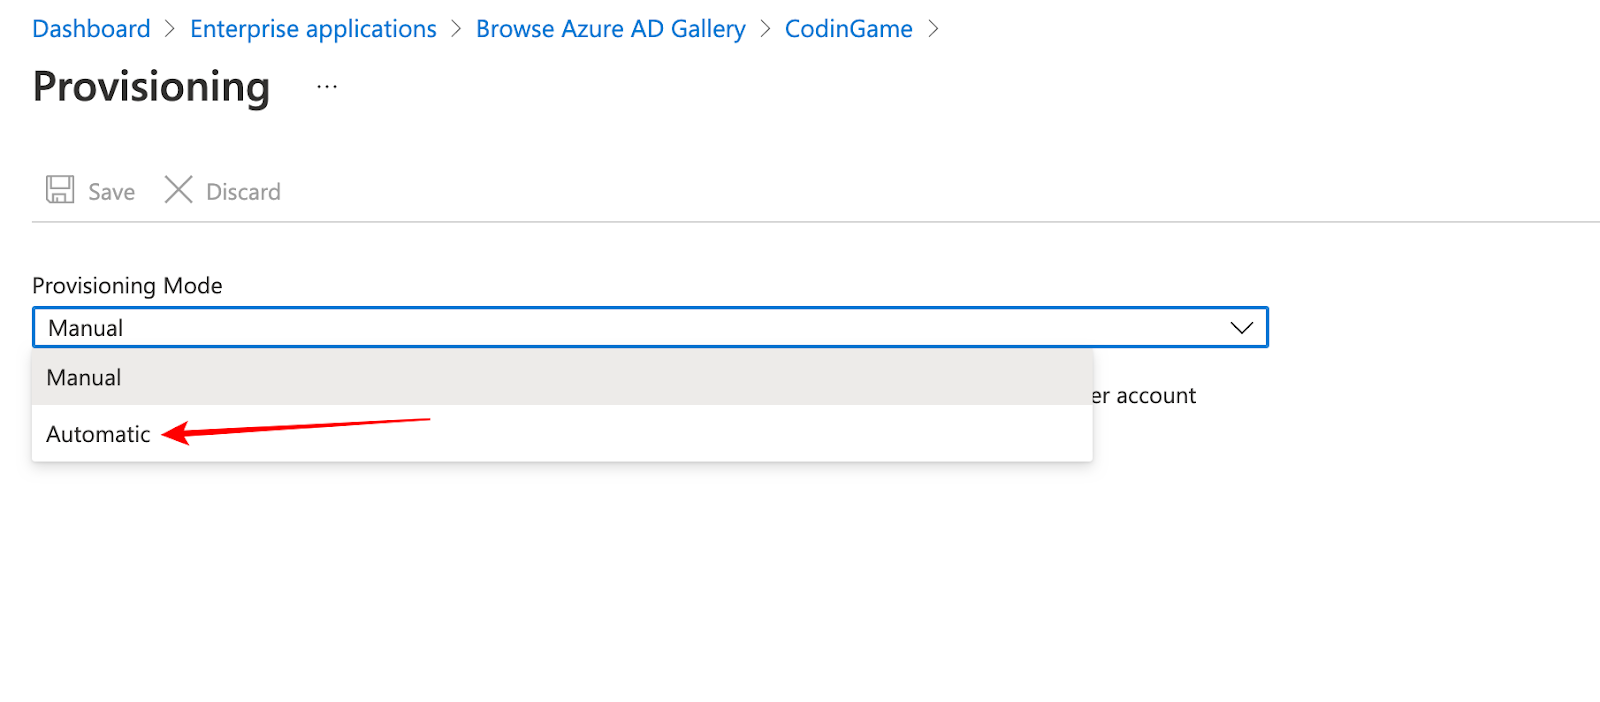
2. Select Automatic provisioning mode
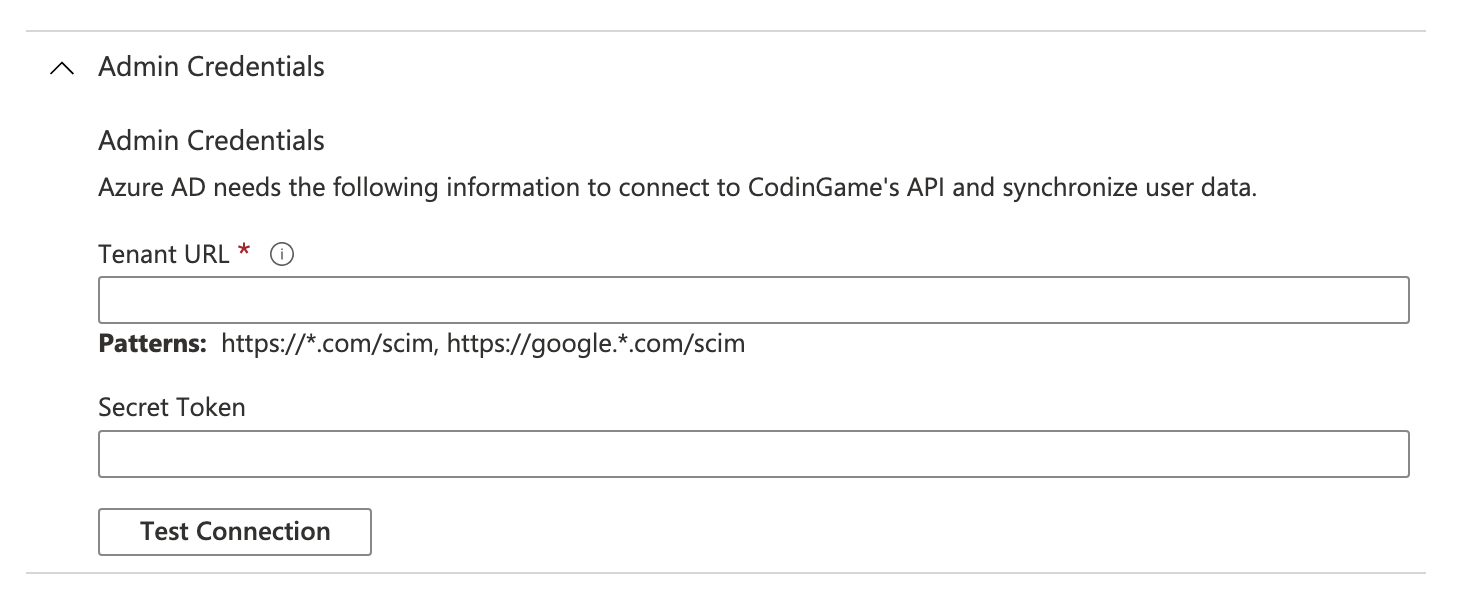
3. Add the following parameters:
Tenant URL = SCIM URL
Secret Token = SCIM Authentication Token
4. The Test Connection action should be working correctly at this point.
5. Edit the provisioning Mappings:
For Provision Azure Active Directory Groups, keep the default values:
Enabled: Yes
Target Object Actions: Create, Update, Delete
Attribute Mappings: display
Name, members
For Provision Azure Active Directory Users, update the Attribute Mappings:
Enabled: Yes
Target Object Actions: Create, Update, Delete
Attribute Mappings:
userPrincipalName = userName (i.e. the login email)
Switch([IsSoftDeleted]…) = active
givenName = name.givenName
surname = name.familyName
❗Make sure you clear the user attribute mapping before you update it. Any mapping with [type eq…] — i.e. addresses[type eq "work"].country — will make the SSO crash. The library we use doesn’t support payloads that include any value selection filters (like [type eq….]), so you will need to ensure they are removed.
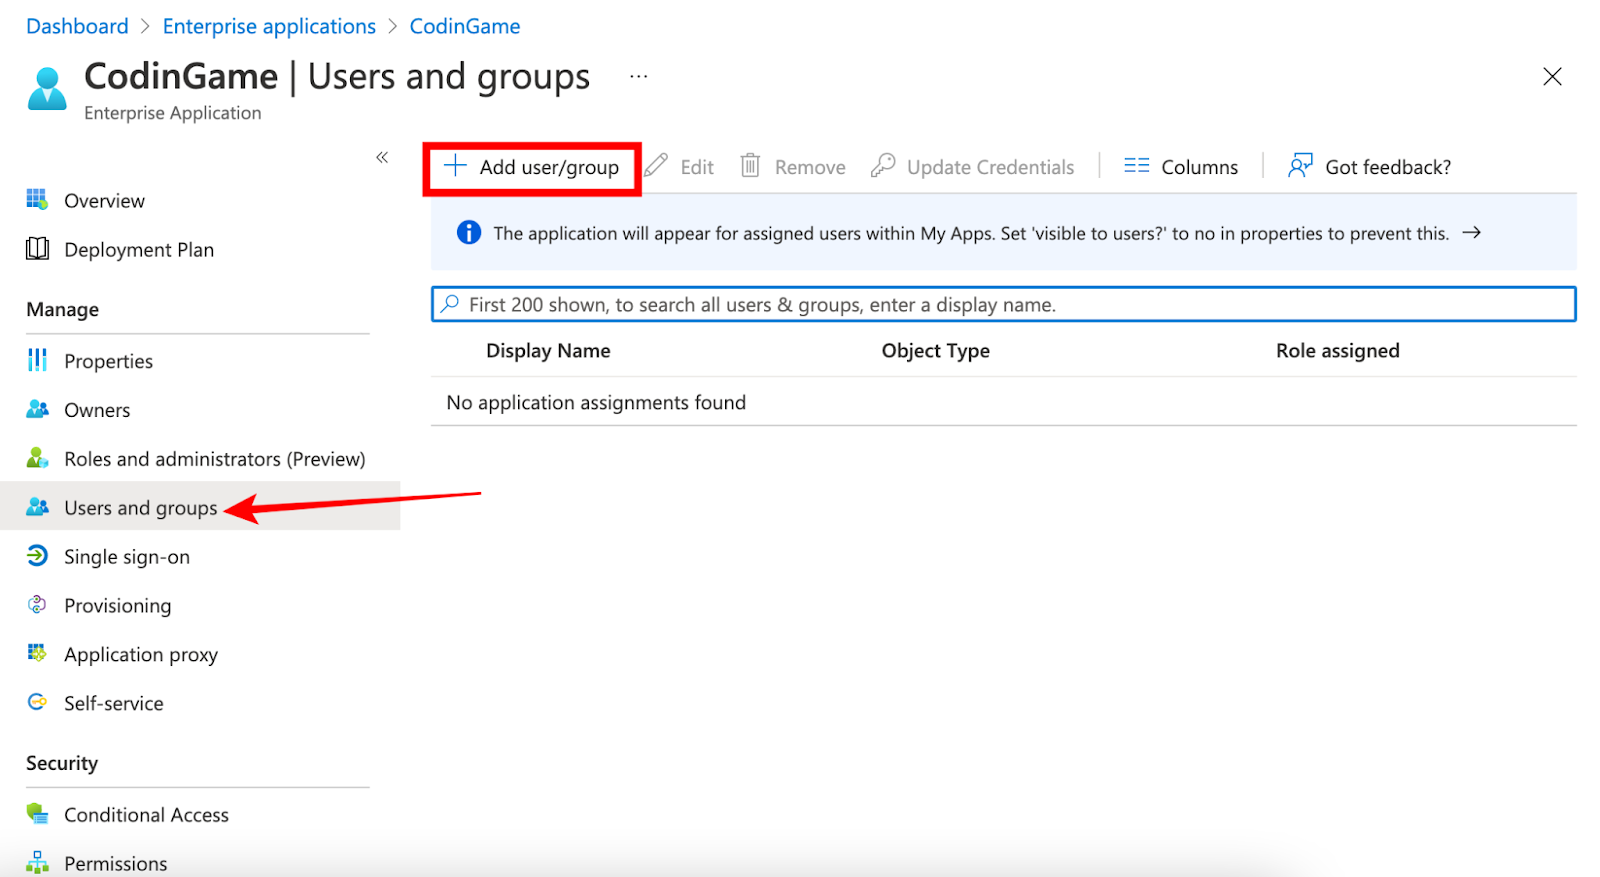
6. Add users and groups to the application:
Users added directly will be created with no permissions on your CoderPad Account
Groups allow to define a common set of permissions automatically set on the users of that group
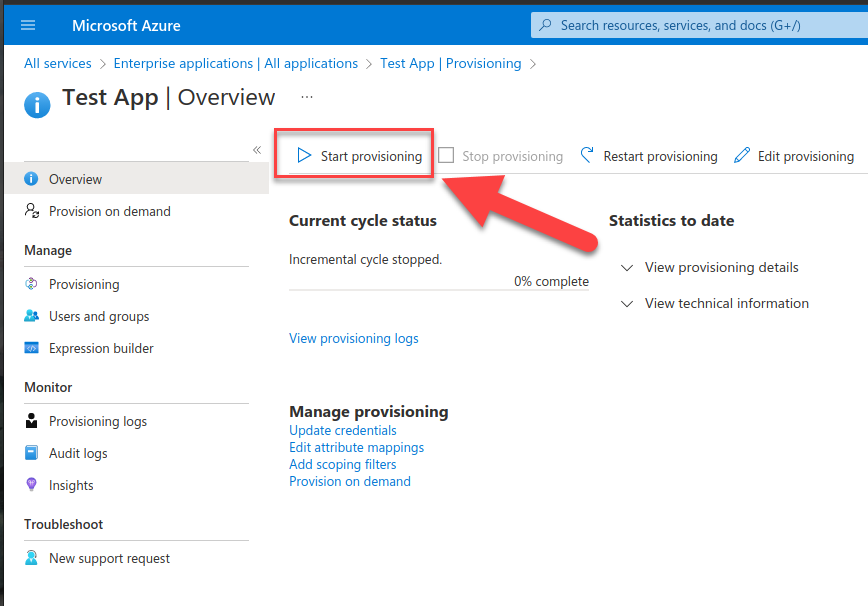
7. From the provisioning menu:
Start the provisioning
Refresh & wait for “Current cycle status: Initial cycle completed”
8. Send a final request to the CoderPad support team specifying the permissions you require for each group attached to the Azure AD application.
9. From now on users added to your groups will be automatically created in CoderPad with the proper set of permissions.
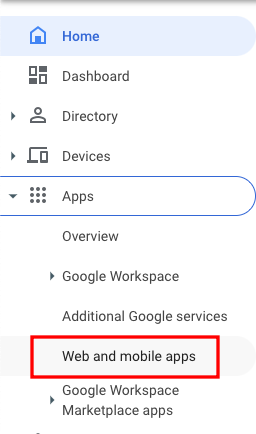
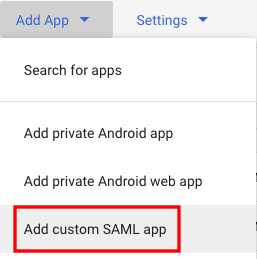
1. Configure an “App” in Google Workspace corresponding to CoderPad : Admin > Apps > Web and mobile apps > Add App > Add custom SAML app
Copy and send the following parameters to the CoderPad support team:
SSO URL
Entity ID
Certificate
Click Continue and enter the following configuration in the Service provider details panel:
ACS URL = SP Assertion Consumer URL
Entity ID = SP Entity ID
Leave the other fields unchanged
Click Continue and on the Attributes panel, click the ADD MAPPING button:
For the Google Directory attributes, select Primary email
For the App attributes, type User.Email
2. Click Finish
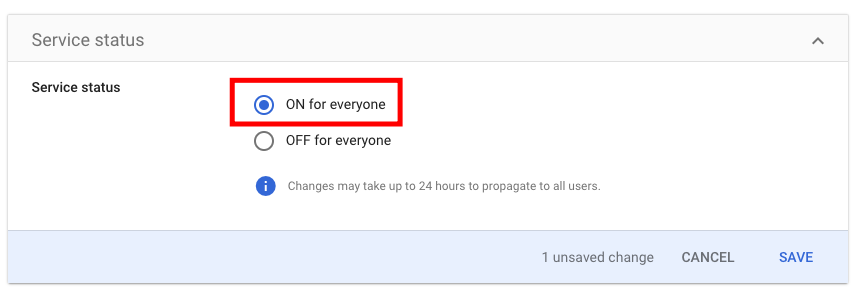
3. Expand the User access panel of the newly created app and activate the service by selecting the ON for everyone option.
4. For testing purposes, add the Google Workspace admin user used to configure SSO as a user of your CoderPad account.
5. Contact CoderPad support to schedule a real-time meeting between one of our engineers and your system administrator. During the meeting, CoderPad will activate SSO on your account, and you may then check that the Google Workspace admin user can indeed connect to CoderPad through SSO. Any final adjustments can be made during this call. As an alternative to a real-time meeting, you may just request activation of SSO by contacting support.
6. From now on, any user added to both the Google Workspace and the CoderPad account will be authenticated through Google Workspace.
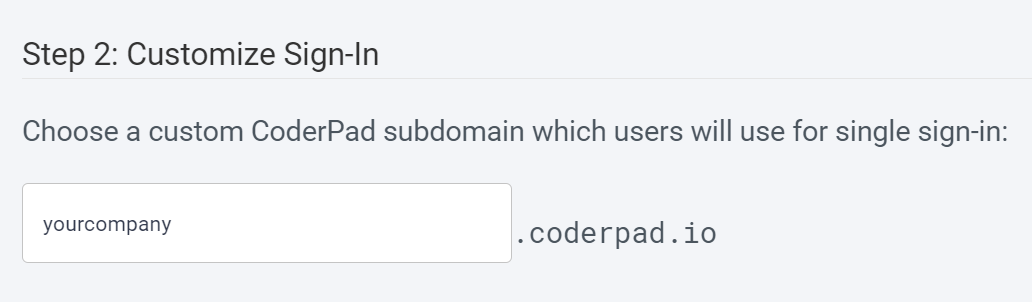
Now that you’ve configured your IdP information, you’re able to customize your SSO login subdomain. This will give you a dedicated sign in page specifically for your organization.
You should direct your users to use this subdomain for login; they’ll be greeted with a welcoming login screen specifically for SSO users to reduce confusion.
However, if one of your users accidentally attempts to login through other CoderPad pages – such as our homepage login button – we’ll redirect them to the correct location upon email input.
Mandatory SSO Enforcement
While we allow organizations to have both SSO and more traditional email/password user accounts, we recommend you enforce SSO login. The benefits of doing this are:
Simplification of organization-wide authentication
Reduced/simplified IT support requests
Ability to add security precautions (such as 2FA)
To make SSO mandatory, simply select the Enforce SSO checkbox in the step 3 section.
 .
.