Developer Diaries: How We Built a Better Browser-Based IDE with Monaco

Integrated development environments (IDEs) are probably the most important tool we use as software developers and engineers. Using another tool, like a notepad or word processor, would be like trying to hammer a nail with your fist.
That’s why our team just spent a good chunk of time working to improve the code editor in the pads that software engineering candidates use to complete technical assessments – but it was anything but an easy feat.
To create the best in-browser IDE experience, we leveraged much of the work from Microsoft’s immensely popular Visual Studio Code (VSCode) IDE, but with a CoderPad twist…
VSCode runs inside of an environment called Electron, which allows a web environment to bind to native APIs, like filesystem. Therefore their core code editor, called Monaco, can run on the web.
However, Monaco has a few limitations that we had to overcome when building an in-browser IDE. These limitations are in place because VSCode has access to native APIs, while Monaco on the web does not.
Let’s look at a few of these limitations, and what we did to solve them.
Parsing, Lexing, and ASTs – Oh My!
Before we talk about the limitations, we need to quickly understand how your code is processed in order to generate compiled instructions.
First, it’s important to realize that when you type text into the computer it’s just that: plain text. It’s stored the same way that a .txt file is stored. Many compilers will even allow you to compile code directly from a .txt file.
Because of this, we need a way for the compiler (even for runtime languages without an ahead-of-time compiler like JavaScript and Python) to have a better understanding of the context it handles.
We do this by creating an Abstract Syntax Tree (AST). This AST allows your computer to read your code like an instruction book. Each section of this instruction book contains all the information a computer needs to transform your original source code into machine-readable code such as assembly. Your editor is also able to use this AST to provide various functions that enhance the editing experience.
The AST is constructed by two tools: A lexer and a parser.
Lexer
A lexer takes plain text and converts it into a list of “tokens.” These tokens are a small allowlist of values that can be better understood by the computer.
For example:
const magicNumber = 185;Code language: JavaScript (javascript)Might be turned into a list of:
[CONSTANT_KEYWORD, IDENTIFIER, ASSIGN, INTEGER, SEMICOL]Code language: JavaScript (javascript)by the lexer.
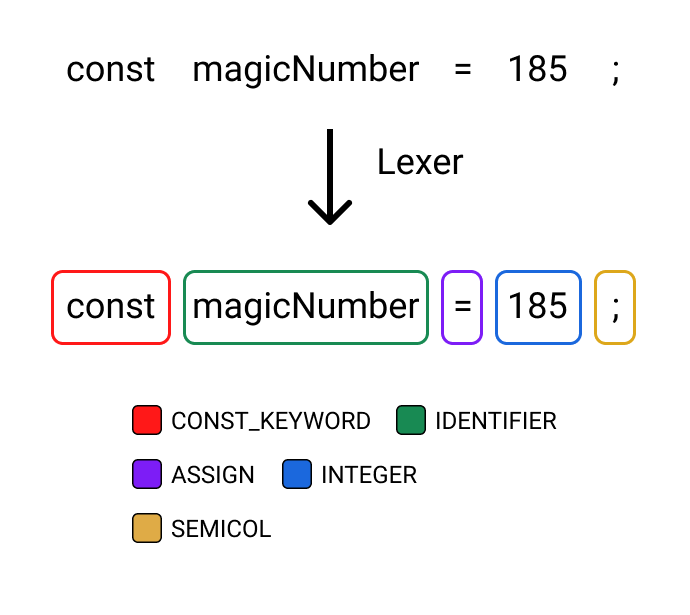
These tokens are defined by a “grammar” that declares which characters should and should not be matched to a token in a language’s source code.
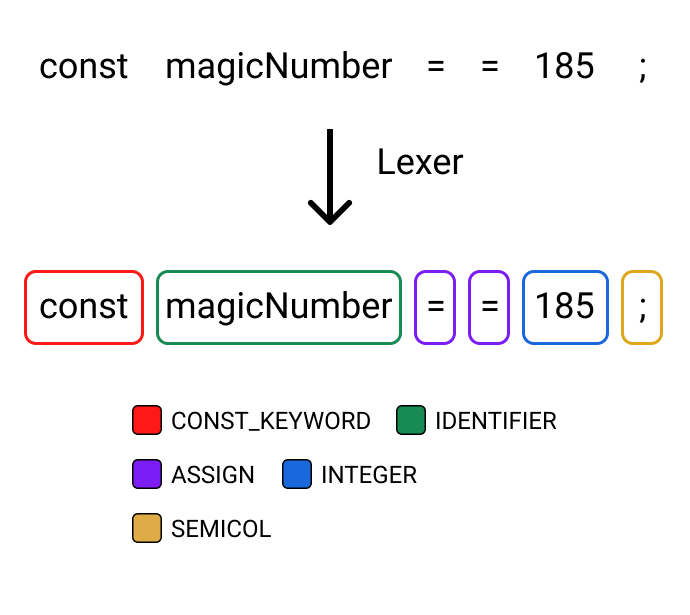
It’s important to note that a tokenizer does not yet actually understand what your code is trying to do. This means that if we added an extraneous equals sign into our code, it would not yet throw an error, but instead tokenize just fine.
While the lexer is important, it only tells half the story behind a language’s syntax because of its inability to actually understand the language. This is where the parser comes into play.
Parser
Once the lexer gathers a list of tokens, it’s time for the parser to assemble an Abstract Syntax Tree (AST) from those tokens.
The AST takes the tokens and adds in further context to fully understand what your code is attempting to say. E.g., our magicNumber example might be turned into a structure similar to the following:
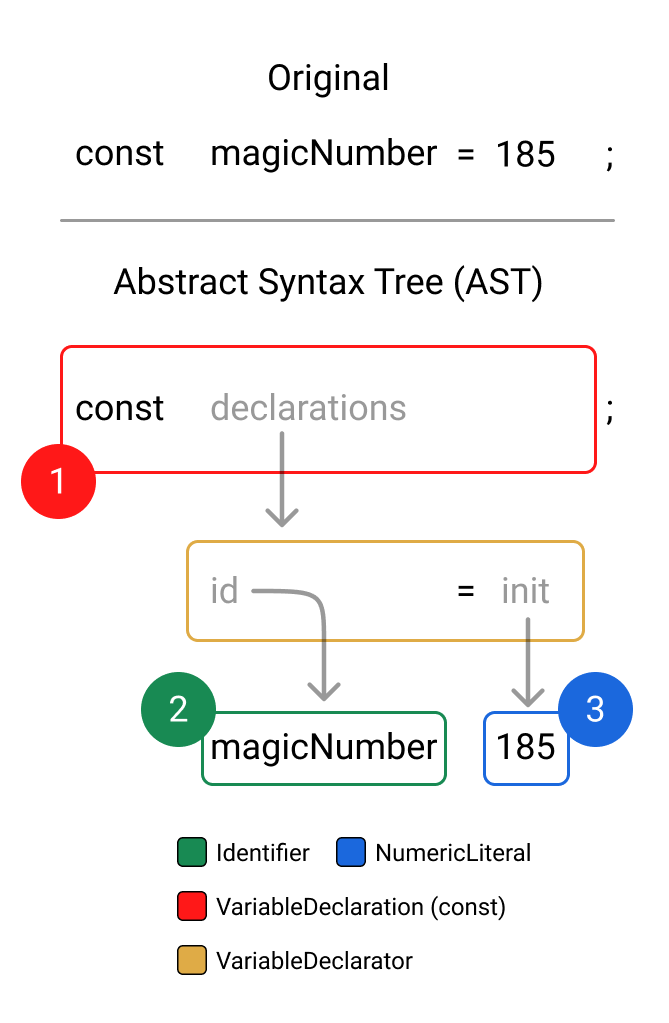
This shows us that we’re trying to:
constassign aVariableDeclaration- with an
IdentifierofmagicNumber, and - an
initial value of185, aNumericLiteral
This parser is the step where syntax validation occurs. If we attempted to add back the second equals sign, we might get the following error:
Uncaught SyntaxError: Unexpected token ‘=’
This error is telling us that while the lexer was able to identify the symbol, the parser did not expect said token where it was present.
Want to learn more about syntax parsing and how your computer takes source code and converts it into a running program? I wrote an article to help explain this more in depth!
Syntax Highlighting
Using this parser-assembled AST, we’re now able to easily add in syntax highlighting to our editor by running a tokenizer over our code and assigning each unique token a different color, right?
This is true, but points towards some problems with Monaco’s default tokenizer.
See, VSCode itself utilizes grammar files called “tmLanguage” files to tokenize your code. This tokenizer is borrowed from TextMate.
However, parsing these files requires a C library called Oniguruma to parse and execute these files. Because this library does not run in a pure JavaScript environment – which was a requirement for Monaco historically due to browser support – Monaco ships out-of-the-box with a different grammar language.
This alternative syntax parser is called Monarch, and unfortunately, does not yield as high-quality highlighting results as TextMate. Take a look for yourself:
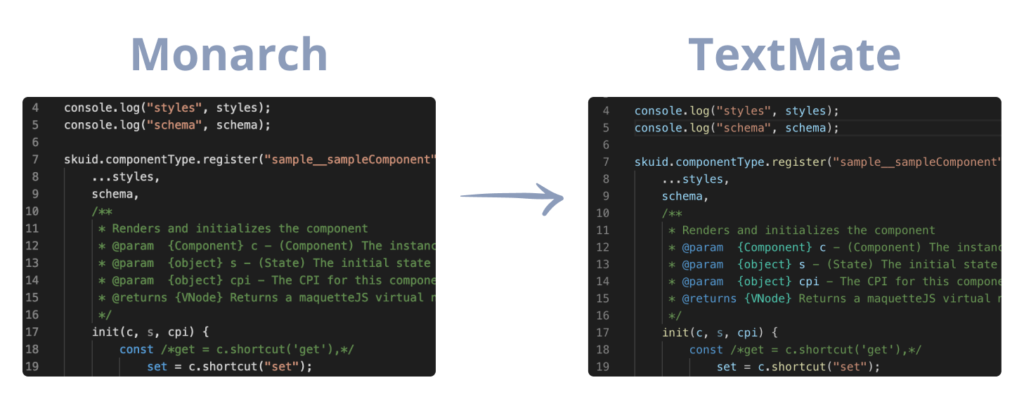
Notice how most of the semantic value is lost in Monarch. TextMate, on the other hand, is able to showcase that console is an object with a method of log.
Luckily for us, newer browsers ship with Web Assembly supported out-of-the-box, which means that we can compile Oniguruma from C to WASM and ship that with our IDE.
More specifically, we’re using `vscode-oniguruma`, which is made by Microsoft.
But this introduced yet another problem: Integrating TextMate into Monaco typically requires hacks of some kind, and introduces some flaws into the experience.
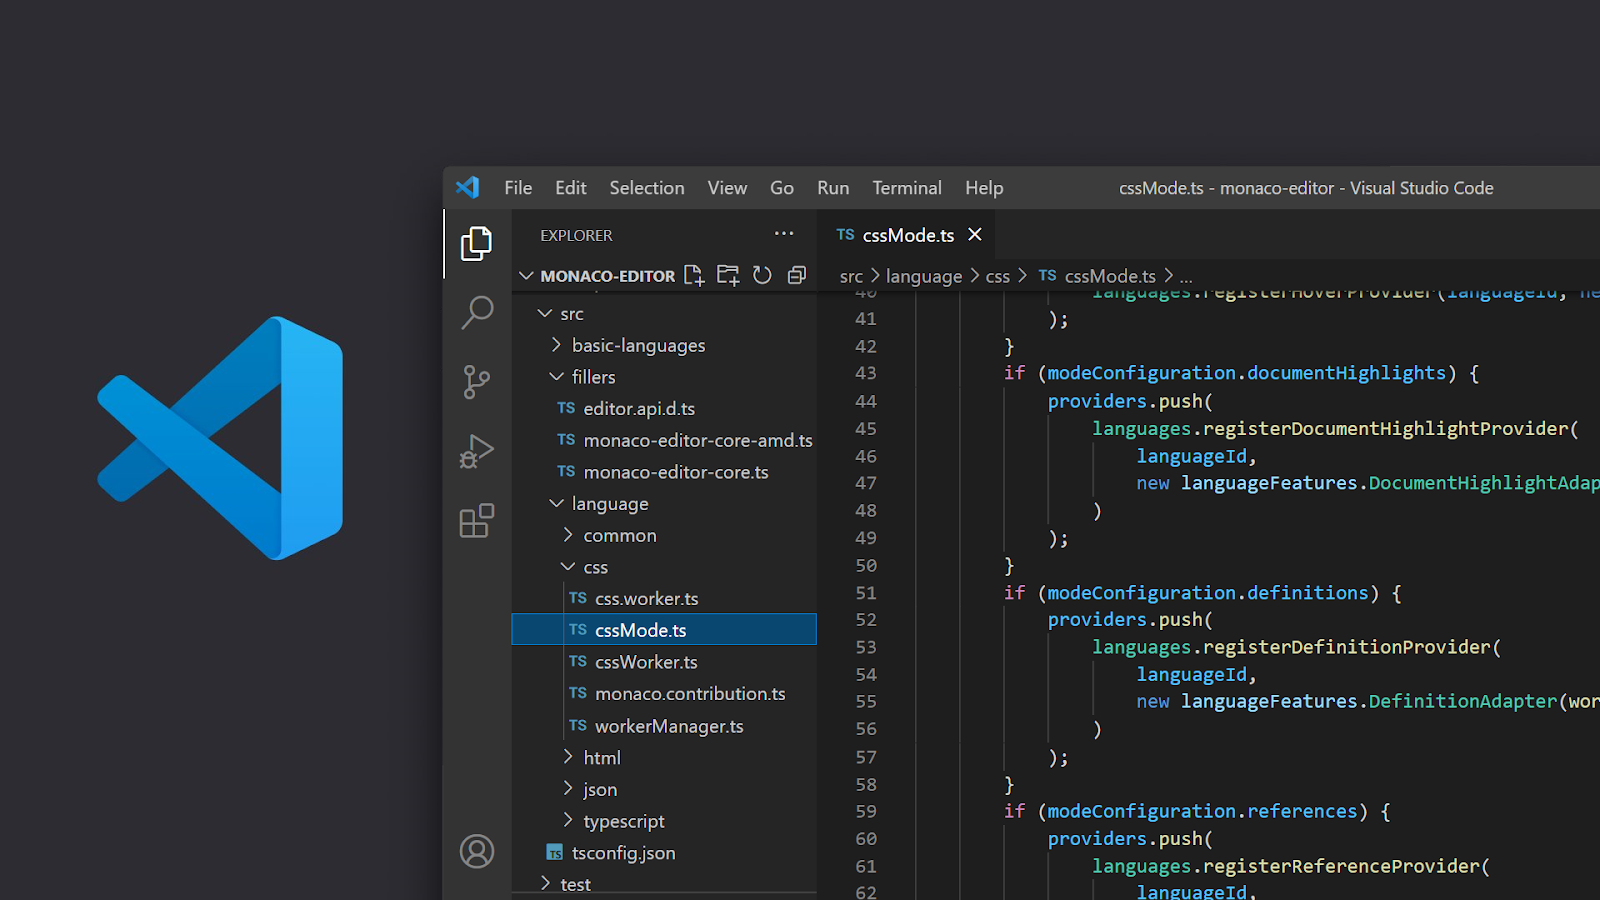
To work around this, we actually forked the monaco-editor package to make it easier to integrate with `vscode-textmate`, the very package VSCode uses to interpret TextMate packages.
Language Services
Now that we have basic syntax highlighting explained, let’s walk through how we were able to add in error displaying.
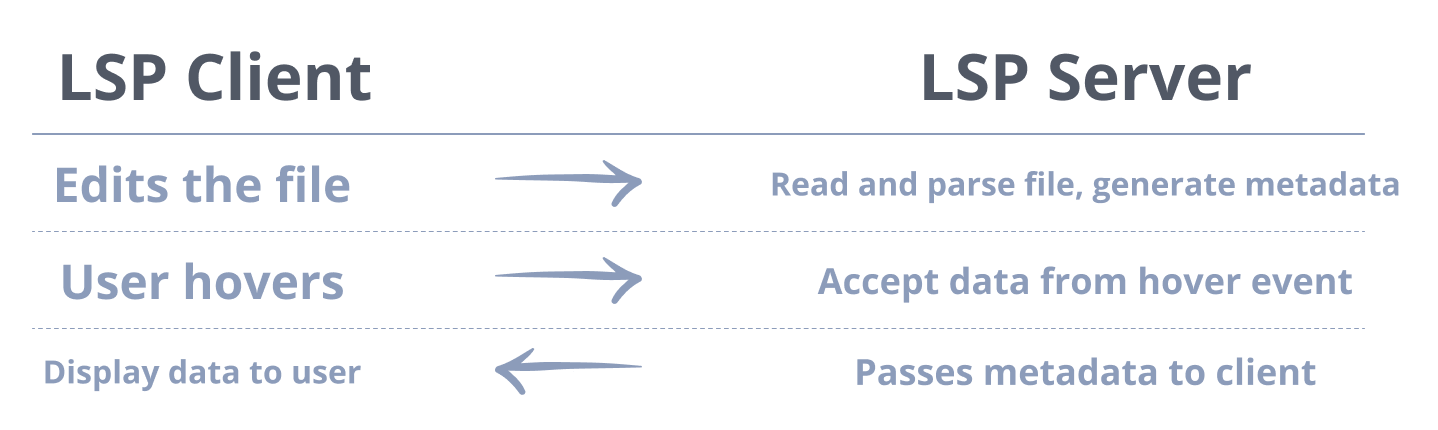
VSCode utilizes something called a Language Service Provider (LSP). When a user makes changes to a file, that file is then persisted to the filesystem. Then, whenever the user has an interaction that requires more metadata than the IDE currently knows about a file’s syntax, it makes a request to this service in order to get said metadata.
This works because the LSP is smarter than the AST the editor has on hand, thanks to additional processing done on the parsed code.
For example, say the user wants to see the TypeScript definition for a variable they see. When they hover over the variable, it sends a request to the LSP server, including a bit of information to fulfill the request.
Every time the user makes an edit to a file, the LSP server handles parsing the relevant files and uses its programmed logic to generate metadata.
Then, when a user makes a request for this metadata, say, with a hover, an RPC connection returns the required metadata to show to the user about their requested TypeScript type information.
This service is also used to report errors, warnings, and other information that an IDE might usually surface to a developer. It also enhances autocomplete by providing the required metadata to make intelligent suggestions.
We’re also using an LSP, although we’ve had to do things slightly differently from VSCode. VSCode has the advantage of running on a user’s computer.
Locally, the language server is able to run using native programming languages. However, since we’re doing this in the browser, we don’t have the ability to do this for all of our 30+ supported programming languages without our bundle size exploding.
To solve this problem, we set up LSP cloud servers to handle requests as if the user was running the editor on their computer.
Extended Syntax Support
These language services aren’t just helpful for error displays; they also allow us to enhance the syntax highlighting provided using “semantic highlighting”
For example, this is what syntax highlighting looks like without semantic highlighting:

While this is what it looks like with semantic highlighting:

Notice how the parameters that are passed in are highlighted the same color. Likewise, Range and Position are both acknowledged as classes, while getFoldingRanges is presented as a function, even when used as a parameter.
This is all possible because the language service provides more metadata than is available to the AST. It’s able to intelligently parse out this context in order to make the editing experience that much better.
This feature is even utilized in VSCode, and well documented in the LSP specification. Because we already utilize LSP, as mentioned earlier, we get this out-of-the-box with minimal additional lift.
Additional Features
While we touched on a lot of features that developers expect, it’s far from a complete list.
We also wanted to enable experiences like:
- Different themes (currently light and dark modes, with more to come!)
- VIM & emacs modes
- Keybindings and user configurations (coming soon)
- Language-specific behaviors (such as COBOL magic tabs)
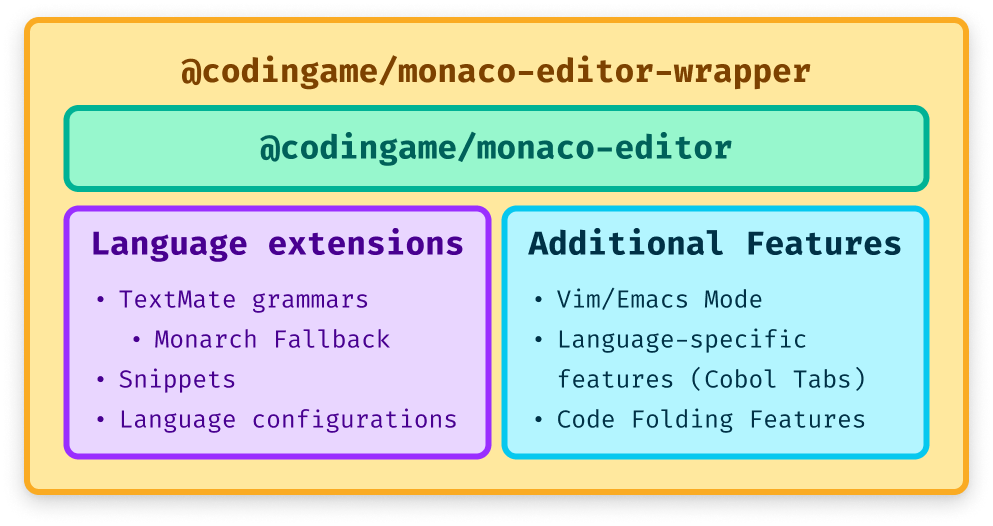
To make all of these experiences possible, we’ve added a wrapper package around Monaco — which we creatively call monaco-editor-wrapper.
Conclusion
Hopefully, this has been an interesting insight into the nuts and bolts of our new Monaco editor. We hope you enjoyed reading about how we crafted the new experience as much as we did building it–we loved the challenge! If so, check out our careers page for open engineering roles, and come work with us on fun problems like this.